Today we are going to work on an HPE ProLiant DL20 Gen9 server. After the initial installation, I was using an SD card as boot media but I still had some Delock SATADOMs laying around from my older lab servers that were replaced. So it was time to improve the performance of the boot media in the servers. In this blog post, I am explaining in detail the SATADOM installation in an HPE ProLiant DL20 Gen9.
So what are the advantages compared to an SD card:
VMware ESXi boot time about 50% faster
VMware ESXi upgrade time about 70% faster
Inventory performance (very noticeable when clicking through the VMware vCenter or VMware ESXi web GUI)
The overall stability of the host, this because of the “high” failure rate of the SD card.
The summary of advantages is based on my own comparison between SD cards en SATADOMs in my ESXi Hosts in my Home Lab.
Delock SATADOM Specifications
Here are the specifications of the Delock Satadom devices I am using for both HPE ProLiant DL20 Gen9 servers. Here are some tips about what I have learned so far… I bought them in 2018 so they are not brand new anymore:
Buy them a little bit bigger because of the future proof > minimal 32GB I would suggest.
Verify before buying if you need the vertical or horizontal model (rack model server go for horizontal / tower model server no really important).
So now it is time to install the device on the server. Of course, it is a little more complicated in a small half-size rack server. For example, there are no Molex power connections available by default. So in the end the cable kit is almost more expensive than the device itself. The preferred option should be to find an HPE cable kit, not sure which one you will need. So after some thinking and looking into the server I came up with the following solution to just plugin the SATADOM.
At first, I needed to find a SATA port on the motherboard. Both ports are available in my case but I used the one that is normally used for the DVD ROM drive number 14 (see the image from the HPE manual).
The storage device itself can be placed in the space of the storage controller battery pack. Both of my machines do not have the expensive storage controller option. Only the onboard default controller. So the space is completely empty and an easily accessible location for the SATADOM.
The power is the most difficult one. I ended up with converters to into the power connection from the storage backplane (keep in mind my server has no internal storage except the boot device (the SATADOM in this post…) If you have your storage filled with SSDs or HDDs you need to figure out a new solution where to get the power from. I have read something about a power kit for the DVD ROM for example. I have never seen it on a picture or in a server so I do not know which connectors are in that cable kit but it might be an option.
To make some more sense and pictures explain more than words… Here is a gallery with some pictures of the SATADOM installation:
HPE ProLiant DL20 Gen9 – Motherboard SATA port
HPE ProLiant DL20 Gen9 – Satadom installation – sata port
HPE ProLiant DL20 Gen9 – Satadom installation – power
DL20 Gen 9 BIOS Settings
After the physical installation, it was time to set up the BIOS. To be honest it was quite easy compared to the HPE Gen8 where I had a lot of problems because of the ports and bios settings.
Here are two screenshots. The first one is the activation of the internal storage controller. Note: make sure you power cycle the machine before the SATADOM is detected. After the power cycle, the VMware ESXi installer should detect the SATADOM when trying to install VMware ESXi.
After this point, the SATADOM installation is completed. Just continue your normal procedures and put your host into production when you are done.
So that is it for today…! I hope it was useful for other people and interesting to read. Keep in mind this blog post was focused on the HPE ProLiant DL20 Gen9 but I think the procedure will be quite identical to other HPE Gen9 servers. The most difficult part will always be the cabling and after that, the BIOS settings to get the device detected correctly.
So far my hosts have been running for about 40+ days without any issues and are working perfectly fine. If you got additional questions or remarks please respond in the comment section below. Thanks for reading my blog post and see you next time.
In this blog post, I am talking about the HPE ProLiant ML10 v2 home lab servers that I have been using for the last three years. I had some performance issues related to the processor with the number of virtual machines and containers running on the little ML10 v2 servers. So it was time for a CPU Swap!
On the internet, there are a lot of speculations on which CPUs are supported in the HPE ProLiant ML10 v2. So that is why I did this blog post.
The servers were originally bought with Intel® Pentium® Processor G3240 CPUs. This was the smallest CPU available at the time. At first, I was looking at the Intel Xeon E3-1220 v3 CPUs but I decided to buy the Intel® Core™ i3-4170 Processor on Ebay.com for a couple of bucks. The choice was related to the pricing difference and the amount of power usage.
I can confirm that both HPE ProLiant ML10 v2 servers detected the i3-4170 CPUs without any issues. The systems are running 24×7 and the CPU temperature is around fourth to fifty degrees with the fans running on their lowest operating mode.
Comparison
As you already figured out the G3240 is a slow CPU compared to the i3-4170. So it was a well worth invested upgrade it for about 40 euro’s for both CPUs in total.
The hypervisor (VMware ESXi) and workload performance improved drastically. Because of the additional instruction sets like AES-NI and clock speed. So it was a good investment at least in my opinion.
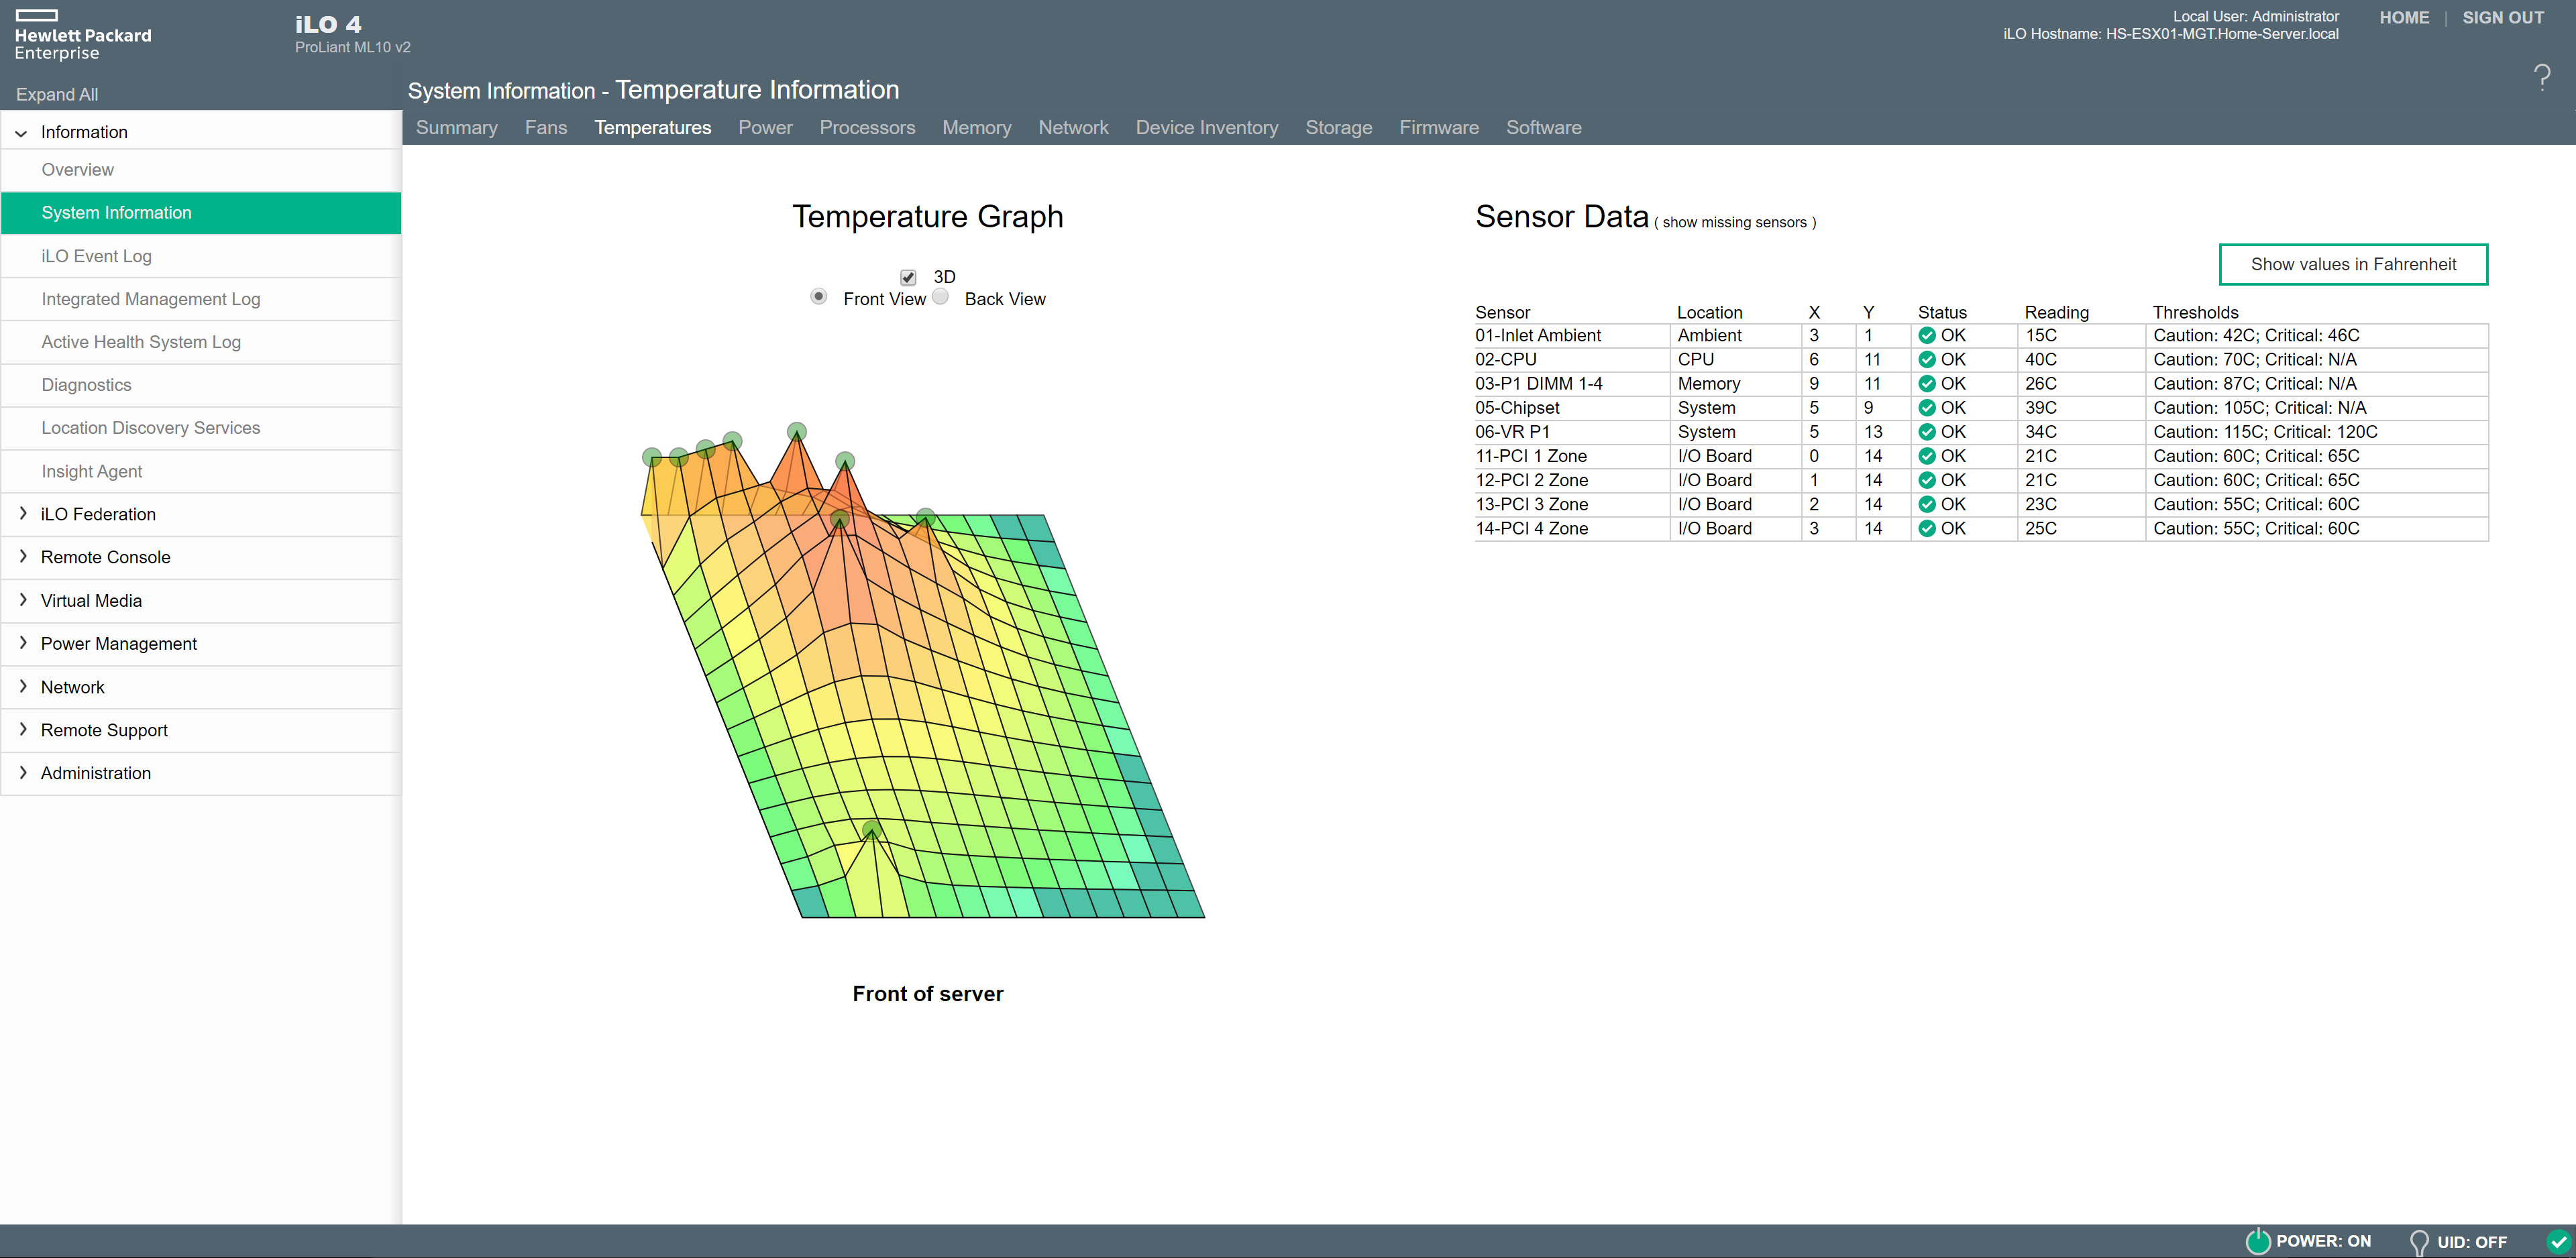
Here are some screenshots of one of the HPE ML10 v2 server that was upgraded with the new CPU. As you can see the screenshots are from the HPE Integrated Lights-out or in short (iLO). The first screenshot is of the new CPU that is detected, the second one is the memory configuration and the third screenshot is the operating temperatures after running a couple of days with the workload.
HPE ProLiant ML10 v2 – Intel I3-4170 – CPU
HPE ProLiant ML10 v2 – Intel I3-4170 – Memory
HPE ProLiant ML10 v2 – Intel I3-4170 – Temperature
Result
As you can see the Intel i3-4170 CPU is working without any issues in the ML10 v2 server. Currently, they have been running for about 100 days without any reboot. So I can confirm they are stable and do not overheat! The CPU swap is successful!
In this blog post, we are going to talk about VMware ESXi and the ability to start & stop a virtual machine from the ESXi shell.
Recently, I ran into a situation where the vCenter Server was powered-off manually and the ESXi host that was responsible was not able to open the VMware Host Client to start VMware vCenter with a single mouse click. So it was time to figure out how to boot a virtual machine from the VMware ESXi shell.
I was lucky because SSH was enabled on the ESXi Host so I was able to connect and log in with the root account, but then I ran into the issue… Which command do I need to power on a virtual machine? I knew for sure that it was possible but it took me some time to find the right commands.
So based on that experience, it was time for a quick write-up to show you how to boot a virtual machine from the shell with VMware ESXi. To complete the article I also added the commands for powering off.
Note: The environment was running on vSphere 6.7 Update 2. So all commands are valid for vSphere 6.7 and probably older versions of VMware vSphere.
Start a Virtual Machine from Shell
Here is a step-by-step procedure for booting a virtual machine from the VMware ESXi shell.
# Step 01: Connect with SSH (for example Putty).

# Step 02: Login as a user with root privileges

# Step 03a: View ESXi host virtual machine inventory
vim-cmd vmsvc/getallvms

# Step 03b: View ESXi host virtual machine inventory with filter
vim-cmd vmsvc/getallvms | grep %VMname%

# Step 04: Write-down the VMid, in my case:
183

# Step 05: Verify the current power status
vim-cmd vmsvc/power.getstate %VMid%

# Step 06: Power-on virtual machine
vim-cmd vmsvc/power.on %VMid%

# Step 07: Command has been executed the virtual machine will be power-on. To verify you can use:
vim-cmd vmsvc/power.getstate %VMid%
Screenshots
Here are the screenshots of performing a VMware vCenter virtual machine startup from the VMware ESXi shell.
VMware ESXi – 01 – SSH Login
VMware ESXi – 01 – SSH Login
VMware ESXi – 02 – Find VM inventory
VMware ESXi – 02 – Find VM inventory
VMware ESXi – 03 – Verify VM status
VMware ESXi – 03 – Verify VM status
VMware ESXi – 04 – Shell Power-on Virtual Machine
VMware ESXi – 04 – Shell Power-on Virtual Machine
VMware ESXi – 05 – Verify VM status
VMware ESXi – 05 – Verify VM status
Stop a Virtual Machine from Shell
Here is the procedure for stopping a virtual machine from the VMware ESXi Shell.
# Step 01: Connect with SSH (for example Putty).

# Step 02: Login as a user with root privileges

# Step 03a: View ESXi host virtual machine inventory
vim-cmd vmsvc/getallvms

# Step 03b: View ESXi host virtual machine inventory with filter
vim-cmd vmsvc/getallvms | grep %VMname%

# Step 04: Write-down the VMid, in my case:
183

# Step 05: Verify the current power status
vim-cmd vmsvc/power.getstate %VMid%

# Step 06: Power-on virtual machine
vim-cmd vmsvc/power.off %VMid%

# Step 07: Command has been executed the virtual machine will be power-off. To verify you can use:
vim-cmd vmsvc/power.getstate %VMid%
Conclusion
You can easily perform this procedure if you know the right commands. There is not a lot of new information available about the vim-cmd command but I added the source(s) below.
In the blog post, I am showing you how to deal with SATADOM boot devices in your ESXi Hosts. Recently I replaced my SD cards with SATADOMs in all my ESXi Hosts in my HomeLab. This blog post is about my experience and configuration that was required for HPE ProLiant servers.
SD Card
In the past, I always used SD cards in my VMware ESXi servers as a boot media but overtime SD cards would wear out of fail. This is of course not ideal but the costs of replacing an SD card are quite low compared to 2.5-inch drives for example. So a nice alternative is a SATADOM, a fast, cheap and more reliable solution.
Here are some screenshots of my Home Lab environment with a failed SD card. The ESXi Host is still fully operational but has lost its boot device. In most cases, you can reboot the ESXi Host and it will work for about three days and the issue is back.
vSphere Web Client – SD Card Failure – Summary Page
So after a couple of failures over the years, it was time to replace the SD cards with a SATADOM. The installation is quite simple but you need to verify some stuff… some SATADOMs use external power and some receive their power from the SATA connector (please verify this before buying).
The “biggest” issue I encountered was configuring the BIOS in a way that the device was correctly detected. Here are the screenshots related to the BIOS settings and SATA port used on the motherboard. It appeared that the ML10v2 expected the SATADOM to be connected to port 5, on other ports, it was not working or it was not detected by VMware ESXi.
HP ProLiant ML10 v2 – BIOS Settings
HP ProLiant ML10 v2 – Detected the device
VMware ESXi Installation detects SATADOM
Here is a recording of the HP ProLiant ML10 v2 booting from SATADOM after a successful ESXi installation. Compared to the SD card the boot time has been reduced with 50%. Speed is of course always nice to have but how many times do you boot an ESXi host in a production environment? On the other hand… it could be very useful for a Lab Environment that is not running 24×7 and you boot your ESXi Hosts on a daily basis.
HP ProLiant ML10 v2 – Booting from SATADOM
VMware vSAN Requirements
So let’s look at the official requirements for VMware vSAN when using a SATADOM as boot media. Note: based on the amount of physical memory installed in your ESXi Host the requirements change!
When you boot a vSAN host from a SATADOM device, you must use single-level cell (SLC) device. The size of the boot device must be at least 16 GB.
If the memory of the ESXi host has 512 GB of memory or less, you can boot the host from a USB, SD, or SATADOM device.
If the memory of the ESXi host has more than 512 GB, consider the following guidelines.
You can boot the host from a SATADOM or disk device with a size of at least 16 GB. When you use a SATADOM device, use a single-level cell (SLC) device.
If you are using vSAN 6.5 or later, you must resize the coredump partition on ESXi hosts to boot from USB/SD devices. For more information, see the VMware knowledge base article at http://kb.vmware.com/kb/2147881.
Sources
Here is a list of sources I used for writing this article.
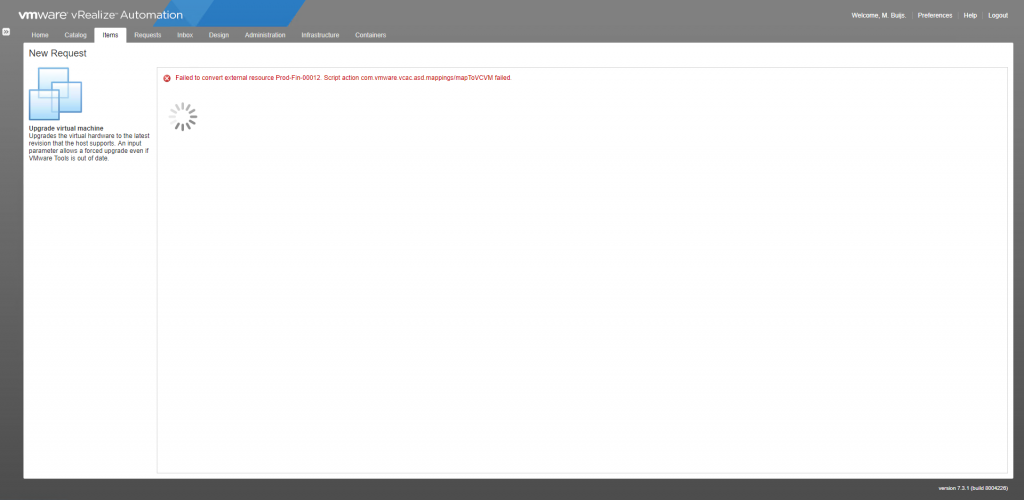
I ran into an error message today with vRealize Automation (vRA). The error message that came up was: Failed to convert external resource Prod-Fin-00012. The issue occurred in vRA version 7.3.1.
Inside the vRealize Automation portal, I tried to upgrade virtual machine hardware but it failed directly when issuing the request. Strange thing was it was working a couple of day ago. After some investigating the error also came back on other day-2 tasks. So it was time to dive deeper into the issue.
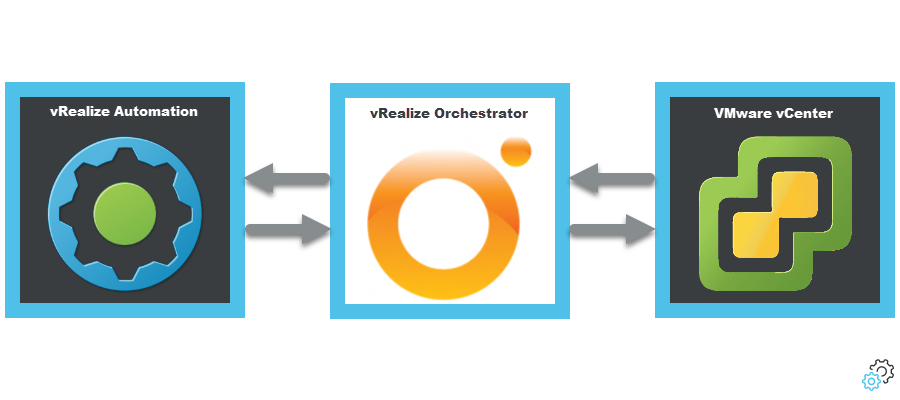
So let us think about what vRealize Automation is performing, it is executing a task on a virtual machine. To perform this it needs to talk to vCenter Server and to talk to vCenter Server it uses vRealize Orchestrator.
Here is a simple overview of the communication that happens in this case. vRealize Automation is communicating to vRealize Orchestrator and vRealize Orchestrator is communicating to vCenter Server.
VMware vRealize Automation – vSphere Endpoint Communication
Error messages
The following error messages were found on the following systems:
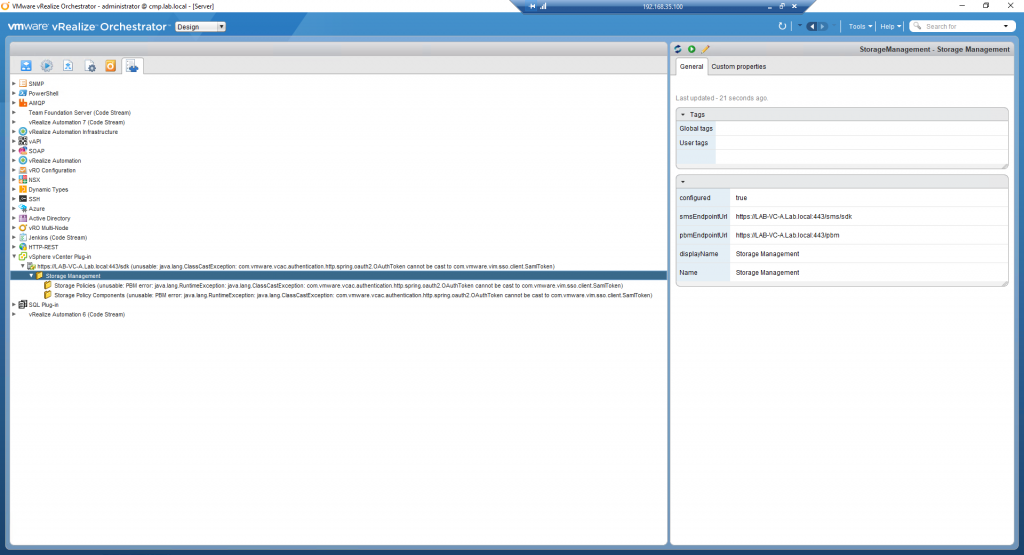
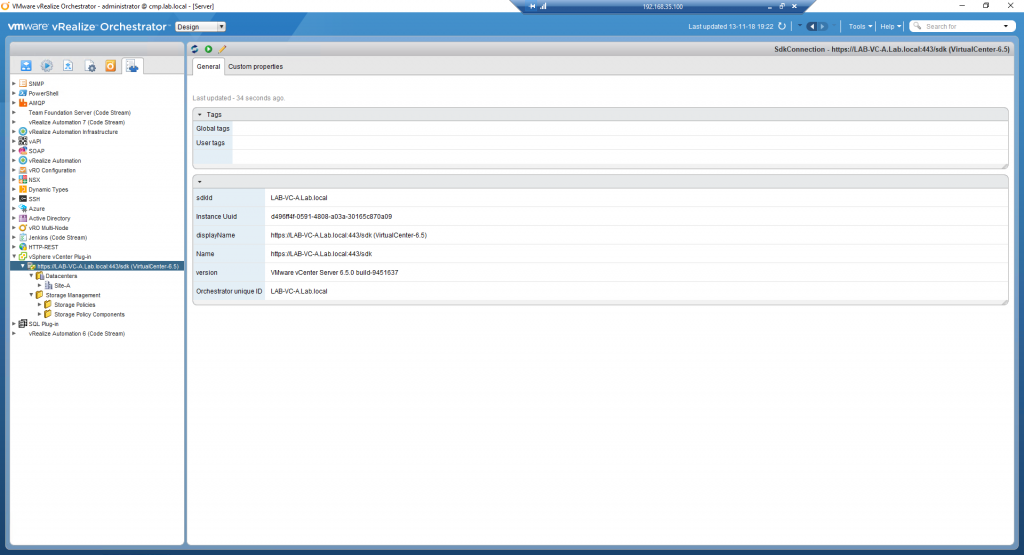
https://LAB-VC-A.Lab.local:443/sdk (unusable: java.lang.ClassCastException: com.vmware.vcac.authentication.http.spring.oauth2.OAuthToken cannot be cast to com.vmware.vim.sso.client.SamlToken)
As you can see here vRealize Orchestrator has communication issues with VMware vCenter Server. This issue needs to be addressed for vRealize Automation.
Screenshots:
vRealize Orchestrator – Error Message – OAuthToken cannot be cast to com.vmware.vim.sso.client.SamlToken
After finding the vRealize Orchestrator vSphere endpoints in an error state it was clear that this was the issue. vRealize Orchestrator is not successfully communicating with vCenter Server so this needs to be addressed.
Procedure:
Open the vRealize Orchestrator Client (https://%vro-node-fqdn%).
Login with administrative credentials (example: administrator@vsphere.local).
Navigate to the following location “Library > vCenter > Configuration“.
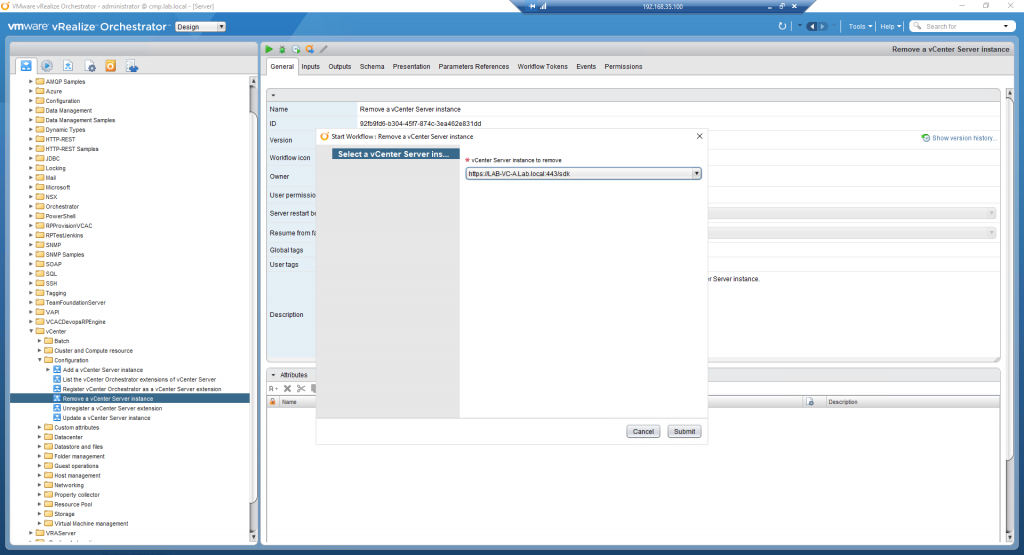
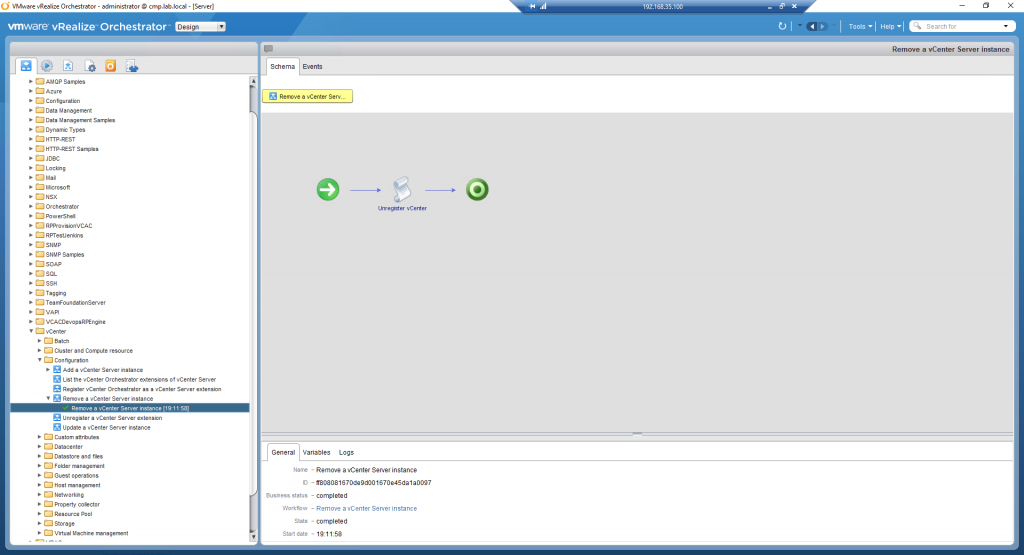
Run the following workflow “Remove a vCenter Server instance” (screenshot 01 & screenshot 02).
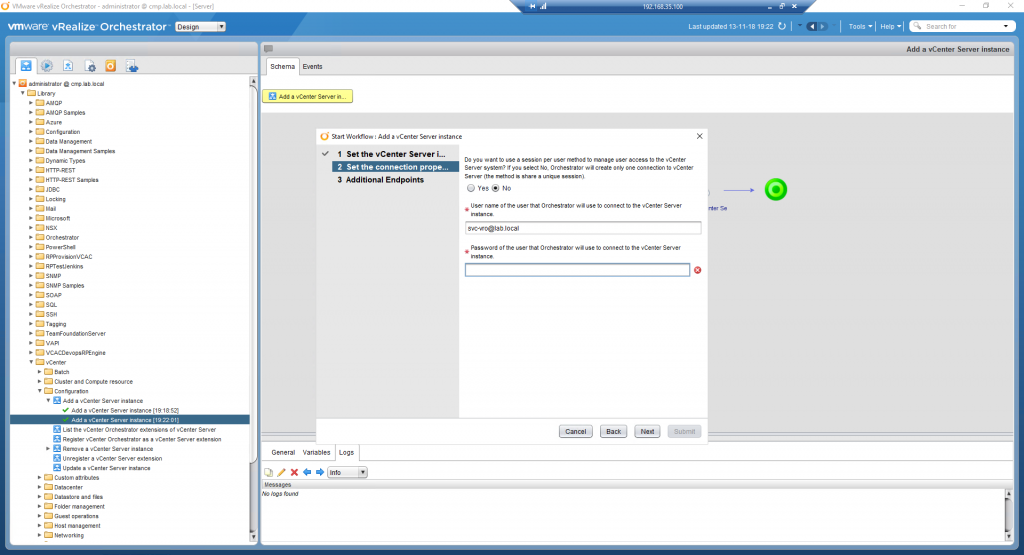
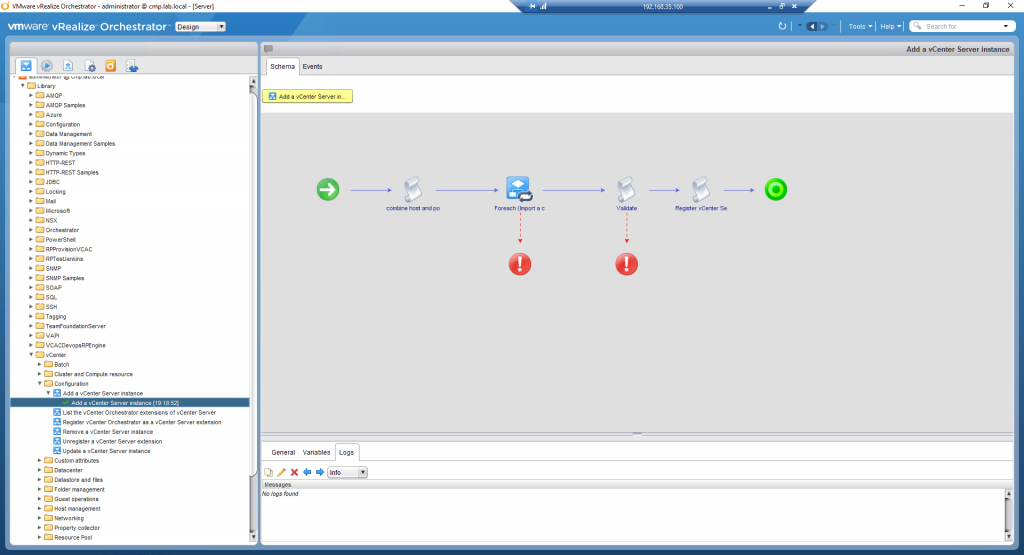
Run the following workflow “Add a vCenter Server instance” (screenshot 03 & screenshot 04).
Validate the vRealize Orchestrator Endpoint Status (screenshots 05).
Lately, I encountered some issues related to VMware vSAN in my Lab environment. The error message that was popping up all the time was “PBM error occurred during PreCloneCheckCallback“.
So how did the problem occur? First, we start with some background information. My Lab environment is powered-on when needed and powered-off when not needed. This is, of course, a little bit different than a production 24×7 environment that you have in your datacenters worldwide.
The environment was booted successfully at first glance. We are talking about Domain Controllers, vCenter Server, VMware NSX-V, nested ESXi Hosts, and vRealize Automation. When I started deploying virtual machines with a vRealize Automation (vRA) based on blueprints with vSphere Templates issues started to occur.
vRealize Automation was failing on the provisioning task and was cleaning up the deployment because of the failed state (default behavior). So it was time to dig into the underlying infrastructure.
Environment
When the issue occurred the following software versions were used in my lab environment:
VMware vCenter 6.5 Update 2B
VMware vRealize Automation 7.3.1
VMware ESXi 6.5 Update 2
VMware vSAN 6.6
Error message(s)
Here is all the information that can be found in various locations surrounding the issue. Lets start with the screenshots. The first one is from VMware vCenter and the second one is from vRealize Automation. As you can see there is clearly a problem.
VMware vCenter – PBM error occurred during PreCloneCheckCallback
vRealize Automation – Service Unavailable (503)
And here is an overview of the error message(s). Here is the vRealize Automation log entry related to the VMware vSAN issue:
Error in Execute DynamicOps.Common.Client.HtmlResponseException: Service Unavailable (503)
Here is the VMware vCenter log entry related to the VMware vSAN issue:
A general system error occurred - PBM error occurred during PreCloneCheckCallback (2118557)
Solution
The solution is quick but is more like a quick fix because it comes back every time I re-start my lab environment (cold boot).
Procedure:
Open a web browser.
Navigate to your vCenter Server URL (https://%vc%/vsphere-client).
Login with a user that has administrator credentials (administrator@vsphere.local).
Navigate to Hosts & Clusters > Select the vCenter Object.
Click on the Configure tab.
Click on the Storage Providers.
Click on the following two buttons:
Synchronizes all Storage Providers with the current state of the environment.
Rescan the storage provider for new storage systems and storage capabilities.
After pressing the buttons, you don’t see any tasks running on the vCenter Server (expected behavior). After 5 seconds everything should be working and provisioning should be possible.
VMware vCenter – PBM error occurred during PreCloneCheckCallback – Solution
Wrap-up
Thanks for reading this blog post. If you have any comments, please respond in the comment section below!
This time I decided to do a blog post about the HPE Smart Array RAID controllers with their wonderful ssacli tool. The tooling of HPE is very powerful because you can online manage a VMware ESXi host and migrate for example from a RAID 1 volume to a RAID 10 without downtime or change the read and write cache ratio.
So far as I know I haven’t seen an identical tool yet from the other server hardware vendors like Cisco, Dell EMC, IBM, and Supermicro. The main difference has always been that the HPE tool can perform the operation live without downtime.
So far as I can remember it has been there for ages. It was already available for VMware ESX 4.0 and is still available in VMware ESXi 6.7. So thumbs-up for HPE :).
Let’s talk about controller support. The tool supports the most HPE SmartArray controllers over the last 10 to 15 years, for example, the Smart Array P400 was released in 2005 and is still working fine today.
Here is an overview of supported controllers:
HPE Smart Array P2XX
HPE Smart Array P4XX
HPE Smart Array P7XX
HPE Smart Array P8XX
HPE SSACLI – Location
In case you are using the HPE VMware ESXi custom images. The tool is already pre-installed when installing ESXi. The tool is installed as a VIB (vSphere Installable Bundle). This means it can also be updated with vSphere Update Manager.
Over the years the name of the HPE Storage Controller Tool has been changed and so has the location. Here is a list of locations that have been used for the last ten years for VMware ESXi:
I have collected some screenshots over the years. Screenshots were taken by doing maintenance on VMware ESXi servers. The give you an idea what valuable information can be shown.
HPE SSACLI – Status Physical Drives
HPE SSACLI – Logical Drive Rebuilding-Recovery
HPE SSACLI – Drive Failure
HPE SSACLI – Abréviation
All commands have a short name to reduce the length of the total input provided to the ssacli tool:
### Shortnames:
- chassisname = ch
- controller = ctrl
- logicaldrive = ld
- physicaldrive = pd
- drivewritecache = dwc
- licensekey = lk

### Specify drives:
- A range of drives (one to three): 1E:1:1-1E:1:3
- Drives that are unassigned: allunassigned
HPE SSACLI – Status
To view the status of the controller, disks or volumes you can run all sorts of commands to get information about what is going on in your VMware ESXi server. The extensive detail is very useful for troubleshooting and gathering information about the system.
# Show - Controller Slot 1 Controller configuration basic
./ssacli ctrl slot=1 show config

# Show - Controller Slot 1 Controller configuration detailed
./ssacli ctrl slot=1 show detail

# Show - Controller Slot 1 full configuration
./ssacli ctrl slot=1 show config detail

# Show - Controller Slot 1 Status
./ssacli ctrl slot=1 show status

# Show - All Controllers Configuration
./ssacli ctrl all show config

# Show - Controller slot 1 logical drive 1 status
./ssacli ctrl slot=1 ld 1 show status

# Show - Physical Disks status basic
./ssacli ctrl slot=1 pd all show status

# Show - Physical Disk status detailed
./ssacli ctrl slot=1 pd all show status

# Show - Logical Disk status basic
./ssacli ctrl slot=1 ld all show status

# Show - Logical Disk status detailed
./ssacli ctrl slot=1 ld all show detail
HPE SSACLI – Creating
Creating a new logical drive can be done online with the HPE Smart Array controllers. I have displayed some basic examples.
# Create - New single disk volume
./ssacli ctrl slot=1 create type=ld drives=2I:0:8 raid=0 forced

# Create - New spare disk (two defined)
./ssacli ctrl slot=1 array all add spares=2I:1:6,2I:1:7

# Create - New RAID 1 volume
./ssacli ctrl slot=1 create type=ld drives=1I:0:1,1I:0:2 raid=1 forced

# Create - New RAID 5 volume
./ssacli ctrl slot=1 create type=ld drives=1I:0:1,1I:0:2,1I:0:3 raid=5 forced
HPE SSACLI – Adding drives to logical drive
Adding drives to an already created logical drive is possible with the following commands. You need to perform two actions: adding the drive(s) and expanding the logical drive. Keep in mind: make a backup before performing the procedure.
# Add - All unassigned drives to logical drive 1
./ssacli ctrl slot=1 ld 1 add drives=allunassigned

# Modify - Extend logical drive 2 size to maximum (must be run with the "forced" flag)
./ssacli ctrl slot=1 ld 2 modify size=max forced
HPE SSACLI – Rescan controller
To issue a controller rescan, you can run the following command. This can be interesting for when you add new drives in hot swap bays.
### Rescan all controllers
./ssacli rescan
HPE SSACLI – Drive Led Status
The LED status of the drives can also be controlled by the ssacli utility. An example is displayed below how to enable and disable a LED.
# Led - Activate LEDs on logical drive 2 disks
./ssacli ctrl slot=1 ld 2 modify led=on

# Led - Deactivate LEDs on logical drive 2 disks
./ssacli ctrl slot=1 ld 2 modify led=off

# Led - Activate LED on physical drive
./ssacli ctrl slot=0 pd 1I:0:1 modify led=on

# Led - Deactivate LED on physical drive
./ssacli ctrl slot=0 pd 1I:0:1 modify led=off
HPE SSACLI – Modify Cache Ratio
Modify the cache ratio on a running system can be interesting for troubleshooting and performance beanchmarking.
# Show - Cache Ratio Status
./ssacli ctrl slot=1 modify cacheratio=?

# Modify - Cache Ratio read: 25% / write: 75%
./ssacli ctrl slot=1 modify cacheratio=25/75

# Modify - Cache Ratio read: 50% / write: 50%
./ssacli ctrl slot=1 modify cacheratio=50/50

# Modify - Cache Ratio read: 0% / Write: 100%
./ssacli ctrl slot=1 modify cacheratio=0/100
HPE SSACLI – Modify Write Cache
Changing the write cache settings on the storage controller can be done with the following commands:
Viewing or changing the rebuild priority can be done on the fly. Even when the rebuild is already active. Used it myself a couple of times to lower the impact on production.
# Show - Rebuild Priority Status
./ssacli ctrl slot=1 modify rp=?

# Modify - Set rebuildpriority to Low
./ssacli ctrl slot=1 modify rebuildpriority=low

# Modify - Set rebuildpriority to Medium
./ssacli ctrl slot=1 modify rebuildpriority=medium

# Modify - Set rebuildpriority to High
./ssacli ctrl slot=1 modify rebuildpriority=high
HPE SSACLI – Modify SSD Smart Path
You can modify the HPE SDD Smart Path feature by disabling or enabling. To make clear what the HPE SDD Smart Path includes, here is a officialstatement by HPE:
“HP SmartCache feature is a controller-based read and write caching solution that caches the most frequently accessed data (“hot” data) onto lower latency SSDs to dynamically accelerate application workloads. This can be implemented on direct-attached storage and SAN storage.”
For example, when running VMware vSAN SSD Smart Path must be disabled for better performance. In some cases worse the entire vSAN disk group fails.
# Note: This command requires the array naming type like A/B/C/D/E

# Modify - Enable SSD Smart Path
./ssacli ctrl slot=1 array a modify ssdsmartpath=enable

# Modify - Disable SSD Smart Path
./ssacli ctrl slot=1 array a modify ssdsmartpath=disable
HPE SSACLI – Delete Logical Drive
Deleting a logical drive on the HPE Smart Array controller can be done with the following commands.
In some cases, you need to erase a physical drive. This can be performed with multiple erasing options. Also, you can stop the process.
Erase patterns available:
Default
Zero
Random_zero
Random_random_zero
# Erase physical drive with default erasepattern
./ssacli ctrl slot=1 pd 2I:1:1 modify erase

# Erase physical drive with zero erasepattern
./ssacli ctrl slot=1 pd 2I:1:1 modify erase erasepattern=zero

# Erase physical drive with random zero erasepattern
./ssacli ctrl slot=1 pd 1E:1:1-1E:1:3 modify erase erasepattern=random_zero

# Erase physical drive with random random zero erasepattern
./ssacli ctrl slot=1 pd 1E:1:1-1E:1:3 modify erase erasepattern=random_random_zero

# Stop the erasing process on phsyical drive 1E:1:1
./ssacli ctrl slot=1 pd 1E:1:1 modify stoperase
HPE SSACLI – License key
In some cases a licence key needs to be installed on the SmartArray storage controller to enable the advanced features. This can be done with the following command:
In this post, we are going to change the Virtual Storage Controller from LSI Logic Parallel to VMware Paravirtual for a CentOS 7 based Virtual Machine that is running on VMware vSphere. This blog post will contain step-by-step guidance for performing the operation.
In my case the virtual machine was built in VMware Workstation and after some time migrated to VMware ESXi. The VMware Paravirtual Storage Controller is not supported in VMware Workstation. That is why the virtual machine came over with the “wrong” storage controller.
My 24×7 Lab environment is running shared iSCSI based storage and all virtual machines are thin provisioned. The Virtual Machine that came over from VMware Workstation is installed with CentOS 7.
Why VMware Paravirtual?
Why should you want to migrate from an LSI Logic Parallel to a VMware Paravirtual SCSI Controller? Two simple reasons and they are two good ones:
Lower CPU utilization
Higher Throughput
Personally, I have a third reason to add… compliance. All my virtual machines should be compliant with the VMware Best Practice and my personal Home Lab standard. In my Lab environment, this means using the VMware Paravirtual where ever possible/supported.
The most important step in the process is to make sure you have a valid backup! After that, it is just following the steps described below:
Create a virtual machine snapshot or backup before you begin.
Power-off the virtual machine.
Add the VMware Paravirtual Controller to the Virtual Machine. Do not change the disk controller assignment yet, only add the storage controller to the VM (screenshot 01).
Power-on the virtual machine.
Login with an account on the virtual machine (account must be able to obtain root access).
Assign disks to the new storage controller and remove the old storage controller (screenshot 03).
Power-on the virtual machine.
Validate that everything is working and disks are mounted (screenshot 04).
Remove the virtual machine snapshot or backup after you are done.
Screenshots
Here are some screenshots from the procedure:
01 – Adding VMware Paravirtual SCSI Controller
02 – CentOS Rebuilding Initial Ramdisk Image
03 – Switching the Disks Between Storage Controllers
04 – Verify the Virtual Disks After Removing LSI Logic Parallel
Conclusion
At this point, I have swapped out three virtual machines from the LSI controller to the VMware Paravirtual SCSI Controller. The machines have been running now for about two weeks without any problems. So everything is compliant again ;).
If you encounter any problems or have any questions about this subject please feel free to contact me on Twitter or the Reply option below.
Source
Here are some interesting related articles that I used for creating this blog post:
At a customer I came across the following problem, the customer was not able to remove a Content Library from vCenter Server. They just created a Content Library and after that, they wanted to remove the item. When they tried to remove the content library it failed. We started troubleshooting the log files and tried to remove the Content Library in different ways with the vSphere Web Client, PowerShell and REST API but all ended with the same error. The error messages are listed below.
To add some more background information: the customer was running the environment with an external platform services controller and a vCenter Server (VCSA). The version that was being used was VCSA 6.5 Update 1e.
Content Library – Error messages
Cannot Remove Content Libary – 01
Cannot Remove Content Libary – 02
Cannot Remove Content Libary – 03
Solution
We ended up calling VMware Global Support Services (GSS) to resolve the issues. They were very helpful and fixed it within a couple of minutes. The knowledge base article listed below is only available for internal VMware personal.
The internal knowledge base article related to the issue: – https://ikb.vmware.com/s/article/50121825 – Unable to delete the stale entry for the content library from the web client
Recently somebody asked me a question about VMware vCenter running on a Windows Server. The Windows Server was running VMware vCenter 6.5 and in case of a datacenter related problem, they wanted to get access to the vSphere Web Client (Flash) on the system locally.
It sounds easy right…? Just open the browser on the Windows Server and navigate to the vSphere Web Client page but that didn’t appear to be the case, because the system is missing the browser plugins required to open the vSphere Web Client.
So let’s dive into the problem.
Microsoft Browsers: They are running Windows Server 2016 and you might expect it to have two browsers: Internet Explorer 11 and Microsoft Edge. That does not seem to be the case. Windows Server 2016 is only shipped with Internet Explorer 11. Why? Windows Server 2016 is marked as an LTSB (Long Time Service Branch) so this means no Microsoft Edge and it is also not available for manual installation.
Microsoft: “The Long-Term Servicing Branch (LTSB) versions of Windows, including Windows Server 2016, don’t include Microsoft Edge or many other Universal Windows Platform (UWP) apps. These apps and their services are frequently updated with new functionality, and can’t be supported on systems running the LTSB operating systems.”
Third-party browsers: The company who was asking had a security policy that does not allow an installation of third-party browsers like Mozilla Firefox or Google Chrome. Alright, so this is not an option. Don’t have to look at that further.
Adobe Flash: So let’s try Internet Explorer 11. It appears to be missing Adobe Flash and you can not download and install it from Adobe Website.
At this point, I was stuck and there did not seem to be a simple solution.
Screenshots
vSphere Web Client missing Adobe Flash
Adobe Flash not available for installation on Windows Server 2016
Solution
After searching for a solution for about an hour. I came across a Microsoft Blog article listed below. This article is talking about installing Adobe Flash on Windows Server 2016. It appears that all the software is already on the system but just needs to be installed.
Procedure:
– Step 01: Close all browsers
– Step 02: Start a PowerShell session with elevated rights.
– Step 03: Run the following command: dism /online /add-package /packagepath:"C:\Windows\servicing\Packages\Adobe-Flash-For-Windows-Package~31bf3856ad364e35~amd64~~10.0.14393.0.mum"
– Step 04: Wait for the installation to complete.
– Step 05: Open a browser and navigate to the vSphere Web Client.
– Step 06: Everything should be working now.
Note: In the Microsoft Blog article they are talking about a reboot required in my case it was not required. Just a browser restart was enough.
Screenshots
Installing Adobe Flash on Windows Server 2016
vSphere Web Client with Adobe Flash
It sounded like an easy problem at first but it took some more time than I expected. The problem is solved with a simple one-liner and the customer is happy. I personally think that there might be other solution to the problem. If you know them please add a comment below.


")


