Tag: Microsoft

OpenSSL Creating Wildcard Certificate Request

OpenSSL Wildcard Certificate Request

In this short blog post, we will create an OpenSSL request for a wildcard certificate. We are going over the installation, configuration, and request. I am performing the steps on a Windows 11-based machine and requesting the certificate at https://www.xolphin.nl/ an external certificate provider, this can also be an internal certificate provider like Microsoft Active Directory Certificate Services (ADCS).

Leveraging a wildcard certificate can be used for many purposes. This can be an internal or external certificate. On a load balancer or a web server with multiple https services. In my case, I am using it for my Lab environment with a load balancer. I am trying to eliminate the certificate complexity for some simple testing of web applications in Kubernetes.

Environment

My environment for performing this operation is as followed:

  • Operating System: Windows 11 X64
  • Public internet access: yes
  • Permissions on the system: Administrator

Installation of OpenSSL on Windows 11

To install OpenSSL on a Windows 11 machine the easiest way is with the package manager “Choco“. Open a PowerShell command prompt with administrative permissions and run the following command:

# Installation of OpenSSL on your system
choco install openssl
PS C:\windows\system32> choco install openssl
Chocolatey v1.4.0
Installing the following packages:
openssl
By installing, you accept licenses for the packages.
Progress: Downloading vcredist2015 14.0.24215.20170201... 100%
Progress: Downloading vcredist140 14.36.32532... 100%
Progress: Downloading chocolatey-core.extension 1.4.0... 100%
Progress: Downloading chocolatey-compatibility.extension 1.0.0... 100%
Progress: Downloading KB3033929 1.0.5... 100%
Progress: Downloading chocolatey-windowsupdate.extension 1.0.5... 100%
Progress: Downloading KB3035131 1.0.3... 100%
Progress: Downloading KB2919355 1.0.20160915... 100%
Progress: Downloading KB2919442 1.0.20160915... 100%
Progress: Downloading KB2999226 1.0.20181019... 100%
Progress: Downloading openssl 3.1.1... 100%

chocolatey-compatibility.extension v1.0.0 [Approved]
chocolatey-compatibility.extension package files install completed. Performing other installation steps.
 Installed/updated chocolatey-compatibility extensions.
 The install of chocolatey-compatibility.extension was successful.
  Software installed to 'C:\ProgramData\chocolatey\extensions\chocolatey-compatibility'

chocolatey-core.extension v1.4.0 [Approved]
chocolatey-core.extension package files install completed. Performing other installation steps.
 Installed/updated chocolatey-core extensions.
 The install of chocolatey-core.extension was successful.
  Software installed to 'C:\ProgramData\chocolatey\extensions\chocolatey-core'

chocolatey-windowsupdate.extension v1.0.5 [Approved]
chocolatey-windowsupdate.extension package files install completed. Performing other installation steps.
 Installed/updated chocolatey-windowsupdate extensions.
 The install of chocolatey-windowsupdate.extension was successful.
  Software installed to 'C:\ProgramData\chocolatey\extensions\chocolatey-windowsupdate'

KB3035131 v1.0.3 [Approved]
kb3035131 package files install completed. Performing other installation steps.
The package KB3035131 wants to run 'ChocolateyInstall.ps1'.
Note: If you don't run this script, the installation will fail.
Note: To confirm automatically next time, use '-y' or consider:
choco feature enable -n allowGlobalConfirmation
Do you want to run the script?([Y]es/[A]ll - yes to all/[N]o/[P]rint): A

Skipping installation because update KB3035131 does not apply to this operating system (Microsoft Windows 11 Pro).
 The install of kb3035131 was successful.
  Software install location not explicitly set, it could be in package or
  default install location of installer.

KB3033929 v1.0.5 [Approved]
kb3033929 package files install completed. Performing other installation steps.
Skipping installation because update KB3033929 does not apply to this operating system (Microsoft Windows 11 Pro).
 The install of kb3033929 was successful.
  Software install location not explicitly set, it could be in package or
  default install location of installer.

KB2919442 v1.0.20160915 [Approved]
kb2919442 package files install completed. Performing other installation steps.
Skipping installation because this hotfix only applies to Windows 8.1 and Windows Server 2012 R2.
 The install of kb2919442 was successful.
  Software install location not explicitly set, it could be in package or
  default install location of installer.

KB2919355 v1.0.20160915 [Approved]
kb2919355 package files install completed. Performing other installation steps.
Skipping installation because this hotfix only applies to Windows 8.1 and Windows Server 2012 R2.
 The install of kb2919355 was successful.
  Software install location not explicitly set, it could be in package or
  default install location of installer.

KB2999226 v1.0.20181019 [Approved] - Possibly broken
kb2999226 package files install completed. Performing other installation steps.
Skipping installation because update KB2999226 does not apply to this operating system (Microsoft Windows 11 Pro).
 The install of kb2999226 was successful.
  Software install location not explicitly set, it could be in package or
  default install location of installer.

vcredist140 v14.36.32532 [Approved]
vcredist140 package files install completed. Performing other installation steps.
Runtime for architecture x86 version 14.36.32532 is already installed.
Runtime for architecture x64 version 14.36.32532 is already installed.
 The install of vcredist140 was successful.
  Software install location not explicitly set, it could be in package or
  default install location of installer.

vcredist2015 v14.0.24215.20170201 [Approved]
vcredist2015 package files install completed. Performing other installation steps.
 The install of vcredist2015 was successful.
  Software installed to 'C:\ProgramData\chocolatey\lib\vcredist2015'

openssl v3.1.1 [Approved]
openssl package files install completed. Performing other installation steps.
Installing 64-bit openssl...
openssl has been installed.
WARNING: No registry key found based on  'OpenSSL-Win'
PATH environment variable does not have C:\Program Files\OpenSSL-Win64\bin in it. Adding...
WARNING: OPENSSL_CONF has been set to C:\Program Files\OpenSSL-Win64\bin\openssl.cfg
  openssl can be automatically uninstalled.
Environment Vars (like PATH) have changed. Close/reopen your shell to
 see the changes (or in powershell/cmd.exe just type `refreshenv`).
 The install of openssl was successful.
  Software installed to 'C:\Program Files\OpenSSL-Win64\'

Chocolatey installed 11/11 packages.
 See the log for details (C:\ProgramData\chocolatey\logs\chocolatey.log).

Installed:
 - kb3033929 v1.0.5
 - chocolatey-windowsupdate.extension v1.0.5
 - vcredist140 v14.36.32532
 - kb2999226 v1.0.20181019
 - kb2919355 v1.0.20160915
 - chocolatey-core.extension v1.4.0
 - kb2919442 v1.0.20160915
 - vcredist2015 v14.0.24215.20170201
 - chocolatey-compatibility.extension v1.0.0
 - openssl v3.1.1
 - kb3035131 v1.0.3
PS C:\windows\system32>

Configuration OpenSSL on Windows 11

To create a certificate you need to tell OpenSSL what to generate. So we create a configuration file for OpenSSL that specifies what type of certificate should be generated.

Create the following configuration file called “config.cfg“. This is the configuration file that will be used by OpenSSL when running the command listed below. Make sure you change your domain name and information in the configuration file.

[ req ]
default_bits            = %In most cased: 2048 or 4094%
default_keyfile         = %key file name%
default_md              = sha512
distinguished_name      = req_distinguished_name
encrypt_key             = no
prompt                  = no

[ req_distinguished_name ]
commonName              = %Certificate address > your wildcard%
countryName             = %Company country code%
emailAddress            = %Administrator/IT email%
localityName            = %Company location%
organizationName        = %Company name%
organizationalUnitName  = %Company department%
stateOrProvinceName     = %Company location province%
[ req ]
default_bits            = 4096
default_keyfile         = wildcard.domain.com.key
default_md              = sha512
distinguished_name      = req_distinguished_name
encrypt_key             = no
prompt                  = no

[ req_distinguished_name ]
commonName              = *.domain.com
countryName             = NL
emailAddress            = admin@domain.com
localityName            = Amsterdam
organizationName        = Domain B.V.
organizationalUnitName  = IT
stateOrProvinceName     = Noord-Holland

OpenSSL Creating Wildcard Certificate Request

Now it is time for generating the certificate request that can be delivered to your certificate provider. This can be done by running the following command in an elevated PowerShell command-prompt.

# Set the path variable
$path = "c:\Users\$Env:UserName\Desktop\cert"

# Create directory
mkdir $path

# Copy the config.cfg into the $path location (manually)

# Create the certificate request
openssl req -new -nodes -out "$path\wildcard.domain.com.csr" -config "$path\config.cfg" -keyout "$path\wildcard.domain.com.key"

# After running the commands, you will end up with three files in the $path location
- config.cfg
- wildcard.domain.com.csr
- wildcard.domain.com.key

Signing the request

Go to your certificate provider website and upload the “wildcard.domain.com.csr” file. You should receive the wildcard certificate in a couple of minutes/hours depending on the certificate provider.

Wrap up

So this is my blog post about creating a wildcard certificate with OpenSSL. Hopefully, it is useful for somebody, please respond below if you have any comments or additional information! See you next time! 🙂

Domain Controller NTP Server Configuration

This blog post is about Microsoft Domain Controllers and NTP Server configuration for the FSMO PDC emulator role. In this blog, we are going to configure NTP and make sure it works correctly for all the clients.

Background

In this case, we were deploying an entire VMware environment at a customer for testing purposes including domain controllers. This was working fine until we wanted to configure the vCenter Server with domain authentication. It was not possible to login into VMware vCenter with domain accounts only with local accounts. After some looking and comparing we realized that the time synchronization in the environment was not working correctly.

I have been sitting on these simple commands for a long time without actually putting them on my blog but the customer that was suffering from this issue encouraged me to do this. So here we are ;).

Why an NTP Server is important

Short introduction on the Network Time Protocol or in short NTP. NTP is used for clock syncronization between IT systems. The NTP protocol uses port 123 and sends UDP packages. Now going back to Microsoft Domain Controllers ;).

One of the main things, when you are setting up a Domain Controller is that you need to make sure that time synchronization is working. This can be done with an NTP source or NTP GPS source. In most cases, an internet source is used, for example pool.ntp.org.

The domain controllers that are controlling the domain act as NTP sources for the domain members. This is the default setting by Microsoft. Keep in mind: that this can be changed with domain group policies.

So what is acceptable and when are things falling apart? By default a 300 seconds difference is allowed by Kerberos, this sounds a lot but when NTP is not working things quickly go beyond that limit. This 300 seconds interval means that you can be 300 seconds behind or 300 seconds in front of the domain controllers. When you are beyond this limit, Kerberos tickets are not working anymore and then there is a real problem: account login, log entry timestamps are not valid, permissions not working, etc.

Command support

I have tested these commands on the following Operating System versions over the years. It doesn’t matter if this is a server with a GUI or core. As long as the PowerShell terminal is accessible!

  • Windows Servers 2008
  • Windows Servers 2008 R2
  • Windows Servers 2012
  • Windows Servers 2012 R2
  • Windows Servers 2016
  • Windows Servers 2019
  • Windows Servers 2022

Commands

Here is an overview of the NTP commands for a domain controller. The most common way is to run this in a PowerShell terminal with administrative rights. I have listed the steps with a simple explanation:

# 1. Stop the NTP service
net stop w32time

# 2. Run the following command
w32tm /config /syncfromflags:manual /manualpeerlist:"0.nl.pool.ntp.org, 1.pool.ntp.org, 2.pool.ntp.org, 3.nl.pool.ntp.org"

# 3. Trust the time server
w32tm /config /reliable:yes

# 4. Start the NTP service
net start w32time

# 5. Check the configuration
w32tm /query /configuration

# 6. Force time resync
w32tm /resync

Troubleshooting

Here are some troubleshooting commands to validate the working and additional settings:

# Show timezone
w32tm /tz

# NTP Peers/Stratum
w32tm /query /peers

# Sync information
w32tm /query /peers /verbose 

# Monitor status
w32tm /monitor

# Read registry values
reg query HKLM\system\CurrentControlSet\Services\W32Time\TimeProviders\NtpServer

Wrap-up

So this is my blog post about Microsoft Domain Controllers in combination with an NTP server. I have explained the importance and the issues that can be caused by an invalid NTP Server configuration and provided the commands related to a good configuration.

Do you have additional tips or remarks please respond in the comment section below.

Have a nice day and see you next time!

Windows Server 2022 Core DC Boot Loop

On 11 January 2022 Microsoft released an update that puts some Microsoft Domain Controllers in a boot loop. This is related to Windows Server 2016, Windows Server 2019, and Windows Server 2022. When my lab environment was running into issues I noticed that I could not find the updates listed online. After some searching, I realized that Windows Server 2022 Core is different and has different updates installed.

In my environment, I am running two Windows Server 2022 Core edition domain controllers. On 19 January both domain controllers came into a boot loop at night after installing the updates automatically with my automated patching tools.

Server with Desktop Experience

As listed on the websites the following updates are the ones you need to delete from the system:

# Remove the updates
wusa /uninstall /kb:5009595 /quiet 
wusa /uninstall /kb:5009624 /quiet

When running the command the Windows Server 2022 domain controller told me that the updates were not installed on this system… So that was quite weird… after running the following command and checking the KB article description on the Microsoft website I found the correct one (the articles I am referring to are listed below).

# List installed updates on the machine
wmic qfe list

Server Core

I have created a simple procedure and added some screenshots. Here is the procedure that I performed on each domain controller in my environment:

  1. Disconnect the virtual network card.
  2. Connect with the virtual machine console through the hypervisor.
  3. Log in with the administrator account.
  4. Open the PowerShell prompt.
  5. Remove the update, see the command below.
  6. Reboot the system.
  7. Connect the virtual network card.
  8. Log in with the administrator account.
  9. Install update KB5010796.
  10. Reboot the system.
  11. Check the available updates to make sure it is installed.
  12. Everything should be working fine again.
# Remove the update (the quiet option was not working and the removal required mouse interaction to work)
wusa /uninstall /kb:5009555

Screenshot(s)

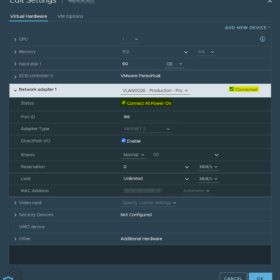
I kind of forgot to screenshot everything because of the time between the boot loops but the end result is captured on the screenshot(s). Also added the screenshots in VMware vCenter for disabling and enabling the network card connectivity.

Wrap-up

A couple of things I have learned so far, Windows Updates KB numbers are not identical between core and desktop experience (full) versions. It was strange that the domain controllers still listed the faulty update as the first update to install and would go into the same state back…

This wraps up the blog article hopefully it is useful for somebody, please respond below if you have any comments or additional information!

Sources

vRealize Automation SQL Database Installation

vRealize Automation SQL Database Installation

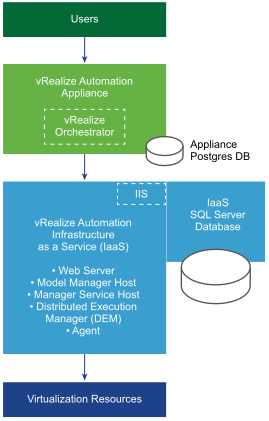
When deploying VMware vRealize Automation (vRA) you required to deploy a Windows Server that is responsible for the SQL Server Database. It does not matter if it is a small, medium or large deployment. All deployments require a Microsoft SQL Server. The Microsoft SQL Server is the database for the vRealize Automation IaaS components and is responsible for maintaining information about the machines it manages and its own elements and policies.

In this article, I’m going to describe the vRealize Automation SQL Database Installation with an automated/unattended PowerShell script. This article is mainly focused on the IaaS database part, so no additional information surrounding the installation of vRealize Automation components is descriped.

Requirements

The following items need to be performed before running the script:

  • Download the latest Microsoft SQL 2016 Server media from the Microsoft website (SQL 2016 – link).
  • Download the latest Microsoft SQL Server Management Studio from the Microsoft website (SSMS – link).
  • Create a virtual machine with Windows Server 2016 installed.
  • Install the latest Windows Updates.
  • Configure a static IP address.
  • Join the server to your company domain.

Environment

In my lab environment, I was deploying a minimal vRealize Automation installation with an external database. This means the following virtual machines are deployed for the vRealize Automation environment:

  • LAB-vRA-APP.Lab.local – vRealize Automation Appliance
  • LAB-vRA-IAAS.Lab.local – Running Windows Server 2016 responsible for vRealize Automation IaaS Components
  • LAB-vRA-SQL.Lab.local – Running Windows Server 2016 responsible for the vRealize Automation IaaS SQL Database
vRealize Automation - Minimal Deployment
vRealize Automation – Minimal Deployment

Note

Keep in mind the following items:

  • The installation code/script for Microsoft SQL Server is tested with the following versions (2016 Non-SP / 2016 SP1 / 2016 SP2). No doubt the code will work with newer releases but make sure to verify all your settings after installation.
  • I do not take any responsibility and I’m are not liable for any damage caused by this code.
  • I did not create a script that fully automates everything. It is based on one-liners with a complete configuration. The reason behind this is flexibility. Every environment is different and every customer is different. This way small tweaks can be made to parts of the code or you just use sections of the code.


Video

To display the full functionality of the code I recorded a video and uploaded it to YouTube. You can see the end result below. The video shows you the execution of the one-liners and what the server is configuring. The video starts after the requirements phase is completed.

Unattended Installation Files

So let’s list all the steps that are executed on the new Windows Server to make it ready to store the vRealize Automation IaaS Database:

  1. Format the D drive and make sure it is using a 64k allocation unit size for storing the Database
  2. Format the E drive and make sure it is using a 64k allocation unit size for storing the TempDB
  3. Format the F drive and make use of a default allocation unit size for storing the log files
  4. Assign both domain service accounts local administrator access on the server (svc-iaas / svc-vrasql)
  5. Create a Windows Firewall rule to allow SQL traffic on the network
  6. Enable multiple Windows Firewall rules to allow the Microsoft Distributed Transaction Coordinator (DTC)
  7. Install Microsoft SQL Server Management Studio
  8. Install Microsoft SQL Server 2016
  9. Reboot the system
  10. Configure the Microsoft Distributed Transaction Coordinator (DTC).
  11. Reboot the system
  12. Verify the system and functioning of the SQL Server

Optional:

  • In some cases, an additional G drive is required to store the SQL Backup.

PowerShell One-Liners

This file is saved as “Microsoft SQL Server 2016 – Commands.ps1” in the “C:\Temp” directory. The SQL Server media is mounted in the B drive (CD-ROM). The SQL Management Studio installation file is located in the “C:\Temp” directory.

##### Files required
# - Microsoft SQL Server 2016 Installation File
# - Microsoft SQL Management Studio 2016 Installation File

##### Volume 1 - DB 64k
$Disk = Get-Disk -Number 1
Set-Disk -InputObject $Disk -IsOffline $false
Initialize-Disk -InputObject $Disk
New-Partition $Disk.Number -UseMaximumSize -DriveLetter D
Format-Volume -DriveLetter D -FileSystem NTFS -AllocationUnitSize 65536 -NewFileSystemLabel "DB" -Confirm:$false

##### Volume 2 - TEMP DB 64k
$Disk = Get-Disk -Number 2
Set-Disk -InputObject $Disk -IsOffline $false
Initialize-Disk -InputObject $Disk
New-Partition $Disk.Number -UseMaximumSize -DriveLetter E
Format-Volume -DriveLetter E -FileSystem NTFS -AllocationUnitSize 65536 -NewFileSystemLabel "TEMP DB" -Confirm:$false

##### Volume 3 - Logs 4k
$Disk = Get-Disk -Number 3
Set-Disk -InputObject $Disk -IsOffline $false
Initialize-Disk -InputObject $Disk
New-Partition $Disk.Number -UseMaximumSize -DriveLetter F
Format-Volume -DriveLetter F -FileSystem NTFS -NewFileSystemLabel "Logs" -Confirm:$false

##### Make the service account member of the local administrators group
Add-LocalGroupMember -Group "Administrators" -Member "svc-vra-iaas"
Add-LocalGroupMember -Group "Administrators" -Member "svc-vra-sql"

##### Windows Firewall

    ### Windows Firewall - Allow Microsoft SQL Port 1433 TCP
    New-NetFirewallRule -DisplayName "Microsoft SQL Server 2016 - SQL - TCP" -Direction Inbound -LocalPort 1433 -Protocol TCP -Action Allow

    ### Windows Firewall - Enable rule for RPC for DTC
    Enable-NetFirewallRule -DisplayName "Distributed Transaction Coordinator (RPC-EPMAP)"

    ### Windows Firewall - Enable rule for Incoming DTC
    Enable-NetFirewallRule -DisplayName "Distributed Transaction Coordinator (TCP-In)"

    ### Windows Firewall - Enable rule for Outgoing DTC
    Enable-NetFirewallRule -DisplayName "Distributed Transaction Coordinator (TCP-Out)"

##### Microsoft SQL Management Studio
C:\Temp\SSMS-Setup-ENU.exe /install /passive /norestart

##### Microsoft SQL Server 2016
B:\Setup.exe /ConfigurationFile="C:\Temp\Microsoft SQL Server 2016 - Configuration.ini"

##### Reboot the server
shutdown -r -t 0

##### Configure the Microsoft Distributed Transaction Coordinator (DTC)
Set-DtcNetworkSetting -DtcName "Local" -RemoteClientAccessEnabled:$true -RemoteAdministrationAccessEnabled:$false -AuthenticationLevel "Mutual" -InboundTransactionsEnabled:$true -OutboundTransactionsEnabled:$true -XATransactionsEnabled:$false -LUTransactionsEnabled:$true -Confirm:$false

##### Reboot the server
shutdown -r -t 0

GIT Repository: Microsoft SQL Server 2016 – Commands.ps1

SQL Configuration File

This file is saved as “Microsoft SQL Server 2016 – Configuration.ini” in the “C:/Temp” directory.

; ************************************************************************************************************************
; Author:       M. Buijs
; Version:      1.0
; Date:         2018-09-26
;
; Information: 
; This configuration file is created to install the Microsoft SQL Server 2016 software for VMware vRealize Automation.
;
; VMware Requirements:
; - Enable TCP/IP protocol for SQL Server. 
; - The Microsoft Distributed Transaction Coordinator Service (MS DTC) is enabled on all SQL nodes in the system. MS DTC is required to support database transactions and actions such as workflow creation.
; - If you have a firewall running between the database server, Web servers or IaaS servers, deactivate the firewall or open the ports needed (MS SQL server uses port 1433 and MS DTC requires the use of port 135 over TCP and a random port between 1024 and 65535).
; - The database service account needs to be local administrator on the server (svc-vra-sql).
; - The IaaS service account needs to be local administrator on the server (svc-vra-iaas).
; - Set up Microsoft SQL server with separate OS volumes for SQL Data, Transaction Logs, TempDB, and Backup. 
; - The NTFS drive where SQL Server is installed has a file allocation unit (cluster) size of 64 KB.
; ************************************************************************************************************************
 
[OPTIONS]

; SQL Server - Workflow
    
    ; Setup Workflow (Install/Uninstall/Upgrade) 
    ACTION="Install"

    ; SQL Server - Accept License Agreement (True = Automatically accepted / False = Users needs to accept)
    IACCEPTSQLSERVERLICENSETERMS="True"

    ; Specify that SQL Server feature usage data can be collected and sent to Microsoft.  
    SQMREPORTING="False"
    ERRORREPORTING="False"

; SQL Server - Unatteded

    ; Parameter that controls the user interface behavior. 
    ; UIMODE="Normal"
    
    ; Setup will not display any user interface. 
    ; QUIET="True"
    
    ; Setup will display progress only, without any user interaction. 
    QUIETSIMPLE="True"

    ; Specifies that the detailed Setup log should be piped to the console. 
    INDICATEPROGRESS="False"

    ; Specify if errors can be reported to Microsoft to improve future SQL Server releases.  
    ERRORREPORTING="True"

    ; Displays the command line parameters usage 
    HELP="False"

    ; RSInputSettings_RSInstallMode_Description 
    RSINSTALLMODE="DefaultNativeMode"

; SQL Server - Installation Features

    ; Specifies features to install, uninstall, or upgrade. 
    FEATURES=SQLENGINE

    ; Language Pack (English / United States)
    ENU="True"

; SQL Server - Updates

    ; Specify whether SQL Server Setup should discover and include product updates. 
    UpdateEnabled="True"

    ; Specify the location where SQL Server Setup will obtain product updates (MU = Microsoft Update).
    UpdateSource="MU"

; SQL Server - Installation Directory

    ; Specify the root installation directory for shared components.  
    INSTALLSHAREDDIR="D:\Program Files\Microsoft SQL Server"
    
    ; Specify the root installation directory for the WOW64 shared components. 
    INSTALLSHAREDWOWDIR="D:\Program Files (x86)\Microsoft SQL Server"

    ; Default directory for the Database Engine backup files. 
    ; SQLBACKUPDIR="<InstallSQLDataDir>\<SQLInstanceID>\MSSQL\Backup"
    
    ; Default directory for the Database Engine user databases. 
    SQLUSERDBDIR="D:\Database"
    
    ; Directory for Database Engine TempDB files. 
    SQLTEMPDBDIR="E:\TempDB"

    ; Default directory for the Database Engine user database logs. 
    SQLUSERDBLOGDIR="F:\Logs"
    
; SQL Server - Instance

    ; Specify a default or named instance. MSSQLSERVER is the default instance for non-Express editions and SQLExpress for Express editions. 
    INSTANCENAME="MSSQLSERVER"
    
    ; Specify the Instance ID for the SQL Server features you have specified. 
    INSTANCEID="MSSQLSERVER"

    ; Specify the installation directory. 
    INSTANCEDIR="D:\Program Files\Microsoft SQL Server"

    ; Specifies a Windows collation or an SQL collation to use for the Database Engine. 
    SQLCOLLATION="SQL_Latin1_General_CP1_CI_AS"

    ; Level to enable FILESTREAM feature at (0, 1, 2 or 3). 
    FILESTREAMLEVEL="0"

; SQL Server - SA Account

    ; Specifies the password for the SQL Server SA account.
    SAPWD="VMware1!"

    ; Specifies the security mode for SQL Server.
    SECURITYMODE=SQL

; SQL Server - Service Access

    ; Windows account(s) to provision as SQL Server system administrators. 
    SQLSYSADMINACCOUNTS="Lab.local\Administrator" "BUILTIN\Administrators"
    
    ; Provision current user as a Database Engine system administrator for SQL Server 2012 Express. 
    ADDCURRENTUSERASSQLADMIN="False"
 
; SQL Server - Connection Support

    ; Specify 0 to disable or 1 to enable the TCP/IP protocol. 
    TCPENABLED="1"
    
    ; Specify 0 to disable or 1 to enable the Named Pipes protocol. 
    NPENABLED="0"

    ; CM brick TCP communication port 
    COMMFABRICPORT="0"
    
    ; How matrix will use private networks 
    COMMFABRICNETWORKLEVEL="0"
    
    ; How inter brick communication will be protected 
    COMMFABRICENCRYPTION="0"

    ; TCP port used by the CM brick 
    MATRIXCMBRICKCOMMPORT="0"
    
; SQL Server - Agent Service and Service Account

    ; Auto-start service after installation.  
    AGTSVCSTARTUPTYPE="Manual"

    ; Specifies the account for the SQL Server Agent service.
    AGTSVCACCOUNT="NT AUTHORITY\SYSTEM"

    ; Required Specifies the password for SQL Server Agent service account. 
    ;AGTSVCPASSWORD=""

; SQL Server - Browser Service and Service Account

    ; Startup type for Browser Service. 
    BROWSERSVCSTARTUPTYPE="Disabled"
 
; SQL Server - Server Service Account

    ; Startup type for the SQL Server service. 
    SQLSVCSTARTUPTYPE="Automatic"

    ; Account for SQL Server service: Domain\User or system account. 
    SQLSVCACCOUNT="Lab.local\svc-vra-sql"

    ; Specifies the password for SQLSVCACCOUNT.
    SQLSVCPASSWORD="heT5S-AbEsagu7ad"

; SQL Server - Report Server Service and Service Account

    ; Specifies how the startup mode of the report server NT service. 
    RSSVCSTARTUPTYPE="Manual"

    ; Specifies which account the report server NT service should execute under.  
    RSSVCACCOUNT="NT AUTHORITY\SYSTEM"

    ; Specifies the password for the startup account for the Reporting Services service.
    ;RSSVCPASSWORD=""

GIT Repository: Microsoft SQL Server 2016 – Configuration.ini


Final Word

This blog post helps you to set up a Microsoft SQL Server 2016 for vRealize Automation 7.X. The code can be used in lab and production environments but make sure to verify the configuration. I think there might be more improvements possible related to the one-lines but maybe also additional SQL configuration improvements. Do you have feedback please respond below or send me an email.

Sources

To create this article and scripts I used the following resources:


  • Update 2018-10-04 – Article was missing the Microsoft Distributed Transaction Coordinator (DTC) information and code (video recording is still missing that part).

Opening vSphere Web Client (Flash) on Windows Server 2016

Microsoft Exchange 2016 Installation “Couldn’t find the Enterprise Organization container”

Today I continued installing Microsoft Exchange 2016 on Windows Server 2016 in my lab environment. It looked like I was making some progress, the forest preparation was executed perfectly but then the installation started with the active directory preparation. After a couple of seconds, it failed… so it was time to start troubleshooting again to figure out what was going on.

Environment

To give you some insight into the environment, the following virtual machines were related to the problem:

  • DC01: Windows Server 2012 R2 – Domain Controller running all FSMO roles
  • EXH01: Windows Server 2016 – A new server that will become an Exchange 2016 server.

In the past the domain controller had a Microsoft Exchange 2013 server joined but that was removed about two years ago. I guest that there were still registrations in the Active Directory schema that were not removed.

Problem

The following error appeared (Couldn’t find the Enterprise Organization container) in the Exchange Server 2016 setup log file, here is an overview of the location and error message:

  • Logfile: C:\ExchangeSetupLogs\ExchangeSetup.txt
  • Error message: [REQUIRED] Setup encountered a problem while validating the state of Active Directory: Couldn’t find the Enterprise Organization container.

Solution

I found a solution… but I do not think Microsoft officially supports it. Keep in mind: if you are still running an Exchange Server infrastructure you will probably destroy it! Here is a write-up to fix the validation issues:

  1. Start an RDP session with the Domain Controller.
  2. Login with administrative credentials.
  3. Open the following tool “ADSI Edit“.
  4. Connect to the “default-naming context“.
  5. Delete the following two CNs completely, including all content:
    CN=Microsoft Exchange,CN=Services,CN=Configuration,DC=Lab,DC=local
    CN=CN=Microsoft Exchange Autodiscover,CN=Services,CN=Configuration,DC=Lab,DC=local
  6. Restart the Microsoft Exchange Server.
  7. Start the Exchange Server 2016 installation again.
  8. Follow the installation wizard.
  9. The problems should be resolved.

Final word

After performing the described steps on my domain environment, the problems were gone and the Microsoft Exchange Server was running without problems. Like I said before, be careful with executing the steps, you are really making a major change in the Active Directory that might affect other components.

Installation Microsoft Exhange 2016 on Windows Server 2016

Today I was installing Microsoft Exchange 2016 on a new Windows Server 2016 purely for lab and education purposes. The Windows Installation was finished all Windows Updates were installed and now it was time to start the Microsoft Exchange installation! I had downloaded the installation media some time ago from the Microsoft website (this is where the mistake began), please read further for the explanation.

Exchange 2016 – Readiness Checks Error

After starting the setup wizard and the Readiness Checks the following error appeared:

Error: The Windows component Server-Gui-Mgmt-Infra isn’t installed on this computer and needs to be installed before Exchange Setup can begin.

Exchange 2016 on Windows Server 2016 - Readiness Checks Failing
Exchange 2016 on Windows Server 2016 – Readiness Checks Failing

Exchange 2016 – Running PowerShell Commands

So I tried installing the required components with the following PowerShell command, just as requested by the Readiness Checks page:

### PowerShell installation command
Install-WindowsFeature Server-Gui-Mgmt-Infra, Server-Gui-Shell -Restart

This is the result of running this PowerShell command-let on the Windows Server 2016 machine. The error states “The role, role service, or feature name is not valid“.

Exchange 2016 on Windows Server 2016 - PowerShell not installing modules
Exchange 2016 on Windows Server 2016 – PowerShell not installing modules

Apparently “Server-Gui-Mgmt-Infra” isn’t something you can install on Windows Server 2016 machine…

Solution to the installation problem

So after some thinking, I realized that the Exchange 2016 application was released much earlier than the Windows Server 2016 operating system… After some searching, I found the latest “Exchange 2016 CU6 release” on the Microsoft.com website.

It appears that every Cumulative Update (CU) is released in the form of a new ISO file which is also the installation media and update media. After downloading the CU6 iso and running the installation everything was working without any problems.

Upgrade MDT 2012 Update 2 to MDT 8443

It was time to start deploying Windows 10 and Windows Server 2016. So an upgrade from MDT 2012 Update 2 to MDT 8443 was required in my Lab environment.

All my virtual machines with a Microsoft Windows Operating System are deployed with Microsoft Deployment Toolkit (MDT) / Windows Deployment Services (WDS).

After a successful upgrade to MDT 8443 and a Deployment Share upgrade everything looked fine… but when I started deploying Windows Machines an error occurred.

The following error was displayed at the end of the Deployment Wizard (Invalid DeploymentType=“”).

After some searching on the internet, I came across the following Microsoft TechNet post.

To resolve my problems, the following steps were required:

  1. Create a backup from the following file (%DeploymentShare%\Scripts\DeployWiz_ProductKeyVista.vbs).
  2. Open the following configuration file in your favorite code editor (%DeploymentShare%\Scripts\DeployWiz_ProductKeyVista.vbs).
  3. In the configuration file locate line 52.
  4. Change the line from (if oProperties(“DeploymentType”) = “UPGRADE” then) to (if Property(“DeploymentType”) = “UPGRADE” then).
  5. Save configuration file.
  6. Start a new MDT deployment.
  7. Verify if the issue is fixed.

Now everything should be working as expected! Happy deploying :).