This blog post is about upgrading vRealize Orchestrator 8.X to a newer version. After a couple of vRealize Orchestrator Upgrades since the 8.0 release and getting stuck a couple of times I decided to do a simple write-up with some tips and tricks.
In my lab environment, I have got multiple orchestrators running embedded, standalone, and cluster. Most issues I encountered are related to the standalone version that is connected with the VMware vCenter Server.
vRO upgrade checks
Let’s start with some simple upgrade checks to make sure everything is working before the upgrade and to improve the chance of succeeding.
Make sure the root account is not expired on all nodes in the cluster.
Make sure you have the correct vCenter SSO password. Verify this by logging in with administrator@vsphere.local on the vCenter Server. The password is required for the standalone upgrade that is directly connected to the VMware vCenter Server.
Make sure the time sync is working on all the nodes in the cluster.
vRO upgrade
Let’s start with the vRealize Orchestrator Upgrade. Here is an overview of the procedure and the commands required to perform the upgrade.
Keep in mind: Step six is optional and is only required for the vRealize Orchestrator that is connected to the vCenter SSO. For the vRealize Automation connected upgrade, this step can be skipped.
Procedure:
Create a virtual machine snapshot.
Open an SSH session with the vRealize Orchestrator node.
Login with the root account on the vRealize Orchestrator node.
Mount the upgrade media to the virtual machine.
Mount the media in the linux system (mount /dev/sr0 /mnt/cdrom).
Enter the SSO password as a variable in the shell (export VRO_SSO_PASSWORD=your_sso_password).
The upgrade will start. Depending on the size of the vRealize Orchestrator node it will take between 30 to 90 minutes.
After the upgrade is completed restart the system (reboot).
Verification:
Check the virtual machine console for startup issues. Make sure the console is displaying a blue screen with information about the node.
Check the virtual machine console for the version/build number on the blue screen that it is displaying.
Check if the web interface is available and the interface is working.
Login into the vRO interface and verify that authentication is working.
Run a basic workflow.
Remove the virtual machine snapshot.
Screenshot(s)
Here are a couple of screenshots of the upgrade process and the end result after a successful upgrade:
vRealize Orchestrator 8.X – Upgrade – Part 1
vRealize Orchestrator 8.X – Upgrade – Part 2
vRealize Orchestrator 8.X – Console
Summary
So that was my short blog post about the vRealize Orchestrator Upgrade experience so far for version 8.X. I hope it was useful. In most cases, there were problems with an expired account or an incorrect SSO password.
It would be nice if the upgrade process would validate the entered SSO password instead of hanging for hours in a crashed upgrade state without returning any error message to the console or shell session.
Thanks for reading and see you next time! Please respond in the comment section below if you got any remarks :).
After a recent deployment in my Lab environment with a new vRealize Automation 8 installation I figured out that my NFR product license was about to expire within a week. So it was time to change the product key on my running environment. Here is a write-up to change the license in vRealize Automation 8 with a standard installation (standalone-node) that is running with an Enterprise license.
Start a connection with the vRealize Automation 8 appliance to get shell access to the system. I like to use Putty but you can use any terminal emulator you prefer that supports SSH.
Procedure:
Start a terminal emulator like Putty on your desktop.
Connect with the FQDN/hostname of the vRealize Automation 8 Appliance.
Login with the root account.
Viewing product license
To validate the currently installed license key on the vRealize Automation 8 appliance you need to enter the following command “vracli license current“. Here can you find a screenshot of the output in my lab environment (keep in mind multiple lines are hidden):
vRealize Automation 8 – Viewing Product License
Installing product license
To install a new license in vRA8 you need to perform some steps on the command line.
In this example we are changing the product license from one license key to the other:
New license key: AAAAA-AAAAA-AAAAA-AAAAA-AAAAA
Old license key: ZZZZZ-ZZZZZ-ZZZZZ-ZZZZZ-ZZZZZ
### List current license installed
vracli license current

### Install new license
vracli license add AAAAA-AAAAA-AAAAA-AAAAA-AAAAA

### Remove old license
vracli license remove ZZZZZ-ZZZZZ-ZZZZZ-ZZZZZ-ZZZZZ

### Reboot the appliance to apply the license change
reboot
Wrap-up
I think this covers this small blog about changing the vRealize Automation 8 product license on a running system because there was no procedure available in the official documentation. I have not tested this procedure yet on a clustered deployment with three vRealize Automation 8 appliances. This might behave differently.
Be aware: I have tested this procedure on vRealize Automation 8.0.1 Hot Fix 1. The result may defer on another hotfix or version because of the ongoing product evolution.
Thanks for reading this blog and see you next time!
I was running into an issue in my Home Lab when upgrading vRealize Automation 8.0.0 to vRealize Automation 8.0.1. The upgrade was performed with vRealize Suite Lifecycle Manager or in short vRLCM and it could not complete the precheck because of issues related to the free disk space and disk space size.
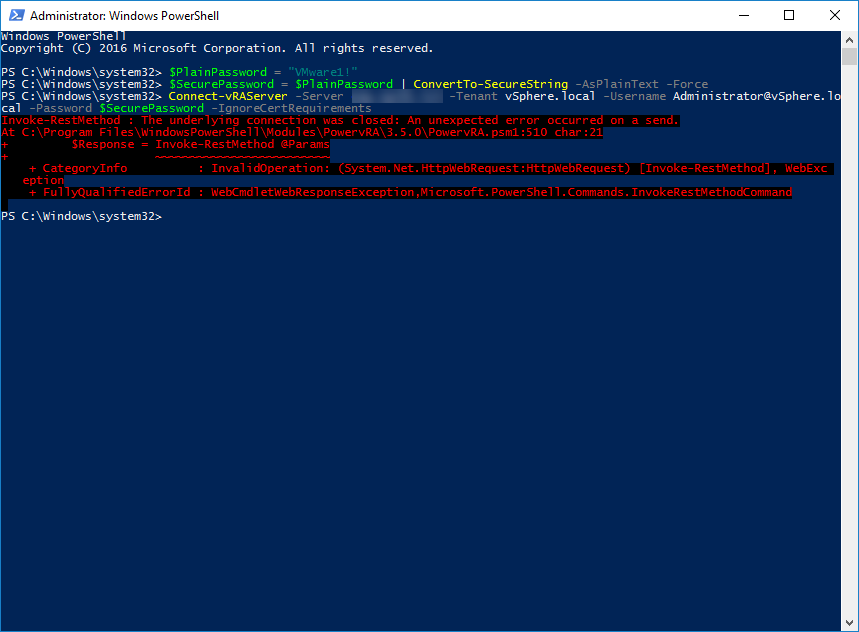
At a customer, I encountered the following issue when trying to connect with PowervRA to vRealize Automation. The error message that appeared was: Invoke-RestMethod : The underlying connection was closed: An unexpected error occurred on a send.
Let go one step back: So what is PowervRA you might ask? PowervRA is a PowerShell Toolkit to manage VMware vRealize Automation (vRA). With PowervRA you can configure and manage your vRealize Automation environment, for example, create a new tenant, assigning permissions or viewing the user’s requests.
The problem
The problem started by connecting with PowervRA to vRealize Automation (vRA). There was no way to get a successful connection. I tried using the IP addresses, hostname and FQDN also different credentials didn’t make any difference. The error that returned in all cases was identical.
The customer was using the latest version of PowervRA. At this moment it was PowervRA 3.5.0. The vRealize Automation version they were using was 7.4.0.
Here is the screenshot of the error message:
PowervRA – Invoke-RestMethod : The underlying connection was closed – Issue
Here is the full error message in plain text from the PowerShell Console:
Error message:
Invoke-RestMethod : The underlying connection was closed: An unexpected error occurred on a send.
At C:\Program Files\WindowsPowerShell\Modules\PowervRA\3.5.0\PowervRA.psm1:510 char:21
+         $Response = Invoke-RestMethod @Params
+                     ~~~~~~~~~~~~~~~~~~~~~~~~~
    + CategoryInfo          : InvalidOperation: (System.Net.HttpWebRequest:HttpWebRequest) [Invoke-RestMethod], WebException
    + FullyQualifiedErrorId : WebCmdletWebResponseException,Microsoft.PowerShell.Commands.InvokeRestMethodCommand
To validate the issue further I tried the same thing in my Lab environment. The strange thing was that everything was working fine with the identical versions.
The solution
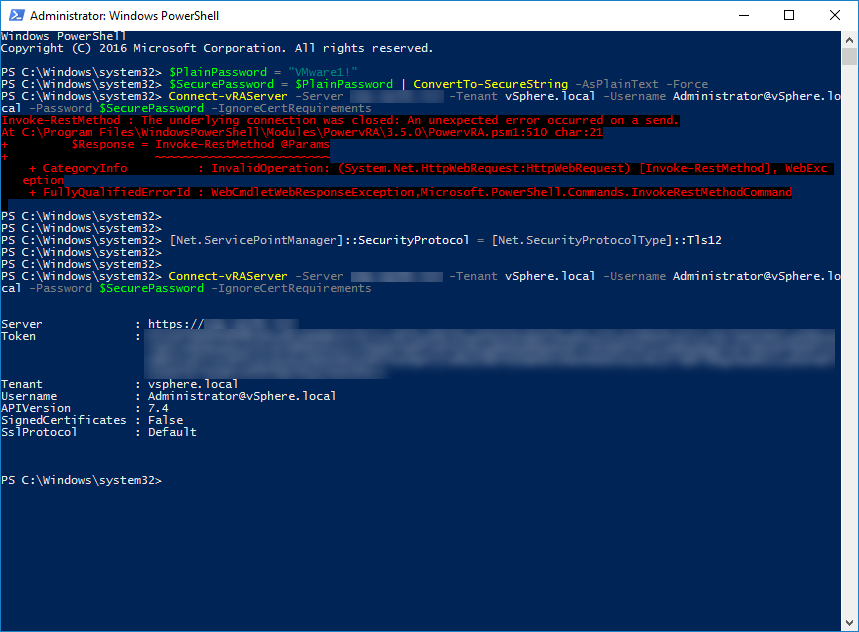
Until this moment I am not really sure why it is working in one environment and not in the other… I suspect it has something to do with Windows Updates or Domain Security Policies? To address the issue there is only one way: force PowerShell/PowervRA to use TLS 1.2 when connecting with vRealize Automation (vRA).
Procedure:
Open the PowerShell command-prompt as administrator.
Run the following command before connecting to vRealize Automation. The command is listed below. No output is expected after running this command.
Run the Connect-vRAServer PowerShell command to start a session with vRealize Automation. Everything should be working and authentication should be possible.
PowerShell code
Copy and paste the code into your PowerShell console before connecting to vRealize Automation:
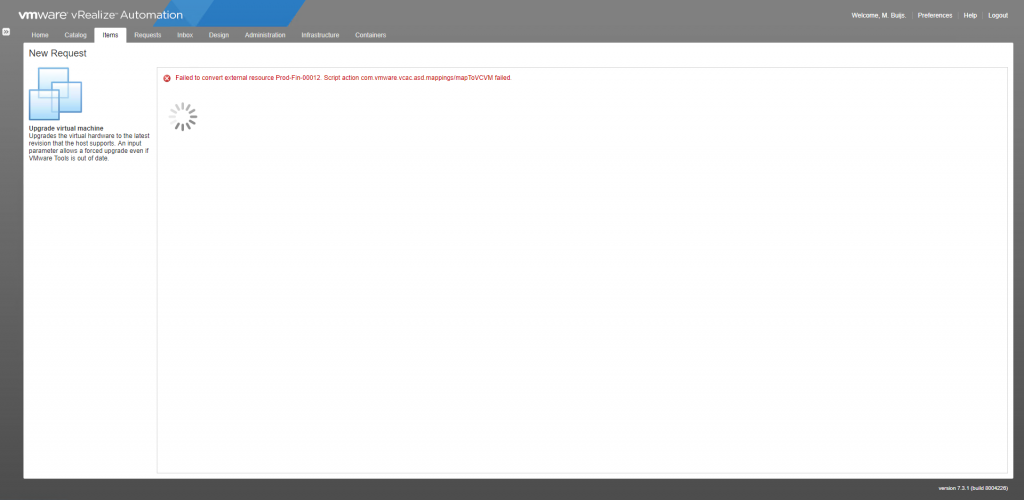
I ran into an error message today with vRealize Automation (vRA). The error message that came up was: Failed to convert external resource Prod-Fin-00012. The issue occurred in vRA version 7.3.1.
Inside the vRealize Automation portal, I tried to upgrade virtual machine hardware but it failed directly when issuing the request. Strange thing was it was working a couple of day ago. After some investigating the error also came back on other day-2 tasks. So it was time to dive deeper into the issue.
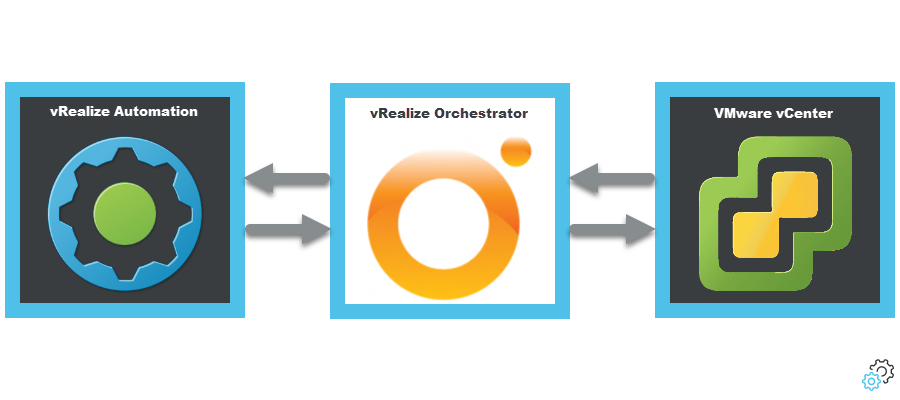
So let us think about what vRealize Automation is performing, it is executing a task on a virtual machine. To perform this it needs to talk to vCenter Server and to talk to vCenter Server it uses vRealize Orchestrator.
Here is a simple overview of the communication that happens in this case. vRealize Automation is communicating to vRealize Orchestrator and vRealize Orchestrator is communicating to vCenter Server.
VMware vRealize Automation – vSphere Endpoint Communication
Error messages
The following error messages were found on the following systems:
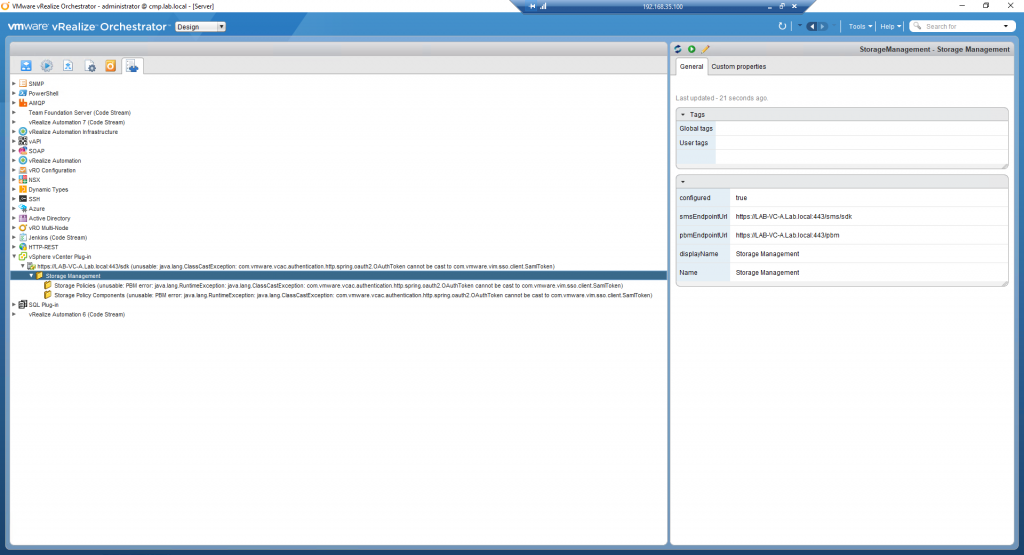
https://LAB-VC-A.Lab.local:443/sdk (unusable: java.lang.ClassCastException: com.vmware.vcac.authentication.http.spring.oauth2.OAuthToken cannot be cast to com.vmware.vim.sso.client.SamlToken)
As you can see here vRealize Orchestrator has communication issues with VMware vCenter Server. This issue needs to be addressed for vRealize Automation.
Screenshots:
vRealize Orchestrator – Error Message – OAuthToken cannot be cast to com.vmware.vim.sso.client.SamlToken
After finding the vRealize Orchestrator vSphere endpoints in an error state it was clear that this was the issue. vRealize Orchestrator is not successfully communicating with vCenter Server so this needs to be addressed.
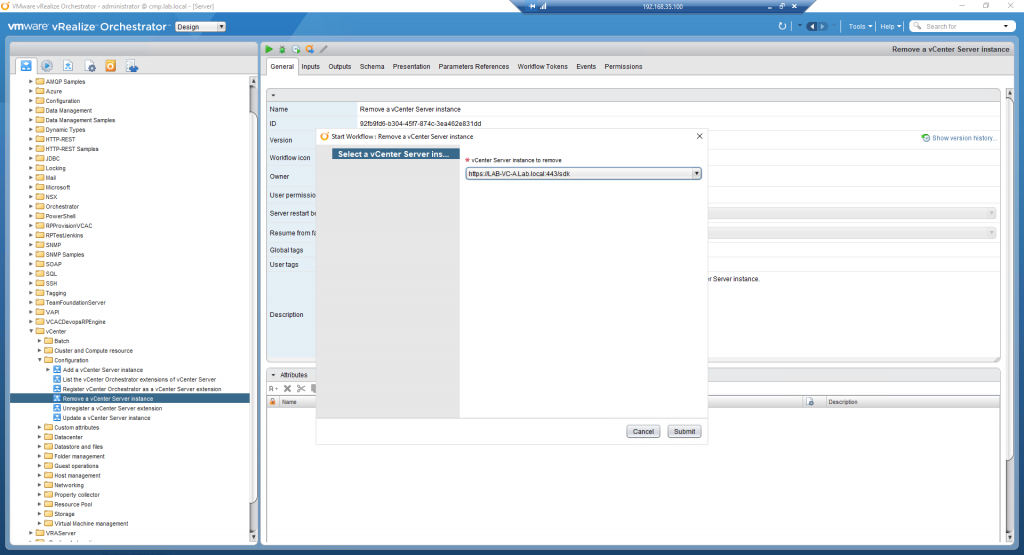
Procedure:
Open the vRealize Orchestrator Client (https://%vro-node-fqdn%).
Login with administrative credentials (example: administrator@vsphere.local).
Navigate to the following location “Library > vCenter > Configuration“.
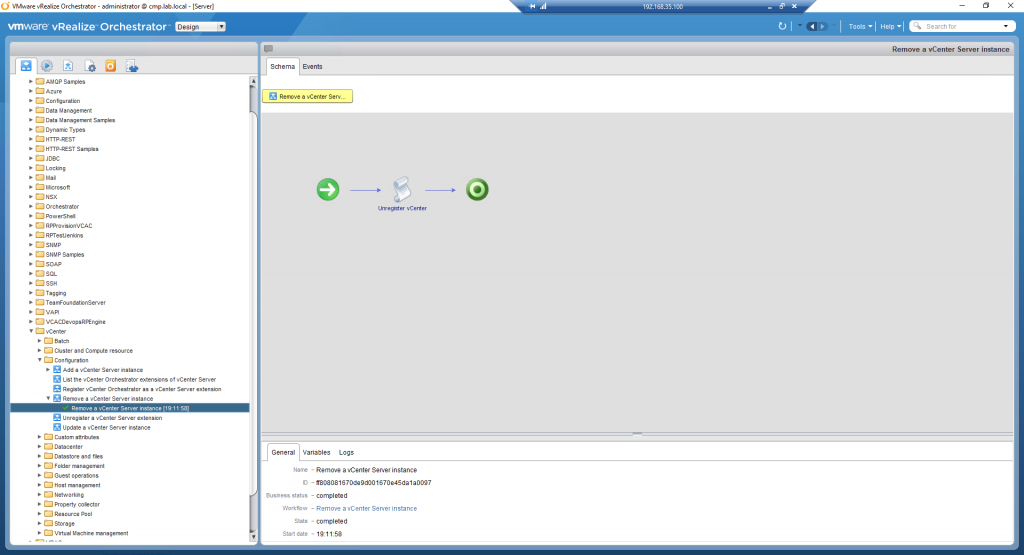
Run the following workflow “Remove a vCenter Server instance” (screenshot 01 & screenshot 02).
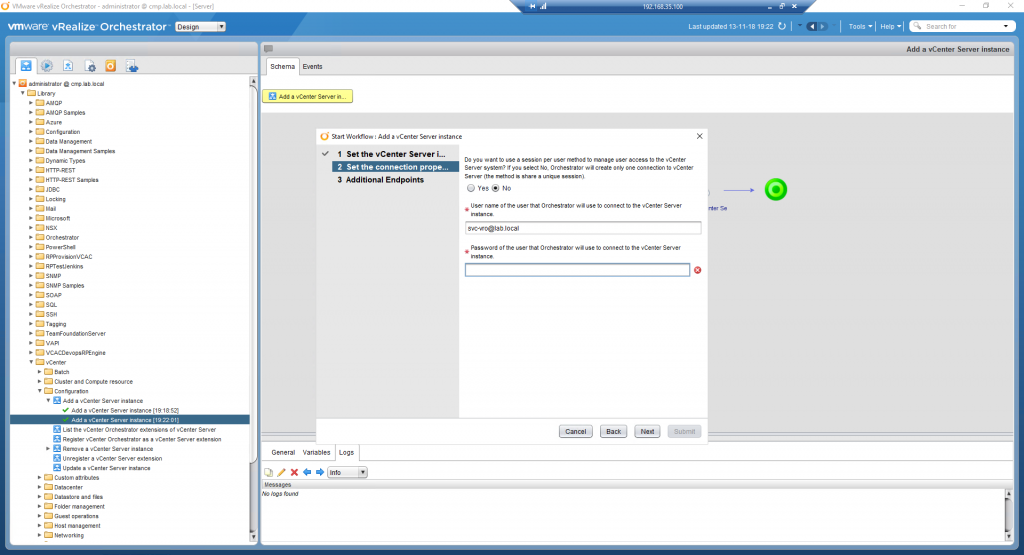
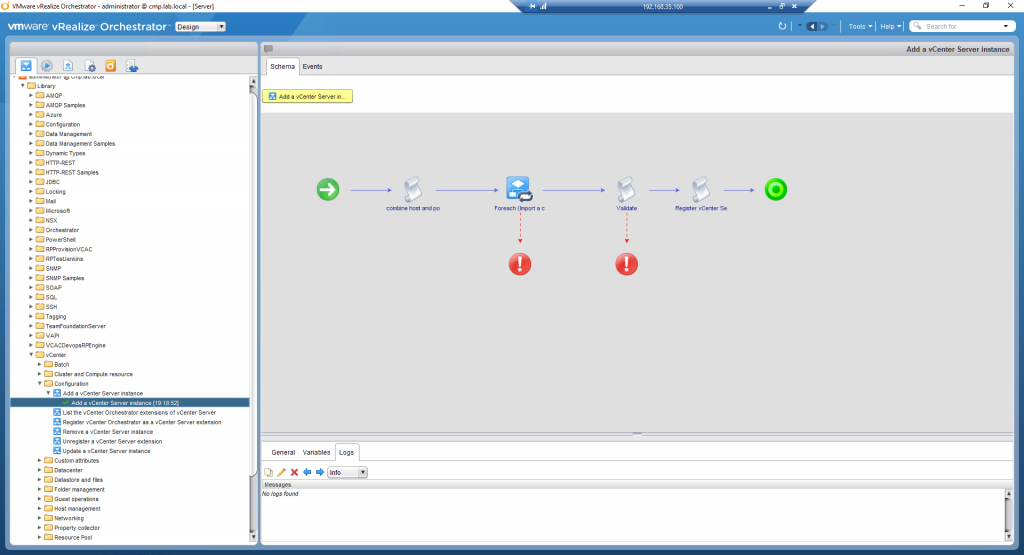
Run the following workflow “Add a vCenter Server instance” (screenshot 03 & screenshot 04).
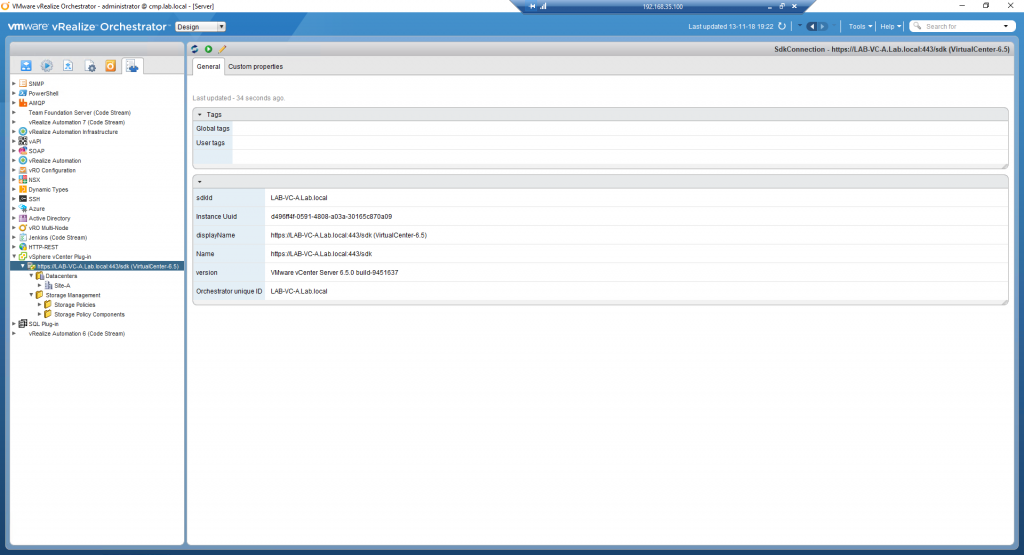
Validate the vRealize Orchestrator Endpoint Status (screenshots 05).
Lately, I encountered some issues related to VMware vSAN in my Lab environment. The error message that was popping up all the time was “PBM error occurred during PreCloneCheckCallback“.
So how did the problem occur? First, we start with some background information. My Lab environment is powered-on when needed and powered-off when not needed. This is, of course, a little bit different than a production 24×7 environment that you have in your datacenters worldwide.
The environment was booted successfully at first glance. We are talking about Domain Controllers, vCenter Server, VMware NSX-V, nested ESXi Hosts, and vRealize Automation. When I started deploying virtual machines with a vRealize Automation (vRA) based on blueprints with vSphere Templates issues started to occur.
vRealize Automation was failing on the provisioning task and was cleaning up the deployment because of the failed state (default behavior). So it was time to dig into the underlying infrastructure.
Environment
When the issue occurred the following software versions were used in my lab environment:
VMware vCenter 6.5 Update 2B
VMware vRealize Automation 7.3.1
VMware ESXi 6.5 Update 2
VMware vSAN 6.6
Error message(s)
Here is all the information that can be found in various locations surrounding the issue. Lets start with the screenshots. The first one is from VMware vCenter and the second one is from vRealize Automation. As you can see there is clearly a problem.
VMware vCenter – PBM error occurred during PreCloneCheckCallback
vRealize Automation – Service Unavailable (503)
And here is an overview of the error message(s). Here is the vRealize Automation log entry related to the VMware vSAN issue:
Error in Execute DynamicOps.Common.Client.HtmlResponseException: Service Unavailable (503)
Here is the VMware vCenter log entry related to the VMware vSAN issue:
A general system error occurred - PBM error occurred during PreCloneCheckCallback (2118557)
Solution
The solution is quick but is more like a quick fix because it comes back every time I re-start my lab environment (cold boot).
Procedure:
Open a web browser.
Navigate to your vCenter Server URL (https://%vc%/vsphere-client).
Login with a user that has administrator credentials (administrator@vsphere.local).
Navigate to Hosts & Clusters > Select the vCenter Object.
Click on the Configure tab.
Click on the Storage Providers.
Click on the following two buttons:
Synchronizes all Storage Providers with the current state of the environment.
Rescan the storage provider for new storage systems and storage capabilities.
After pressing the buttons, you don’t see any tasks running on the vCenter Server (expected behavior). After 5 seconds everything should be working and provisioning should be possible.
VMware vCenter – PBM error occurred during PreCloneCheckCallback – Solution
Wrap-up
Thanks for reading this blog post. If you have any comments, please respond in the comment section below!
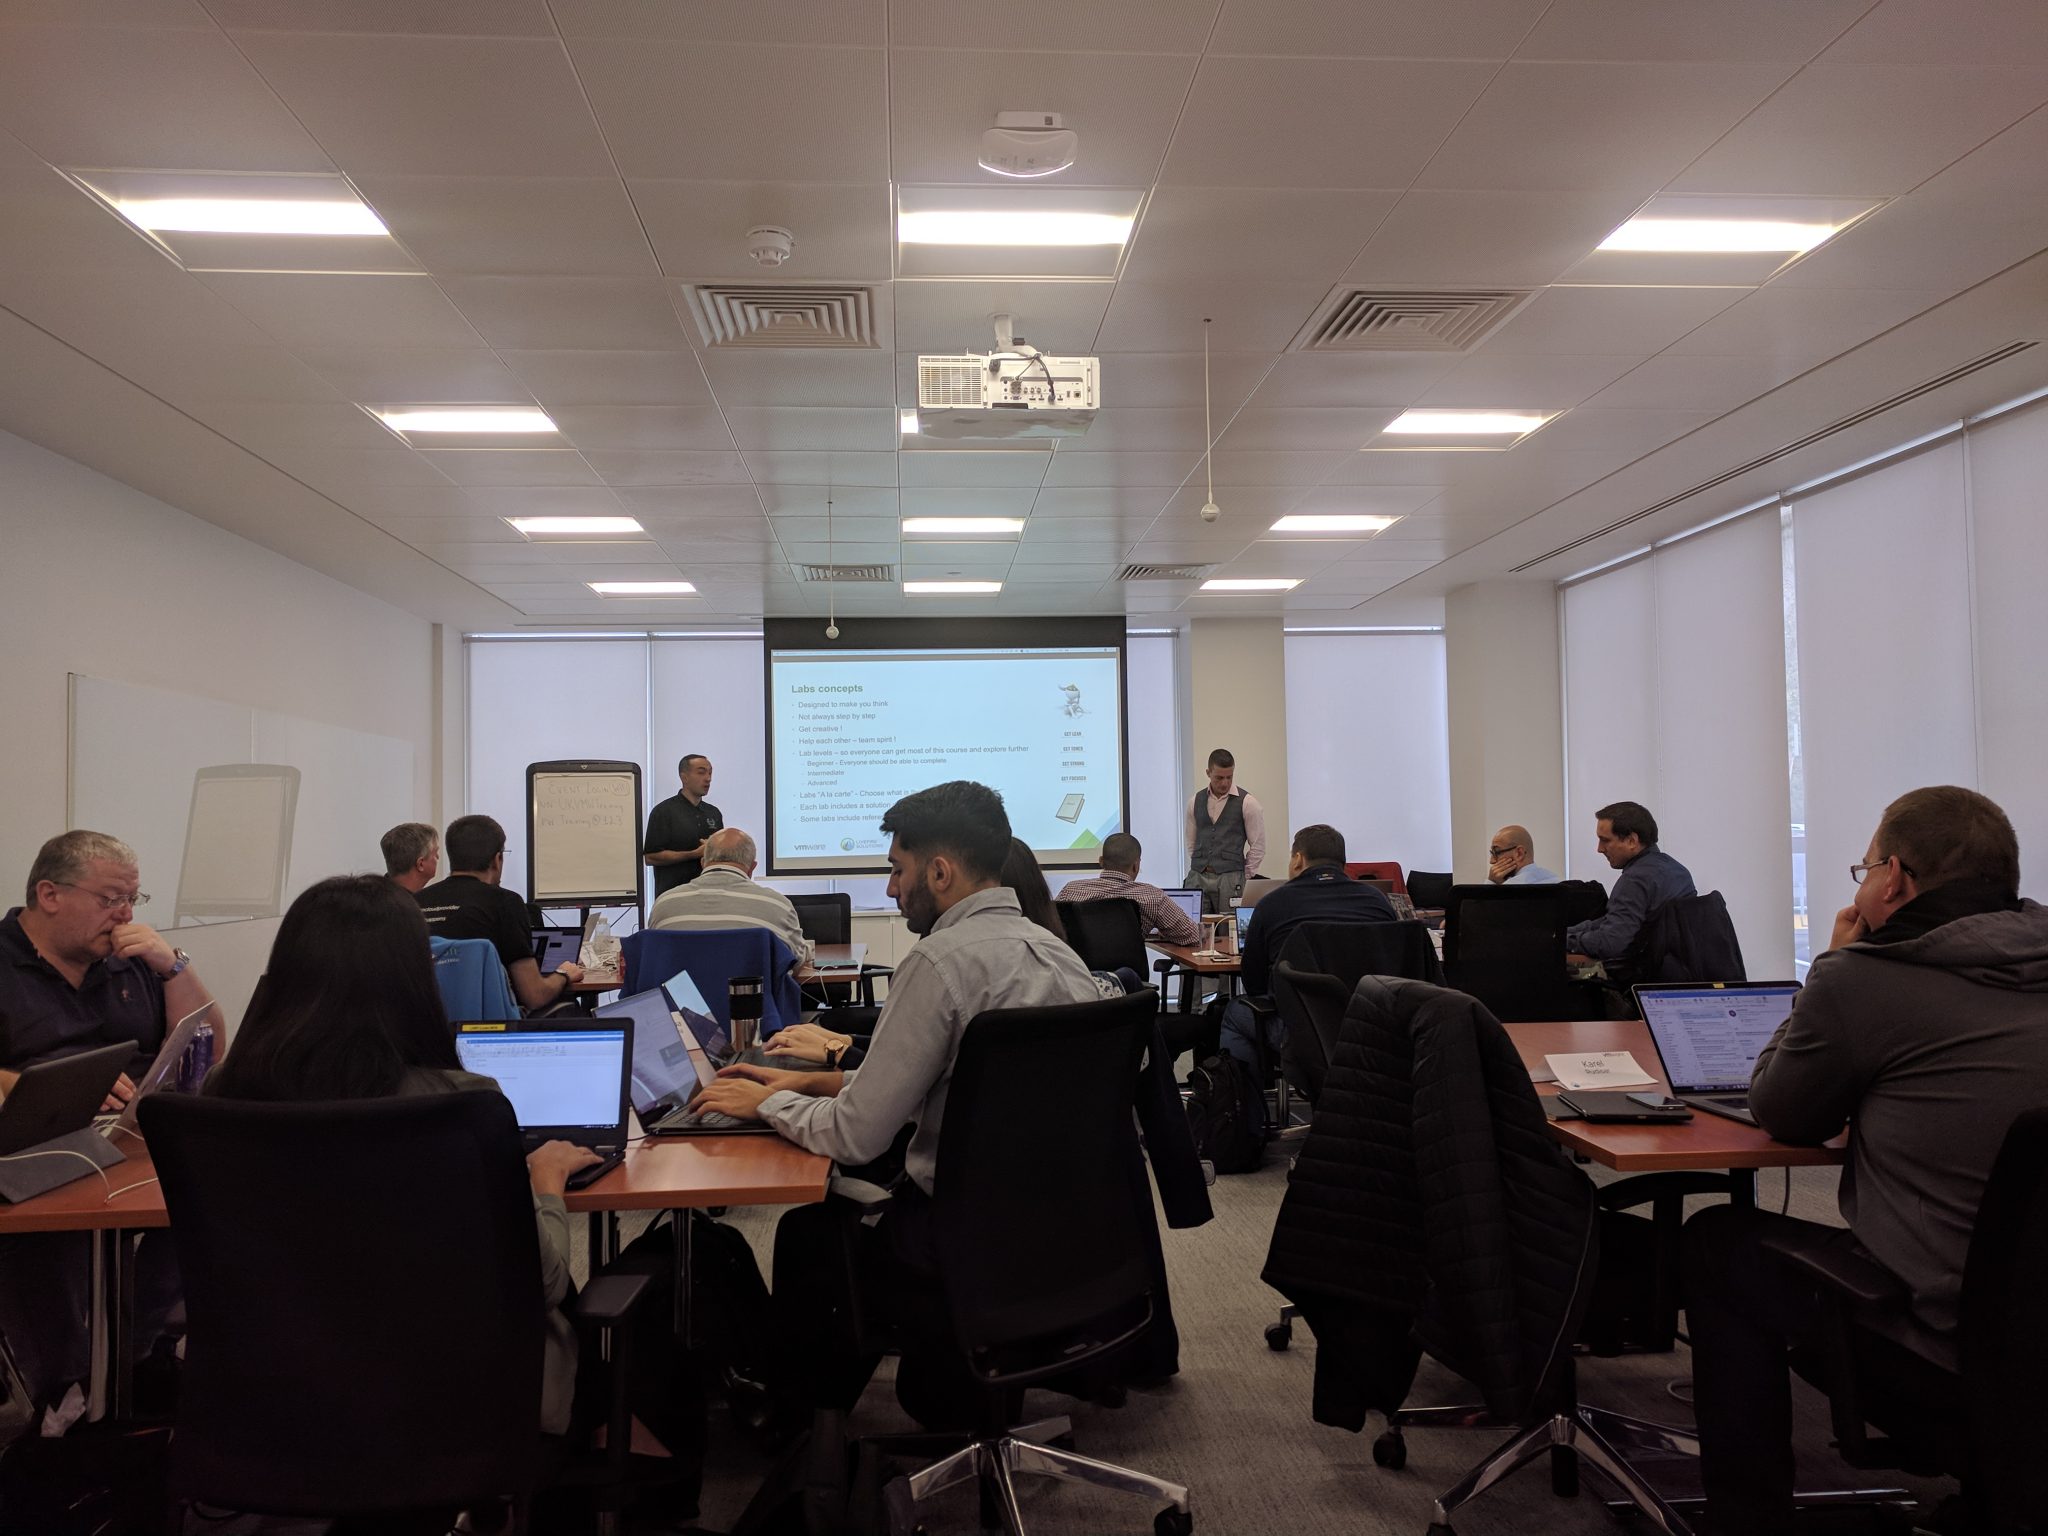
This week we (Vincent van Vierzen and myself) attended the vRO Master Class that was offered to us by our employee ITQ. It is a three-day course on-site in the VMware UK HQ in Staines. The class was attended by seventeen people from all over the EMEA region. Keep in mind: the Livefire courses are only available to VMware employees and VMware partners. The information shared at the Livefire is protected by the VMware NDA, so no information is covered here that will break the NDA.
Before we went to the vRO Master Class course we didn’t know what to expect. A couple of questions that went through our heads were: What would the expected technical level be? What items would be discussed and explained? Is it a theoretical or hands-on course?
On the first day, we got access to a dedicated HOL environment that has been build for the vRO Master Class and the vRealize Orchestrator history and architecture is explained. There was also a lot of talk about the new and coming features for vRealize Automation (vRA) and vRealize Orchestrator (vRO).
Day two was about Dynamic Types and the APIs available in vRealize Automation & vRealize Orchestrator. Christophe explained some projects he has done and blogged on his one website. There was just a lot of information available first hand.
Day three was about vRealize Orchestrator best practices. The best practices slides were extensive and were covering all the aspects. Examples were workflow performance and troubleshooting. They also covered workflow and action development. In the afternoon Spas covered the integration with Microsoft PowerShell and his first-hand experience.
The vRO Master Class course covered the following use cases that were relevant for in the real world:
Create a bunch of VMs (vCenter plug-in)
Resume a failed workflow
Leverage the vAPI
Create a Dynamic Types plug-in from scratch
Create a plug-in with the Dynamic Types plug-in generator
Extend the vRealize Automation Lifecycle with Event Broker
vRA 7.4 – Create a blueprint with an IP input field (Custom Forms & Iaas plug-in)
vRA 7.3 – Create a blueprint with an IP input field (CBP, XaaS, vRA CAFE & IaaS plug-in)
Leverage Dynamic Types Microsoft DNS plug-in with XaaS and XaaS Blueprint components
Create scalable Photon Swarm Blueprint
Use vRA Scalable XaaS components
Simple Database Integration (SQL Plug-in)
Using PowerShell Credential Delegation in vRO
Leverage Guest Operations with Script Manager
Use the vRO REST API
As consultants, we were also interested in vCloud Director use cases and real-world examples but they will be included in the new vRO Master Class in 2019. So in case you are going for vCD stuff wait for 2019.
Livefire instructors
The following instructors can be available for the vRO Master Class. We were lucky to have Spas Kaloferov and Christophe Decanini available for the three days. Here is an overview of the vRO Master Class instructors:
The vRO Master Class is really focused on vRealize Orchestrator. You have to be a vRO guy definitely to join this class. We think it is a good thing that there is a course available that is purely focused on vRO because VMware Education is more or less focused on the entire CMP.
The instructors were really qualified and experts on vRealize Orchestrator. Christophe is one of the original Dunes Technologies employees that came over to VMware when the product was acquired in 2007. He knows all the ins and outs about the Orchestrator product and the history related to chooses that have been made over time.
The balance between talking about the material and spending time in the lab environment could be improved. The course should be extended with an additional day to a total of four days (at least). This will bring the course more into balance and it introduces more time for the attendees to spend time on the labs and get more hands-on experience out of the course.
Sources
Here is a list of interesting sources related to the vRO Master Class course:
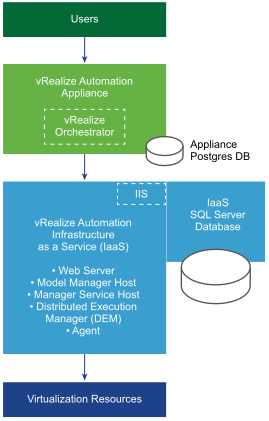
When deploying VMware vRealize Automation (vRA) you required to deploy a Windows Server that is responsible for the SQL Server Database. It does not matter if it is a small, medium or large deployment. All deployments require a Microsoft SQL Server. The Microsoft SQL Server is the database for the vRealize Automation IaaS components and is responsible for maintaining information about the machines it manages and its own elements and policies.
In this article, I’m going to describe the vRealize Automation SQL Database Installation with an automated/unattended PowerShell script. This article is mainly focused on the IaaS database part, so no additional information surrounding the installation of vRealize Automation components is descriped.
Requirements
The following items need to be performed before running the script:
Download the latest Microsoft SQL 2016 Server media from the Microsoft website (SQL 2016 – link).
Download the latest Microsoft SQL Server Management Studio from the Microsoft website (SSMS – link).
Create a virtual machine with Windows Server 2016 installed.
LAB-vRA-IAAS.Lab.local – Running Windows Server 2016 responsible for vRealize Automation IaaS Components
LAB-vRA-SQL.Lab.local – Running Windows Server 2016 responsible for the vRealize Automation IaaS SQL Database
vRealize Automation – Minimal Deployment
Note
Keep in mind the following items:
The installation code/script for Microsoft SQL Server is tested with the following versions (2016 Non-SP / 2016 SP1 / 2016 SP2). No doubt the code will work with newer releases but make sure to verify all your settings after installation.
I do not take any responsibility and I’m are not liable for any damage caused by this code.
I did not create a script that fully automates everything. It is based on one-liners with a complete configuration. The reason behind this is flexibility. Every environment is different and every customer is different. This way small tweaks can be made to parts of the code or you just use sections of the code.
Video
To display the full functionality of the code I recorded a video and uploaded it to YouTube. You can see the end result below. The video shows you the execution of the one-liners and what the server is configuring. The video starts after the requirements phase is completed.
Unattended Installation Files
So let’s list all the steps that are executed on the new Windows Server to make it ready to store the vRealize Automation IaaS Database:
Format the D drive and make sure it is using a 64k allocation unit size for storing the Database
Format the E drive and make sure it is using a 64k allocation unit size for storing the TempDB
Format the F drive and make use of a default allocation unit size for storing the log files
Assign both domain service accounts local administrator access on the server (svc-iaas / svc-vra–sql)
Create a Windows Firewall rule to allow SQL traffic on the network
Enable multiple Windows Firewall rules to allow the Microsoft Distributed Transaction Coordinator (DTC)
Install Microsoft SQL Server Management Studio
Install Microsoft SQL Server 2016
Reboot the system
Configure the Microsoft Distributed Transaction Coordinator (DTC).
Reboot the system
Verify the system and functioning of the SQL Server
Optional:
In some cases, an additional G drive is required to store the SQL Backup.
PowerShell One-Liners
This file is saved as “Microsoft SQL Server 2016 – Commands.ps1” in the “C:\Temp” directory. The SQL Server media is mounted in the B drive (CD-ROM). The SQL Management Studio installation file is located in the “C:\Temp” directory.
##### Files required
# - Microsoft SQL Server 2016 Installation File
# - Microsoft SQL Management Studio 2016 Installation File

##### Volume 1 - DB 64k
$Disk = Get-Disk -Number 1
Set-Disk -InputObject $Disk -IsOffline $false
Initialize-Disk -InputObject $Disk
New-Partition $Disk.Number -UseMaximumSize -DriveLetter D
Format-Volume -DriveLetter D -FileSystem NTFS -AllocationUnitSize 65536 -NewFileSystemLabel "DB" -Confirm:$false

##### Volume 2 - TEMP DB 64k
$Disk = Get-Disk -Number 2
Set-Disk -InputObject $Disk -IsOffline $false
Initialize-Disk -InputObject $Disk
New-Partition $Disk.Number -UseMaximumSize -DriveLetter E
Format-Volume -DriveLetter E -FileSystem NTFS -AllocationUnitSize 65536 -NewFileSystemLabel "TEMP DB" -Confirm:$false

##### Volume 3 - Logs 4k
$Disk = Get-Disk -Number 3
Set-Disk -InputObject $Disk -IsOffline $false
Initialize-Disk -InputObject $Disk
New-Partition $Disk.Number -UseMaximumSize -DriveLetter F
Format-Volume -DriveLetter F -FileSystem NTFS -NewFileSystemLabel "Logs" -Confirm:$false

##### Make the service account member of the local administrators group
Add-LocalGroupMember -Group "Administrators" -Member "svc-vra-iaas"
Add-LocalGroupMember -Group "Administrators" -Member "svc-vra-sql"

##### Windows Firewall

    ### Windows Firewall - Allow Microsoft SQL Port 1433 TCP
    New-NetFirewallRule -DisplayName "Microsoft SQL Server 2016 - SQL - TCP" -Direction Inbound -LocalPort 1433 -Protocol TCP -Action Allow

    ### Windows Firewall - Enable rule for RPC for DTC
    Enable-NetFirewallRule -DisplayName "Distributed Transaction Coordinator (RPC-EPMAP)"

    ### Windows Firewall - Enable rule for Incoming DTC
    Enable-NetFirewallRule -DisplayName "Distributed Transaction Coordinator (TCP-In)"

    ### Windows Firewall - Enable rule for Outgoing DTC
    Enable-NetFirewallRule -DisplayName "Distributed Transaction Coordinator (TCP-Out)"

##### Microsoft SQL Management Studio
C:\Temp\SSMS-Setup-ENU.exe /install /passive /norestart

##### Microsoft SQL Server 2016
B:\Setup.exe /ConfigurationFile="C:\Temp\Microsoft SQL Server 2016 - Configuration.ini"

##### Reboot the server
shutdown -r -t 0

##### Configure the Microsoft Distributed Transaction Coordinator (DTC)
Set-DtcNetworkSetting -DtcName "Local" -RemoteClientAccessEnabled:$true -RemoteAdministrationAccessEnabled:$false -AuthenticationLevel "Mutual" -InboundTransactionsEnabled:$true -OutboundTransactionsEnabled:$true -XATransactionsEnabled:$false -LUTransactionsEnabled:$true -Confirm:$false

##### Reboot the server
shutdown -r -t 0
This file is saved as “Microsoft SQL Server 2016 – Configuration.ini” in the “C:/Temp” directory.
; ************************************************************************************************************************
; Author:       M. Buijs
; Version:      1.0
; Date:         2018-09-26
;
; Information:
; This configuration file is created to install the Microsoft SQL Server 2016 software for VMware vRealize Automation.
;
; VMware Requirements:
; - Enable TCP/IP protocol for SQL Server.
; - The Microsoft Distributed Transaction Coordinator Service (MS DTC) is enabled on all SQL nodes in the system. MS DTC is required to support database transactions and actions such as workflow creation.
; - If you have a firewall running between the database server, Web servers or IaaS servers, deactivate the firewall or open the ports needed (MS SQL server uses port 1433 and MS DTC requires the use of port 135 over TCP and a random port between 1024 and 65535).
; - The database service account needs to be local administrator on the server (svc-vra-sql).
; - The IaaS service account needs to be local administrator on the server (svc-vra-iaas).
; - Set up Microsoft SQL server with separate OS volumes for SQL Data, Transaction Logs, TempDB, and Backup.
; - The NTFS drive where SQL Server is installed has a file allocation unit (cluster) size of 64 KB.
; ************************************************************************************************************************

[OPTIONS]

; SQL Server - Workflow

    ; Setup Workflow (Install/Uninstall/Upgrade)
    ACTION="Install"

    ; SQL Server - Accept License Agreement (True = Automatically accepted / False = Users needs to accept)
    IACCEPTSQLSERVERLICENSETERMS="True"

    ; Specify that SQL Server feature usage data can be collected and sent to Microsoft.
    SQMREPORTING="False"
    ERRORREPORTING="False"

; SQL Server - Unatteded

    ; Parameter that controls the user interface behavior.
    ; UIMODE="Normal"

    ; Setup will not display any user interface.
    ; QUIET="True"

    ; Setup will display progress only, without any user interaction.
    QUIETSIMPLE="True"

    ; Specifies that the detailed Setup log should be piped to the console.
    INDICATEPROGRESS="False"

    ; Specify if errors can be reported to Microsoft to improve future SQL Server releases.
    ERRORREPORTING="True"

    ; Displays the command line parameters usage
    HELP="False"

    ; RSInputSettings_RSInstallMode_Description
    RSINSTALLMODE="DefaultNativeMode"

; SQL Server - Installation Features

    ; Specifies features to install, uninstall, or upgrade.
    FEATURES=SQLENGINE

    ; Language Pack (English / United States)
    ENU="True"

; SQL Server - Updates

    ; Specify whether SQL Server Setup should discover and include product updates.
    UpdateEnabled="True"

    ; Specify the location where SQL Server Setup will obtain product updates (MU = Microsoft Update).
    UpdateSource="MU"

; SQL Server - Installation Directory

    ; Specify the root installation directory for shared components.
    INSTALLSHAREDDIR="D:\Program Files\Microsoft SQL Server"

    ; Specify the root installation directory for the WOW64 shared components.
    INSTALLSHAREDWOWDIR="D:\Program Files (x86)\Microsoft SQL Server"

    ; Default directory for the Database Engine backup files.
    ; SQLBACKUPDIR="<InstallSQLDataDir>\<SQLInstanceID>\MSSQL\Backup"

    ; Default directory for the Database Engine user databases.
    SQLUSERDBDIR="D:\Database"

    ; Directory for Database Engine TempDB files.
    SQLTEMPDBDIR="E:\TempDB"

    ; Default directory for the Database Engine user database logs.
    SQLUSERDBLOGDIR="F:\Logs"

; SQL Server - Instance

    ; Specify a default or named instance. MSSQLSERVER is the default instance for non-Express editions and SQLExpress for Express editions.
    INSTANCENAME="MSSQLSERVER"

    ; Specify the Instance ID for the SQL Server features you have specified.
    INSTANCEID="MSSQLSERVER"

    ; Specify the installation directory.
    INSTANCEDIR="D:\Program Files\Microsoft SQL Server"

    ; Specifies a Windows collation or an SQL collation to use for the Database Engine.
    SQLCOLLATION="SQL_Latin1_General_CP1_CI_AS"

    ; Level to enable FILESTREAM feature at (0, 1, 2 or 3).
    FILESTREAMLEVEL="0"

; SQL Server - SA Account

    ; Specifies the password for the SQL Server SA account.
    SAPWD="VMware1!"

    ; Specifies the security mode for SQL Server.
    SECURITYMODE=SQL

; SQL Server - Service Access

    ; Windows account(s) to provision as SQL Server system administrators.
    SQLSYSADMINACCOUNTS="Lab.local\Administrator" "BUILTIN\Administrators"

    ; Provision current user as a Database Engine system administrator for SQL Server 2012 Express.
    ADDCURRENTUSERASSQLADMIN="False"

; SQL Server - Connection Support

    ; Specify 0 to disable or 1 to enable the TCP/IP protocol.
    TCPENABLED="1"

    ; Specify 0 to disable or 1 to enable the Named Pipes protocol.
    NPENABLED="0"

    ; CM brick TCP communication port
    COMMFABRICPORT="0"

    ; How matrix will use private networks
    COMMFABRICNETWORKLEVEL="0"

    ; How inter brick communication will be protected
    COMMFABRICENCRYPTION="0"

    ; TCP port used by the CM brick
    MATRIXCMBRICKCOMMPORT="0"

; SQL Server - Agent Service and Service Account

    ; Auto-start service after installation.
    AGTSVCSTARTUPTYPE="Manual"

    ; Specifies the account for the SQL Server Agent service.
    AGTSVCACCOUNT="NT AUTHORITY\SYSTEM"

    ; Required Specifies the password for SQL Server Agent service account.
    ;AGTSVCPASSWORD=""

; SQL Server - Browser Service and Service Account

    ; Startup type for Browser Service.
    BROWSERSVCSTARTUPTYPE="Disabled"

; SQL Server - Server Service Account

    ; Startup type for the SQL Server service.
    SQLSVCSTARTUPTYPE="Automatic"

    ; Account for SQL Server service: Domain\User or system account.
    SQLSVCACCOUNT="Lab.local\svc-vra-sql"

    ; Specifies the password for SQLSVCACCOUNT.
    SQLSVCPASSWORD="heT5S-AbEsagu7ad"

; SQL Server - Report Server Service and Service Account

    ; Specifies how the startup mode of the report server NT service.
    RSSVCSTARTUPTYPE="Manual"

    ; Specifies which account the report server NT service should execute under.
    RSSVCACCOUNT="NT AUTHORITY\SYSTEM"

    ; Specifies the password for the startup account for the Reporting Services service.
    ;RSSVCPASSWORD=""
This blog post helps you to set up a Microsoft SQL Server 2016 for vRealize Automation 7.X. The code can be used in lab and production environments but make sure to verify the configuration. I think there might be more improvements possible related to the one-lines but maybe also additional SQL configuration improvements. Do you have feedback please respond below or send me an email.
Sources
To create this article and scripts I used the following resources:
Update 2018-10-04 – Article was missing the Microsoft Distributed Transaction Coordinator (DTC) information and code (video recording is still missing that part).
This blog post is dedicated to the VMworld 2018 US announcements. In the post, you will find the articles, links and highlights. VMworld 2018 US is an event that is organized by VMware. The US version is a five-day event that is held in Las Vegas. It takes place from 26 August to 30 August 2018. This page will be updated multiple times to coming days to add additional information and the latest announcements.
Please reply underneath this blog post if you have some additional information. This can also be additional links or blogs posts.
VMworld 2018 US – Product Announcements
In this chapter are all the product announcements. I can tell you there are a lot of announcements made at VMworld 2018.
vRealize Automation (vRA) 7.5
One the first day of VMworld 2018 US vRealize Automation 7.5 was announced.
On the first day of VMworld 2018 US vRealize Network Insight 3.9 was announced.
The key highlights are:
Plan micro-segmentation and get visibility for NSX Data Center, including NSX-T
Enhanced security for service access with Multi-factor Authentication
Custom dashboard support for Cisco ASA firewall and enhancements to Checkpoint Firewall support
Many customers are now using VMware Network Insight as a service, and customers based in Europe now also have the option of using the VMware Network Insight service hosted out of London, UK.
On the first day of VMworld 2018 US, a new vSphere edition was announced. The product is called vSphere Platinum and it has a tight integration with VMware AppDefense.
The key highlights are:
Benefits for vSphere Admins
Gain visibility into the intent of each virtual machine, and a detailed inventory of application assets and context.
Understand how applications behave and be alerted to potential issues and deviations.
Shrink the attack surface and reduce the risk of security compromise. Establish a simple and powerful way to collaborate with security, compliance and application teams.
Get better visibility and protection with a simple, light-weight and scalable security solution, with no agents to manage, and minimal overhead.
Use what you already own, understand, and run in your data center – vSphere – with its unique visibility, automation and isolation qualities.
Play a larger and critical role in the security of your entire IT environment – Be the Security Hero!
Benefits for Security Teams
Better visibility and situational awareness of application behaviours, and virtual machine purpose.
Faster detection, analysis, and time to response – quickly understand attacks and make fast decisions using application context and scope.
Enhance existing security tools and support compliance efforts through contextual visibility and alerts into application communications and deviations.
Lower false positives – integrated behavioural analytics and machine learning offer a more precise method to identify and respond to threats.
Big data correlation for better identification and context using cloud SaaS model.
Security as an agile business enabler – support DevOps environment through continuous learning and protection.
Easily Coordinate with vSphere Admins and Application teams for better security while respecting existing workflows & maintaining separation of duties.
Secure Applications
VMware AppDefense – Protects the integrity of applications running on vSphere, using machine learning to monitor against threats and automate responses. AppDefense locks down the guest operating system for all applications, the VMware application stack and third-party applications. To accomplish this, AppDefense gathers inventory data on virtual machines and applications from vCenter Server, development tools, and automation frameworks and applies machine learning to discover the intended state and establish the known good behaviours for the application and machine. Any deviations from this state are detected and prevented, securing the integrity of the applications, infrastructure, and guest operating system. AppDefense provides detailed visibility for better change management and compliance reporting and also provides a rich set of automated or orchestrated incident response mechanisms to address attacks. Moreover, it leverages machine learning for a simple and automated way to conduct audits and reviews for applications.
Secure Data
FIPS 140-2 Validated VM Encryption, and cross-vCenter Encrypted vMotion – Secure against unauthorized data access both at rest and in motion, across the hybrid cloud. Secure Infrastructure
Secure Boot for ESXi – Allows only VMware and Partner signed code to run in your hypervisor. Secure Boot for Virtual Machines – Helps prevent images from being tampered with and prevents the loading of unauthorized components.
Support for TPM 2.0 for ESXi – Enables hypervisor integrity by validating the Secure Boot for ESXi process and enables remote host attestation.
Virtual TPM 2.0 – Provides the necessary support for guest operating system security features while retaining operational features such as vMotion and disaster recovery.
Support for Microsoft Virtualization Based Security – Supports Windows 10 and Windows 2016 security features, like Credential Guard, on vSphere.
Secure Access
Audit Quality Logging – Enables authorized administration and control by providing high fidelity visibility in vSphere operations.
Also, the VMware Validated Design (VVD) received some new features and changes to the documentation. Personally, the greatest value in this release is the Visio stencils that are available for everyone.
The key highlights are:
Official NSX-T Support
Documentation Updates
IT Automating IT Scenarios
Intelligent Operations Scenarios
Introduction to Security and Compliance
Operational Verification
Certificate Replacement for 2-pod
Certificate Replacement for 1-pod
Architecture and Design of VMware PKS for Workload Domains
There were also a lot of announcements surrounding some new developments/projects.
Project list:
Project Concord – Project Concord uses Byzantine fault-tolerant consensus protocols to deliver a functioning distributed trust system: one that is both “safe” and “alive.” Concord is a generic state machine replication library that can handle malicious (Byzantine) replicas.
Project Dimension – Project Dimension will extend VMware Cloud to deliver SDDC infrastructure and hardware as-a-service to on-premises locations.
Project Magna – Project Magna will make possible a self-driving data center based on machine learning.
RDS on VMware – VMware demonstrated how Amazon Web Service’s RDS service will run on VMware in a private data center, thus offering developers a familiar RDS Functionality available on VMware in a private data center or at the Edge.
Virtualization on 64-bit ARM for Edge – VMware demonstrated ESXi on 64-bit ARM running on a windmill farm at the Edge.
Just like every year, William Lam from the website virtuallyGhetto creates a GIT repository with all the VMworld sessions. For each session, a recording and presentation are provided. It will probably be a couple of days till weeks until all sessions become available.
In this blog post, I am going to show you how to enable the VMware Identity Manager GUI when it is located inside vRealize Automation. I am going to explain why you sometimes should and how the procedure is performed.
For some who don’t know, VMware vRealize Automation (vRA) is using under the covers VMware Identity Manager (vIDM). By default is the VMware Identity Manager GUI disabled after the vRealize Automation installation process. If you want to configure parts of vIDM you are configuring it through the vRealize Automation GUI.
Let’s get everybody on the same page: So you are talking about two GUIs the vRealize Automation GUI and the VMware Identity Manager GUI? Who is who, explain it to me!
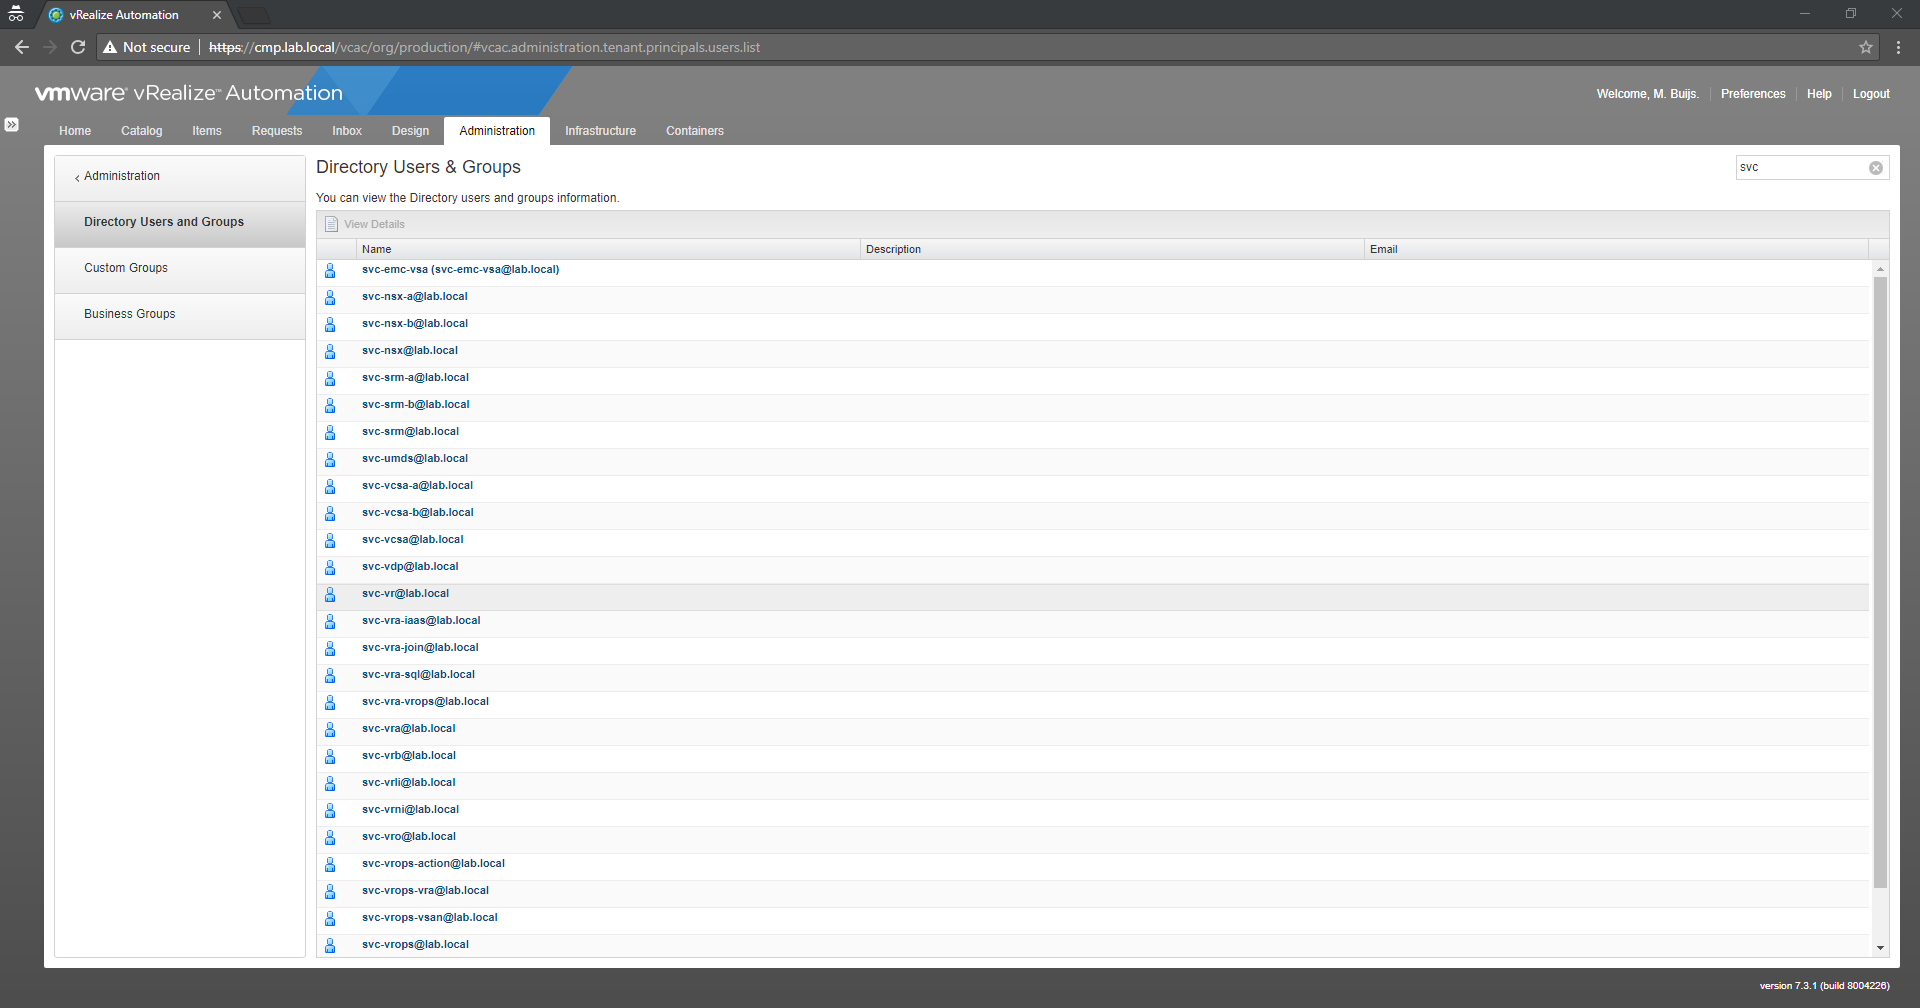
Here is the vRealize Automation (vRA) GUI – Displaying multiple Active Directory users
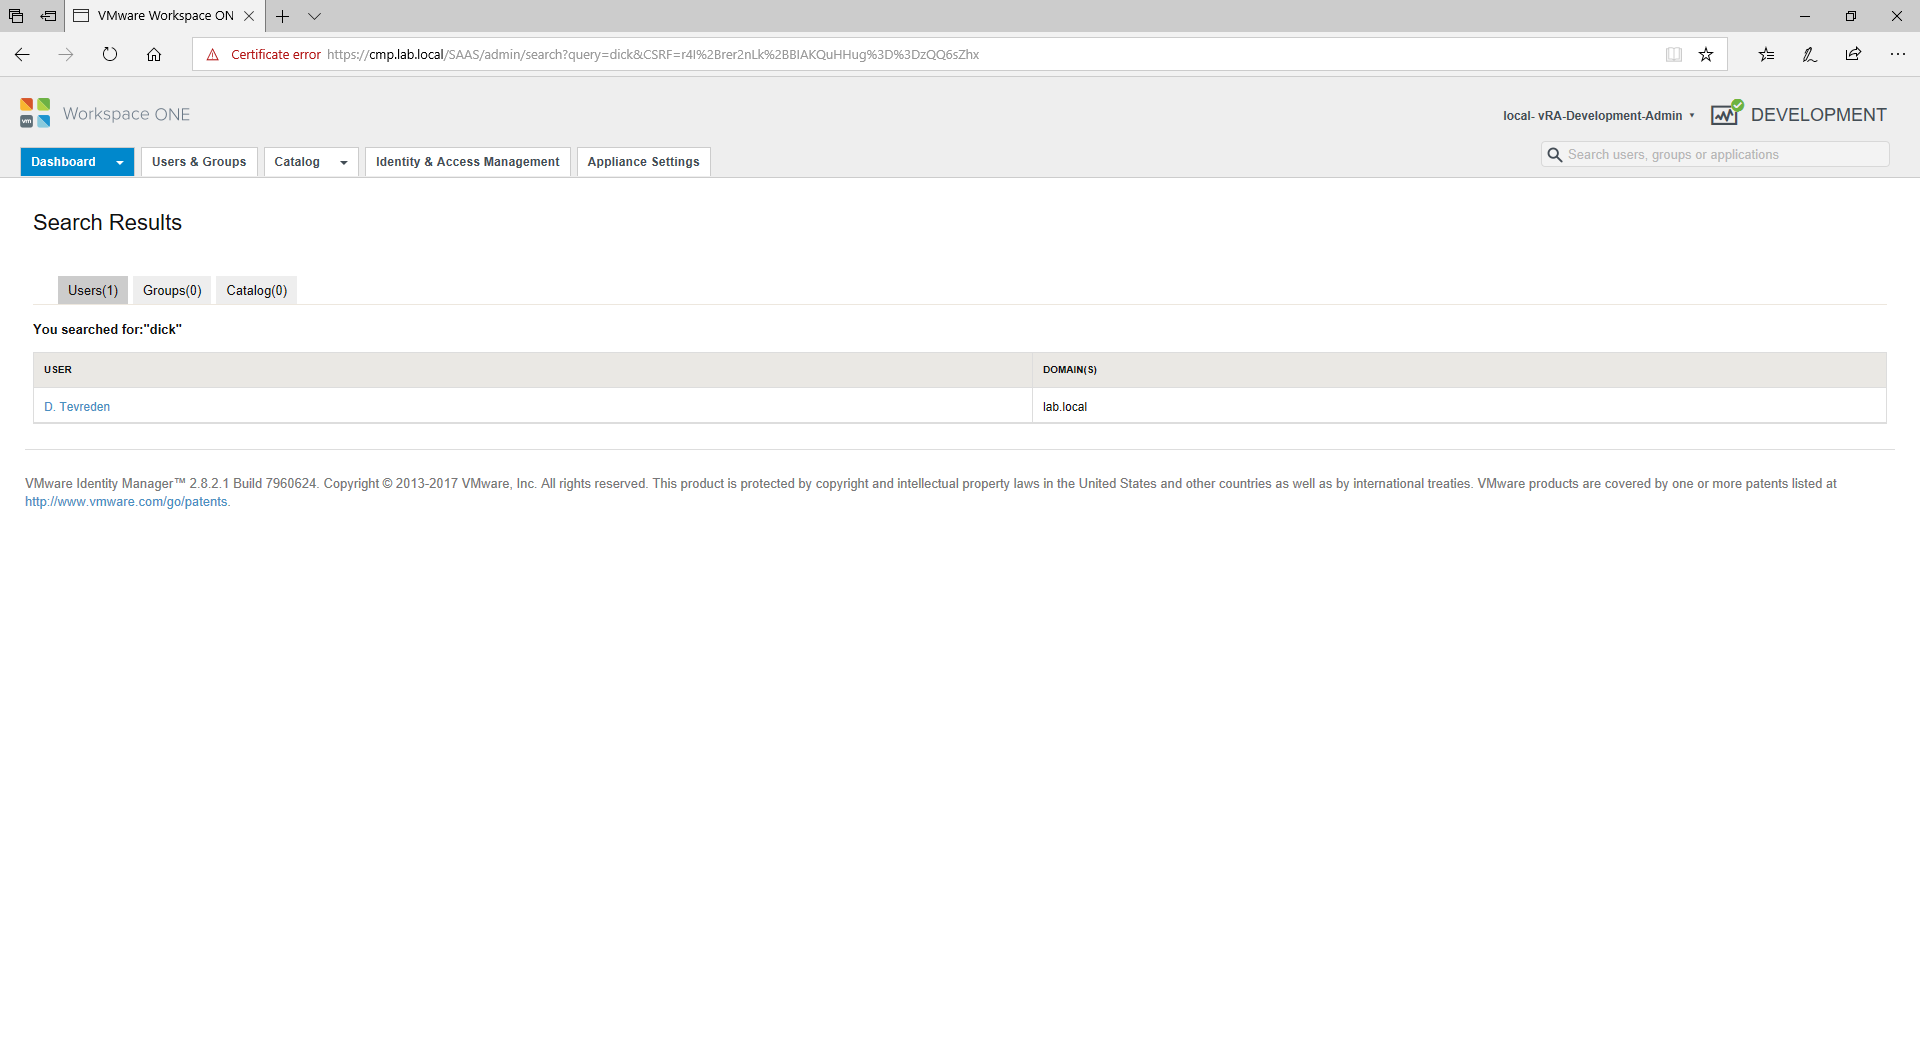
Here is the VMware Identity Manager (vIDM) GUI – Displaying an Active Directory user (by the way: the name Dick is a common name in The Netherlands)
Keep in mind: I’m not completely sure what will happen if you would configure items with the vIDM GUI. Because you are bypassing the default vRealize Automation GUI. I have done some tests and no problems were caused in my Lab environment but it might cause issues later on… So why do you enable it then? Because of the large amount of information provided throughout the vIDM GUI. The vRealize Automation GUI is only showing a small peace and not the big picture.
Product support: I have tested this procedure on vRealize Automation version 7.3 and vRealize Automation 7.3.1. I would expect it to work on newer and older vRealize Automation 7.X releases.
Enable the vIDM Interface
This procedure is for enabling the interface:
Step 01: Connect with an SSH session to the vRealize Automation Appliance. Use for example Putty.
Step 02: Login with the root credentials.
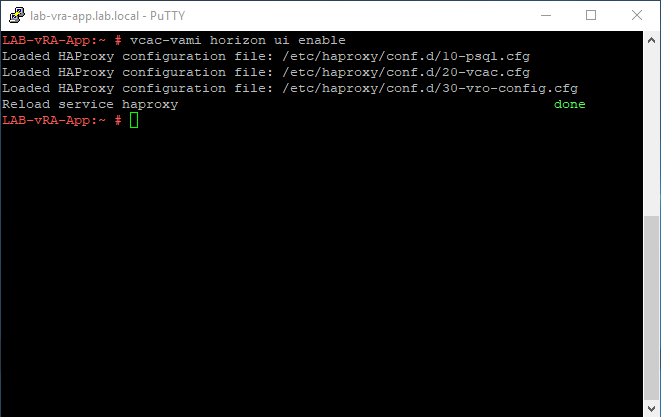
Step 03: Run the following command to start the VMware Identity Manager Interface: (vcac–vami horizon ui enable).
Step 04: Open a web browser and navigate to the following URL:(https://%FQDN%/SAAS/admin/).
VMware Identity Manager (vIDM) interface enable
Disable the vIDM Interface
This procedure is for disabling the interface:
Step 01: Connect with an SSH session to the vRealize Automation Appliance. Use for example Putty.
Step 02: Login with the root credentials.
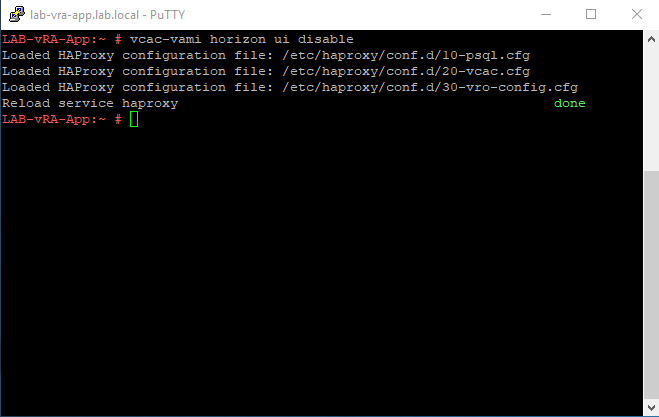
Step 03: Run the following command to stop the VMware Identity Manager Interface: (vcac–vami horizon ui disable).
Step 04: When you navigate to the following URL no page should appear: (https://%FQDN%/SAAS/admin/).
VMware Identity Manager (vIDM) interface disable
Status of the vIDM Interface
This procedure is for viewing the vIDM Interface status:
Step 01: Connect with an SSH session to the vRealize Automation Appliance. Use for example Putty.
Step 02: Login with the root credentials.
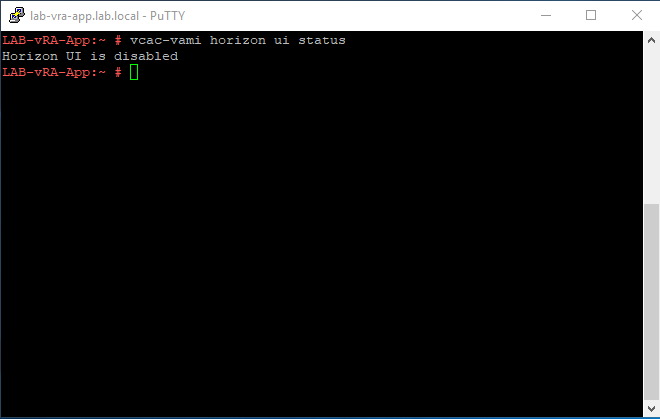
Step 03: Run the following command to view the current status of the VMware Identity Manager Interface: (vcac–vami horizon ui status).
Step 04: When you navigate to the following URL no page should appear: (https://%FQDN%/SAAS/admin/).
VMware Identity Manager (vIDM) interface status
VMware Identity Manager URLs
The following URLs are available when the GUI is enabled (there are probably more URLs available than listed below):
To explain what happens under the covers is the following: When you run the command to start or stop vIDM interface the reverse proxy configuration located in vRealize Automation Appliance (vRA) is changed. The command adds or removes some configuration files. Then the proxy daemon is reloaded to pick up the changes. At that point, the vIDM webpage becomes available or unavailable depending on the given command. Under the covers, vRealize Automation uses HAProxy for IT guys working in container or web hosting environments that might be a very familiar product. Here is a quote from the HAProxy website to explain what HAProxy is capable of:
HAProxy is a free, very fast and reliable solution offering high availability, load balancing, and proxying for TCP and HTTP-based applications. It is particularly suited for very high traffic websites and powers quite a number of the world’s most visited ones. Over the years it has become the de-facto standard opensource load balancer, is now shipped with most mainstream Linux distributions, and is often deployed by default in cloud platforms. Since it does not advertise itself, we only know it’s used when the admins report it.
https://www.haproxy.org/#desc
VMware Identity Manager GUI Advantages
The main advantages of enabling the GUI:
You can view the currently logged in users in vRealize Automation.
When logging into the default tenant in the vIDM GUI you can view the total amount of users and groups that are identified by vIDM (counters are from all tenants combined).
You can view the health status of VMware Identity Manager (vIDM).
You can view the user login history based on the last days and you have reporting functionality.
Final word
In this blog post, I explained how to enable and disable the VMware Identity Manager interface on a vRealize Automation Appliance. As noted before be careful! I personally only use this method for troubleshooting Identity Manager related problems with authentication and viewing user activity.
Content Update
The following items have been verified:
2020-09-24: This is still working on vRealize Automation 7.6.


")