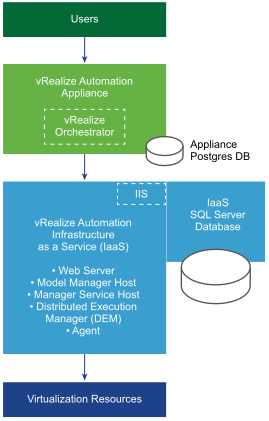
When deploying VMware vRealize Automation (vRA) you required to deploy a Windows Server that is responsible for the SQL Server Database. It does not matter if it is a small, medium or large deployment. All deployments require a Microsoft SQL Server. The Microsoft SQL Server is the database for the vRealize Automation IaaS components and is responsible for maintaining information about the machines it manages and its own elements and policies.
In this article, I’m going to describe the vRealize Automation SQL Database Installation with an automated/unattended PowerShell script. This article is mainly focused on the IaaS database part, so no additional information surrounding the installation of vRealize Automation components is descriped.
Requirements
The following items need to be performed before running the script:
- Download the latest Microsoft SQL 2016 Server media from the Microsoft website (SQL 2016 – link).
- Download the latest Microsoft SQL Server Management Studio from the Microsoft website (SSMS – link).
- Create a virtual machine with Windows Server 2016 installed.
- Install the latest Windows Updates.
- Configure a static IP address.
- Join the server to your company domain.
Environment
In my lab environment, I was deploying a minimal vRealize Automation installation with an external database. This means the following virtual machines are deployed for the vRealize Automation environment:
- LAB-vRA-APP.Lab.local – vRealize Automation Appliance
- LAB-vRA-IAAS.Lab.local – Running Windows Server 2016 responsible for vRealize Automation IaaS Components
- LAB-vRA-SQL.Lab.local – Running Windows Server 2016 responsible for the vRealize Automation IaaS SQL Database
Note
Keep in mind the following items:
- The installation code/script for Microsoft SQL Server is tested with the following versions (2016 Non-SP / 2016 SP1 / 2016 SP2). No doubt the code will work with newer releases but make sure to verify all your settings after installation.
- I do not take any responsibility and I’m are not liable for any damage caused by this code.
- I did not create a script that fully automates everything. It is based on one-liners with a complete configuration. The reason behind this is
flexibility . Every environment is different and every customer is different. This way small tweaks can be made to parts of the code or you just use sections of the code.
Video
To display the full functionality of the code I recorded a video and uploaded it to YouTube. You can see the end result below. The video shows you the execution of the one-liners and what the server is configuring. The video starts after the requirements
Unattended Installation Files
So let’s list all the steps that are executed on the new Windows Server to make it ready to store the vRealize Automation IaaS Database:
- Format the D drive and make sure it is using a 64k allocation unit size for storing the Database
- Format the E drive and make sure it is using a 64k allocation unit size for storing the TempDB
- Format the F drive and make use of a default allocation unit size for storing the log files
- Assign both domain service accounts local administrator access on the server (svc-
iaas / svc-vra –sql ) - Create a Windows Firewall rule to allow SQL traffic on the network
- Enable multiple Windows Firewall rules to allow the Microsoft Distributed Transaction Coordinator (DTC)
- Install Microsoft SQL Server Management Studio
- Install Microsoft SQL Server 2016
- Reboot the system
- Configure the Microsoft Distributed Transaction Coordinator (DTC).
- Reboot the system
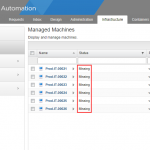
- Verify the system and functioning of the SQL Server
Optional:
- In some cases
, an additional G drive is required to store the SQL Backup.
PowerShell One-Liners
This file is saved as “Microsoft SQL Server 2016 – Commands.ps1” in the “C:\Temp” directory. The SQL Server media is mounted in the B drive (CD-ROM). The SQL Management Studio installation file is located in the “C:\Temp” directory.
##### Files required
# - Microsoft SQL Server 2016 Installation File
# - Microsoft SQL Management Studio 2016 Installation File

##### Volume 1 - DB 64k
$Disk = Get-Disk -Number 1
Set-Disk -InputObject $Disk -IsOffline $false
Initialize-Disk -InputObject $Disk
New-Partition $Disk.Number -UseMaximumSize -DriveLetter D
Format-Volume -DriveLetter D -FileSystem NTFS -AllocationUnitSize 65536 -NewFileSystemLabel "DB" -Confirm:$false

##### Volume 2 - TEMP DB 64k
$Disk = Get-Disk -Number 2
Set-Disk -InputObject $Disk -IsOffline $false
Initialize-Disk -InputObject $Disk
New-Partition $Disk.Number -UseMaximumSize -DriveLetter E
Format-Volume -DriveLetter E -FileSystem NTFS -AllocationUnitSize 65536 -NewFileSystemLabel "TEMP DB" -Confirm:$false

##### Volume 3 - Logs 4k
$Disk = Get-Disk -Number 3
Set-Disk -InputObject $Disk -IsOffline $false
Initialize-Disk -InputObject $Disk
New-Partition $Disk.Number -UseMaximumSize -DriveLetter F
Format-Volume -DriveLetter F -FileSystem NTFS -NewFileSystemLabel "Logs" -Confirm:$false

##### Make the service account member of the local administrators group
Add-LocalGroupMember -Group "Administrators" -Member "svc-vra-iaas"
Add-LocalGroupMember -Group "Administrators" -Member "svc-vra-sql"

##### Windows Firewall

    ### Windows Firewall - Allow Microsoft SQL Port 1433 TCP
    New-NetFirewallRule -DisplayName "Microsoft SQL Server 2016 - SQL - TCP" -Direction Inbound -LocalPort 1433 -Protocol TCP -Action Allow

    ### Windows Firewall - Enable rule for RPC for DTC
    Enable-NetFirewallRule -DisplayName "Distributed Transaction Coordinator (RPC-EPMAP)"

    ### Windows Firewall - Enable rule for Incoming DTC
    Enable-NetFirewallRule -DisplayName "Distributed Transaction Coordinator (TCP-In)"

    ### Windows Firewall - Enable rule for Outgoing DTC
    Enable-NetFirewallRule -DisplayName "Distributed Transaction Coordinator (TCP-Out)"

##### Microsoft SQL Management Studio
C:\Temp\SSMS-Setup-ENU.exe /install /passive /norestart

##### Microsoft SQL Server 2016
B:\Setup.exe /ConfigurationFile="C:\Temp\Microsoft SQL Server 2016 - Configuration.ini"

##### Reboot the server
shutdown -r -t 0

##### Configure the Microsoft Distributed Transaction Coordinator (DTC)
Set-DtcNetworkSetting -DtcName "Local" -RemoteClientAccessEnabled:$true -RemoteAdministrationAccessEnabled:$false -AuthenticationLevel "Mutual" -InboundTransactionsEnabled:$true -OutboundTransactionsEnabled:$true -XATransactionsEnabled:$false -LUTransactionsEnabled:$true -Confirm:$false

##### Reboot the server
shutdown -r -t 0
GIT Repository: Microsoft SQL Server 2016 – Commands.ps1
SQL Configuration File
This file is saved as “Microsoft SQL Server 2016 – Configuration.ini” in the “C:/Temp” directory.
; ************************************************************************************************************************
; Author:       M. Buijs
; Version:      1.0
; Date:         2018-09-26
;
; Information:
; This configuration file is created to install the Microsoft SQL Server 2016 software for VMware vRealize Automation.
;
; VMware Requirements:
; - Enable TCP/IP protocol for SQL Server.
; - The Microsoft Distributed Transaction Coordinator Service (MS DTC) is enabled on all SQL nodes in the system. MS DTC is required to support database transactions and actions such as workflow creation.
; - If you have a firewall running between the database server, Web servers or IaaS servers, deactivate the firewall or open the ports needed (MS SQL server uses port 1433 and MS DTC requires the use of port 135 over TCP and a random port between 1024 and 65535).
; - The database service account needs to be local administrator on the server (svc-vra-sql).
; - The IaaS service account needs to be local administrator on the server (svc-vra-iaas).
; - Set up Microsoft SQL server with separate OS volumes for SQL Data, Transaction Logs, TempDB, and Backup.
; - The NTFS drive where SQL Server is installed has a file allocation unit (cluster) size of 64 KB.
; ************************************************************************************************************************

[OPTIONS]

; SQL Server - Workflow

    ; Setup Workflow (Install/Uninstall/Upgrade)
    ACTION="Install"

    ; SQL Server - Accept License Agreement (True = Automatically accepted / False = Users needs to accept)
    IACCEPTSQLSERVERLICENSETERMS="True"

    ; Specify that SQL Server feature usage data can be collected and sent to Microsoft.
    SQMREPORTING="False"
    ERRORREPORTING="False"

; SQL Server - Unatteded

    ; Parameter that controls the user interface behavior.
    ; UIMODE="Normal"

    ; Setup will not display any user interface.
    ; QUIET="True"

    ; Setup will display progress only, without any user interaction.
    QUIETSIMPLE="True"

    ; Specifies that the detailed Setup log should be piped to the console.
    INDICATEPROGRESS="False"

    ; Specify if errors can be reported to Microsoft to improve future SQL Server releases.
    ERRORREPORTING="True"

    ; Displays the command line parameters usage
    HELP="False"

    ; RSInputSettings_RSInstallMode_Description
    RSINSTALLMODE="DefaultNativeMode"

; SQL Server - Installation Features

    ; Specifies features to install, uninstall, or upgrade.
    FEATURES=SQLENGINE

    ; Language Pack (English / United States)
    ENU="True"

; SQL Server - Updates

    ; Specify whether SQL Server Setup should discover and include product updates.
    UpdateEnabled="True"

    ; Specify the location where SQL Server Setup will obtain product updates (MU = Microsoft Update).
    UpdateSource="MU"

; SQL Server - Installation Directory

    ; Specify the root installation directory for shared components.
    INSTALLSHAREDDIR="D:\Program Files\Microsoft SQL Server"

    ; Specify the root installation directory for the WOW64 shared components.
    INSTALLSHAREDWOWDIR="D:\Program Files (x86)\Microsoft SQL Server"

    ; Default directory for the Database Engine backup files.
    ; SQLBACKUPDIR="<InstallSQLDataDir>\<SQLInstanceID>\MSSQL\Backup"

    ; Default directory for the Database Engine user databases.
    SQLUSERDBDIR="D:\Database"

    ; Directory for Database Engine TempDB files.
    SQLTEMPDBDIR="E:\TempDB"

    ; Default directory for the Database Engine user database logs.
    SQLUSERDBLOGDIR="F:\Logs"

; SQL Server - Instance

    ; Specify a default or named instance. MSSQLSERVER is the default instance for non-Express editions and SQLExpress for Express editions.
    INSTANCENAME="MSSQLSERVER"

    ; Specify the Instance ID for the SQL Server features you have specified.
    INSTANCEID="MSSQLSERVER"

    ; Specify the installation directory.
    INSTANCEDIR="D:\Program Files\Microsoft SQL Server"

    ; Specifies a Windows collation or an SQL collation to use for the Database Engine.
    SQLCOLLATION="SQL_Latin1_General_CP1_CI_AS"

    ; Level to enable FILESTREAM feature at (0, 1, 2 or 3).
    FILESTREAMLEVEL="0"

; SQL Server - SA Account

    ; Specifies the password for the SQL Server SA account.
    SAPWD="VMware1!"

    ; Specifies the security mode for SQL Server.
    SECURITYMODE=SQL

; SQL Server - Service Access

    ; Windows account(s) to provision as SQL Server system administrators.
    SQLSYSADMINACCOUNTS="Lab.local\Administrator" "BUILTIN\Administrators"

    ; Provision current user as a Database Engine system administrator for SQL Server 2012 Express.
    ADDCURRENTUSERASSQLADMIN="False"

; SQL Server - Connection Support

    ; Specify 0 to disable or 1 to enable the TCP/IP protocol.
    TCPENABLED="1"

    ; Specify 0 to disable or 1 to enable the Named Pipes protocol.
    NPENABLED="0"

    ; CM brick TCP communication port
    COMMFABRICPORT="0"

    ; How matrix will use private networks
    COMMFABRICNETWORKLEVEL="0"

    ; How inter brick communication will be protected
    COMMFABRICENCRYPTION="0"

    ; TCP port used by the CM brick
    MATRIXCMBRICKCOMMPORT="0"

; SQL Server - Agent Service and Service Account

    ; Auto-start service after installation.
    AGTSVCSTARTUPTYPE="Manual"

    ; Specifies the account for the SQL Server Agent service.
    AGTSVCACCOUNT="NT AUTHORITY\SYSTEM"

    ; Required Specifies the password for SQL Server Agent service account.
    ;AGTSVCPASSWORD=""

; SQL Server - Browser Service and Service Account

    ; Startup type for Browser Service.
    BROWSERSVCSTARTUPTYPE="Disabled"

; SQL Server - Server Service Account

    ; Startup type for the SQL Server service.
    SQLSVCSTARTUPTYPE="Automatic"

    ; Account for SQL Server service: Domain\User or system account.
    SQLSVCACCOUNT="Lab.local\svc-vra-sql"

    ; Specifies the password for SQLSVCACCOUNT.
    SQLSVCPASSWORD="heT5S-AbEsagu7ad"

; SQL Server - Report Server Service and Service Account

    ; Specifies how the startup mode of the report server NT service.
    RSSVCSTARTUPTYPE="Manual"

    ; Specifies which account the report server NT service should execute under.
    RSSVCACCOUNT="NT AUTHORITY\SYSTEM"

    ; Specifies the password for the startup account for the Reporting Services service.
    ;RSSVCPASSWORD=""
GIT Repository: Microsoft SQL Server 2016 – Configuration.ini
Final Word
This blog post helps you to set up a Microsoft SQL Server 2016 for vRealize Automation 7.X. The code can be used in lab and production environments but make sure to verify the configuration. I think there might be more improvements possible related to the one-lines but maybe also additional SQL configuration improvements. Do you have feedback please respond below or send me an email.
Sources
To create this article and scripts I used the following resources:
- Deployment Research (Johan Arwidmark) – Installing SQL Server 2016 like a boss
- Docs.microsoft.com – Install SQL Server from the Command Prompt
- Docs.vmware.com – IaaS SQL Server Host
- Docs.vmware.com – Microsoft SQL Server
- Update 2018-10-04 – Article was missing the Microsoft Distributed Transaction Coordinator (DTC) information and code (video recording is still missing that part).