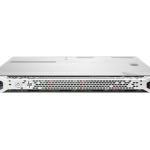
Today we are going to work on an HPE ProLiant DL20 Gen9 server. After the initial installation, I was using an SD card as boot media but I still had some Delock SATADOMs laying around from my older lab servers that were replaced. So it was time to improve the performance of the boot media in the servers. In this blog post, I am explaining in detail the SATADOM installation in an HPE ProLiant DL20 Gen9.
So what are the advantages compared to an SD card:
- VMware ESXi boot time about 50% faster
- VMware ESXi upgrade time about 70% faster
- Inventory performance (very noticeable when clicking through the VMware vCenter or VMware ESXi web GUI)
- The overall stability of the host, this because of the “high” failure rate of the SD card.
The summary of advantages is based on my own comparison between SD cards en SATADOMs in my ESXi Hosts in my Home Lab.
Delock SATADOM Specifications
Here are the specifications of the Delock Satadom devices I am using for both HPE ProLiant DL20 Gen9 servers. Here are some tips about what I have learned so far… I bought them in 2018 so they are not brand new anymore:
- Buy them a little bit bigger because of the future proof > minimal 32GB I would suggest.
- Verify before buying if you need the vertical or horizontal model (rack model server go for horizontal / tower model server no really important).

So here are the specifications from the Delock website:
| Item | Value |
|---|---|
| Vendor | Delock |
| Type | SATA 6 Gb/s Flash Module 16 GB vertical |
| Part nr | 54655 |
| Capacity | 16 GB |
| Interface | SATA 6 Gb/s, SATA 3 Gb/s, SATA 1.5 Gb/s |
| Performance | 460 MB/s read – 160 MB/s write |
| Power usage | 1.0 W max. (5V x 200mA) |
SATADOM Installation
So now it is time to install the device on the server. Of course, it is a little more complicated in a small half-size rack server. For example, there are no Molex power connections available by default. So in the end the cable kit is almost more expensive than the device itself. The preferred option should be to find an HPE cable kit, not sure which one you will need. So after some thinking and looking into the server I came up with the following solution to just plugin the SATADOM.
At first, I needed to find a SATA port on the motherboard. Both ports are available in my case but I used the one that is normally used for the DVD ROM drive number 14 (see the image from the HPE manual).
The storage device itself can be placed in the space of the storage controller battery pack. Both of my machines do not have the expensive storage controller option. Only the onboard default controller. So the space is completely empty and an easily accessible location for the SATADOM.
The power is the most difficult one. I ended up with converters to into the power connection from the storage backplane (keep in mind my server has no internal storage except the boot device (the SATADOM in this post…) If you have your storage filled with SSDs or HDDs you need to figure out a new solution where to get the power from. I have read something about a power kit for the DVD ROM for example. I have never seen it on a picture or in a server so I do not know which connectors are in that cable kit but it might be an option.
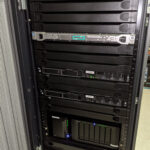
To make some more sense and pictures explain more than words… Here is a gallery with some pictures of the SATADOM installation:


DL20 Gen 9 BIOS Settings
After the physical installation, it was time to set up the BIOS. To be honest it was quite easy compared to the HPE Gen8 where I had a lot of problems because of the ports and bios settings.
Here are two screenshots. The first one is the activation of the internal storage controller. Note: make sure you power cycle the machine before the SATADOM is detected. After the power cycle, the VMware ESXi installer should detect the SATADOM when trying to install VMware ESXi.
After this point, the SATADOM installation is completed. Just continue your normal procedures and put your host into production when you are done.


Wrap-up
So that is it for today…! I hope it was useful for other people and interesting to read. Keep in mind this blog post was focused on the HPE ProLiant DL20 Gen9 but I think the procedure will be quite identical to other HPE Gen9 servers. The most difficult part will always be the cabling and after that, the BIOS settings to get the device detected correctly.
So far my hosts have been running for about 40+ days without any issues and are working perfectly fine. If you got additional questions or remarks please respond in the comment section below. Thanks for reading my blog post and see you next time.