I’m happy to announce that as of today my lightboard session about VMware vRealize Orchestrator (vRO) is online. The guys at ITQ (the company I work for) build a lightboard to record lightboard sessions. So I decided to record a session to help people getting started with automation and introduced to the vRealize Orchestrator.
The session is called “Mischa Buijs explains the benefits of vRealize Orchestrator“. In the session, I explain a basic use case to automate virtual machine provisioning and integrate with external systems like Microsoft Active Directory and a storage array with an SSH interface.
The Storyline Lightboard Session:
Here is an overview of the storyline that I am presenting in the video:
Step 01: We are using the REST API integration in vRO for communicating with VMware NSX-V to provision a new virtual network (Logical Switch).
Step 02: We need storage to provide space for a new virtual machine. So we are leveraging the SSH integration in vRO to create a new volume on the storage array. This can be for example a NetApp FAS array or a FreeNAS virtual appliance.
Step 03: Let’s use vCenter to format the new datastore with VMFS, so it can be used by the ESXi Hosts.
Step 04: Than again we are using the vCenter integration to mount the new volume on an entire vSphere Cluster so let’s say, ten ESXi hosts.
Step 05: We also use the vCenter integration to build a new virtual machine.
Step 06: Now it is time to leverage PowerShell to create a new computer account in Active Directory.
Step 07: The last step is with PowerShell, now we are creating forward and reverse DNS records on the Windows DNS Server.
ITQ YouTube Channel
At ITQ we created a lot of recordings the last couple of months. For all the videos go to the ITQ YouTube channel.
This blog post is dedicated to the VMworld 2018 US announcements. In the post, you will find the articles, links and highlights. VMworld 2018 US is an event that is organized by VMware. The US version is a five-day event that is held in Las Vegas. It takes place from 26 August to 30 August 2018. This page will be updated multiple times to coming days to add additional information and the latest announcements.
Please reply underneath this blog post if you have some additional information. This can also be additional links or blogs posts.
VMworld 2018 US – Product Announcements
In this chapter are all the product announcements. I can tell you there are a lot of announcements made at VMworld 2018.
vRealize Automation (vRA) 7.5
One the first day of VMworld 2018 US vRealize Automation 7.5 was announced.
On the first day of VMworld 2018 US vRealize Network Insight 3.9 was announced.
The key highlights are:
Plan micro-segmentation and get visibility for NSX Data Center, including NSX-T
Enhanced security for service access with Multi-factor Authentication
Custom dashboard support for Cisco ASA firewall and enhancements to Checkpoint Firewall support
Many customers are now using VMware Network Insight as a service, and customers based in Europe now also have the option of using the VMware Network Insight service hosted out of London, UK.
On the first day of VMworld 2018 US, a new vSphere edition was announced. The product is called vSphere Platinum and it has a tight integration with VMware AppDefense.
The key highlights are:
Benefits for vSphere Admins
Gain visibility into the intent of each virtual machine, and a detailed inventory of application assets and context.
Understand how applications behave and be alerted to potential issues and deviations.
Shrink the attack surface and reduce the risk of security compromise. Establish a simple and powerful way to collaborate with security, compliance and application teams.
Get better visibility and protection with a simple, light-weight and scalable security solution, with no agents to manage, and minimal overhead.
Use what you already own, understand, and run in your data center – vSphere – with its unique visibility, automation and isolation qualities.
Play a larger and critical role in the security of your entire IT environment – Be the Security Hero!
Benefits for Security Teams
Better visibility and situational awareness of application behaviours, and virtual machine purpose.
Faster detection, analysis, and time to response – quickly understand attacks and make fast decisions using application context and scope.
Enhance existing security tools and support compliance efforts through contextual visibility and alerts into application communications and deviations.
Lower false positives – integrated behavioural analytics and machine learning offer a more precise method to identify and respond to threats.
Big data correlation for better identification and context using cloud SaaS model.
Security as an agile business enabler – support DevOps environment through continuous learning and protection.
Easily Coordinate with vSphere Admins and Application teams for better security while respecting existing workflows & maintaining separation of duties.
Secure Applications
VMware AppDefense – Protects the integrity of applications running on vSphere, using machine learning to monitor against threats and automate responses. AppDefense locks down the guest operating system for all applications, the VMware application stack and third-party applications. To accomplish this, AppDefense gathers inventory data on virtual machines and applications from vCenter Server, development tools, and automation frameworks and applies machine learning to discover the intended state and establish the known good behaviours for the application and machine. Any deviations from this state are detected and prevented, securing the integrity of the applications, infrastructure, and guest operating system. AppDefense provides detailed visibility for better change management and compliance reporting and also provides a rich set of automated or orchestrated incident response mechanisms to address attacks. Moreover, it leverages machine learning for a simple and automated way to conduct audits and reviews for applications.
Secure Data
FIPS 140-2 Validated VM Encryption, and cross-vCenter Encrypted vMotion – Secure against unauthorized data access both at rest and in motion, across the hybrid cloud. Secure Infrastructure
Secure Boot for ESXi – Allows only VMware and Partner signed code to run in your hypervisor. Secure Boot for Virtual Machines – Helps prevent images from being tampered with and prevents the loading of unauthorized components.
Support for TPM 2.0 for ESXi – Enables hypervisor integrity by validating the Secure Boot for ESXi process and enables remote host attestation.
Virtual TPM 2.0 – Provides the necessary support for guest operating system security features while retaining operational features such as vMotion and disaster recovery.
Support for Microsoft Virtualization Based Security – Supports Windows 10 and Windows 2016 security features, like Credential Guard, on vSphere.
Secure Access
Audit Quality Logging – Enables authorized administration and control by providing high fidelity visibility in vSphere operations.
Also, the VMware Validated Design (VVD) received some new features and changes to the documentation. Personally, the greatest value in this release is the Visio stencils that are available for everyone.
The key highlights are:
Official NSX-T Support
Documentation Updates
IT Automating IT Scenarios
Intelligent Operations Scenarios
Introduction to Security and Compliance
Operational Verification
Certificate Replacement for 2-pod
Certificate Replacement for 1-pod
Architecture and Design of VMware PKS for Workload Domains
There were also a lot of announcements surrounding some new developments/projects.
Project list:
Project Concord – Project Concord uses Byzantine fault-tolerant consensus protocols to deliver a functioning distributed trust system: one that is both “safe” and “alive.” Concord is a generic state machine replication library that can handle malicious (Byzantine) replicas.
Project Dimension – Project Dimension will extend VMware Cloud to deliver SDDC infrastructure and hardware as-a-service to on-premises locations.
Project Magna – Project Magna will make possible a self-driving data center based on machine learning.
RDS on VMware – VMware demonstrated how Amazon Web Service’s RDS service will run on VMware in a private data center, thus offering developers a familiar RDS Functionality available on VMware in a private data center or at the Edge.
Virtualization on 64-bit ARM for Edge – VMware demonstrated ESXi on 64-bit ARM running on a windmill farm at the Edge.
Just like every year, William Lam from the website virtuallyGhetto creates a GIT repository with all the VMworld sessions. For each session, a recording and presentation are provided. It will probably be a couple of days till weeks until all sessions become available.
In my home lab environment, I wanted to rebuild my VyOS virtual router/firewall. So I exported the configuration from the old appliance and I tried to perform a restore on the new virtual appliance. The question that arose was: how do you perform a VyOS configuration restore?
Somehow on the internet, I could not find any tutorial or manual that explained to me how this action could be performed. There are enough write-ups and articles surrounding the TFTP, FTP and SCP restore procedure but the VyOS appliance is empty… with a default configuration. I just wanted to restore the configuration without setting up all kinds of services and configuring by hand my interfaces on the VyOS appliance.
So it was time to examine the VyOS appliance and figure out what was going on under the covers.
Why do you need VyOS?
Before diving any further let‘s talk about VyOS! I use VyOS for my Lab environment because it is easily configurable and has an entire feature set of enterprise-grade network technology onboard by default. Like the routing protocols BGP and OSPF and high availability option VRRP.
So why do you need OSPF and BGP at home? I’m a VMware Consultant that is responsible for SDDC / SDN / NSX designs and implementations. I regularly need to perform tests in my Lab environment. VMware NSX likes to have a dynamic routing protocol to connect the virtual overlay network to the physical world. Both routing protocols can be used to perform this. An article about a detailed configuration can be found here at Jeffrey Kusters his blog (my ITQ colleague). I not going into further detail on VMware NSX, this blog post is focused on VyOS.
VyOS Virtual Hardware
My VyOS appliance is deployed on a VMware vSphere 6.5 infrastructure. I used the OVA file that is available on the VyOS website (vyos-1.1.8-amd64.ova). The virtual machine is called the “LAB-FW01” this hostname will appear in the video record. The YouTube video is listed below.
The Virtual Machine hardware is configured as default. I only assigned the virtual network cards to the right networks. An overview is listed here:
Public – Network adapter 1 – Connected to a WAN interface
Private – Network adapter 2 – Connected to a VLAN trunk
VyOS Configuration Restore
Now it is time for restoring the VyOS configuration file on a newly deployed VyOS appliance.
Preparation:
Deploy a new VyOS appliance and make sure that the virtual networks are connected to the correct adapter.
Verify and/or change the MAC addresses were needed. The MAC addresses should align between the configuration file and the new virtual appliance:
Option 01: Change the virtual network card MAC address to the ones that were used on the old appliance.
Option 02: Change the MAC addresses in the configuration file that is used for the restore. The MAC address should align with the newly deployed VyOS appliance.
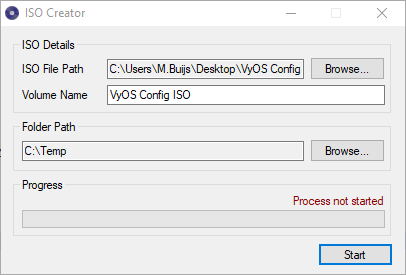
Create an ISO file with your latest configuration on it. I used the following opensource tooling as displayed below. Link to IsoCreator.
Creating an ISO file with VyOS Configuration
Procedure:
Open your vSphere Infrastructure and navigate to the Virtual Machine. This would be in my case “LAB-FW01“.
Assign the newly created ISO file to the Virtual Machine. You connect the ISO file to the CD-ROM drive.
Power-on the Virtual Machine.
Make sure you select in the GRUB bootloader the following mode to startup from: “VyOS 1.1.8 linux (USB console)”.
When VyOS is booted, log in with the following default credentials:
Username: vyos
Password: vyos
You are now logged in into the Linux Shell.
Now it’s time to mount the connected CD-ROM media:
sudo mount /dev/cdrom /mnt
To make sure my configuration is available. I list the directory content with the following command:
ls -l /mnt
Now it is time to copy my old configuration to the startup configuration location of VyOS. Use the following command to perform this action (keep in mind: My configuration is called “2018-06-05-vyos.config.boot”):
To verify the copy action, I run the following command to display my hostname that is listed in the configuration file:
cat /config/config.boot | grep LAB-FW01
Now it is time to reboot the VyOS appliance. At the next boot, the old configuration will be loaded and everything should be restored. The following commands are required for rebooting VyOS:
reboot
yes
After the reboot is completed you should log in with your old credentials that belong to the restored configuration.
To verify that the configuration is loaded correctly I run the following command to display all my interfaces and sub-interfaces:
show interfaces
From this point, everything should be working.
Tips:
I have listed all the VyOS configuration locations that are important to this article.
In case you messed up your VyOS configuration you can always restore the default out-of-the-box configuration with the procedure described above. You only need to change the copy action in step eight to the following: (cp /opt/vyatta/etc/config.boot.default /config/config.boot).
Because there are a couple of steps involved I decided to record a video of me performing the procedure. Keep in mind:my VMware Remote Console is in dutch :).
Final word
About six months back I switched from pfSense to VyOS. The main reason was the BGP support and stability of the BGP routing process. I am happy I did. The VyOS appliance is just amazing and extremely reliable and robust.
If you are familiar with the Cisco CLI than you will be flying through the VyOS CLI in no-time.
In this blog post, I am going to show you how to enable the VMware Identity Manager GUI when it is located inside vRealize Automation. I am going to explain why you sometimes should and how the procedure is performed.
For some who don’t know, VMware vRealize Automation (vRA) is using under the covers VMware Identity Manager (vIDM). By default is the VMware Identity Manager GUI disabled after the vRealize Automation installation process. If you want to configure parts of vIDM you are configuring it through the vRealize Automation GUI.
Let’s get everybody on the same page: So you are talking about two GUIs the vRealize Automation GUI and the VMware Identity Manager GUI? Who is who, explain it to me!
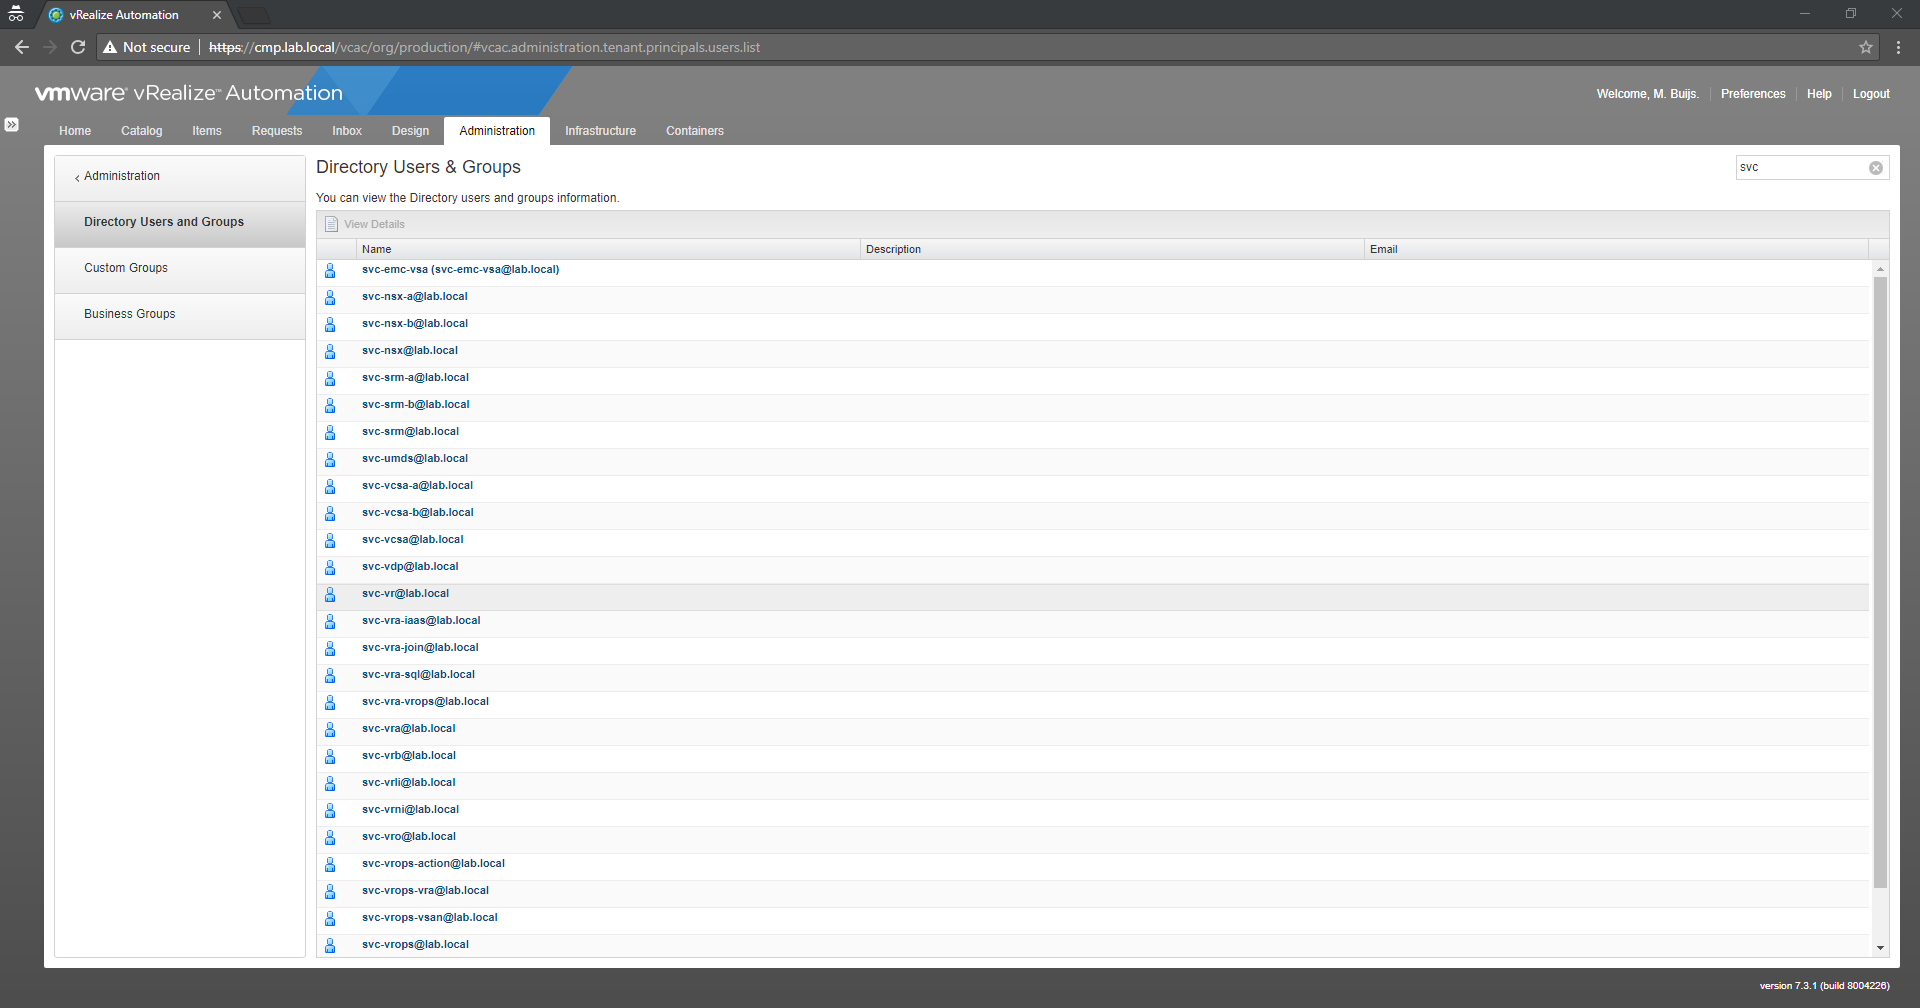
Here is the vRealize Automation (vRA) GUI – Displaying multiple Active Directory users
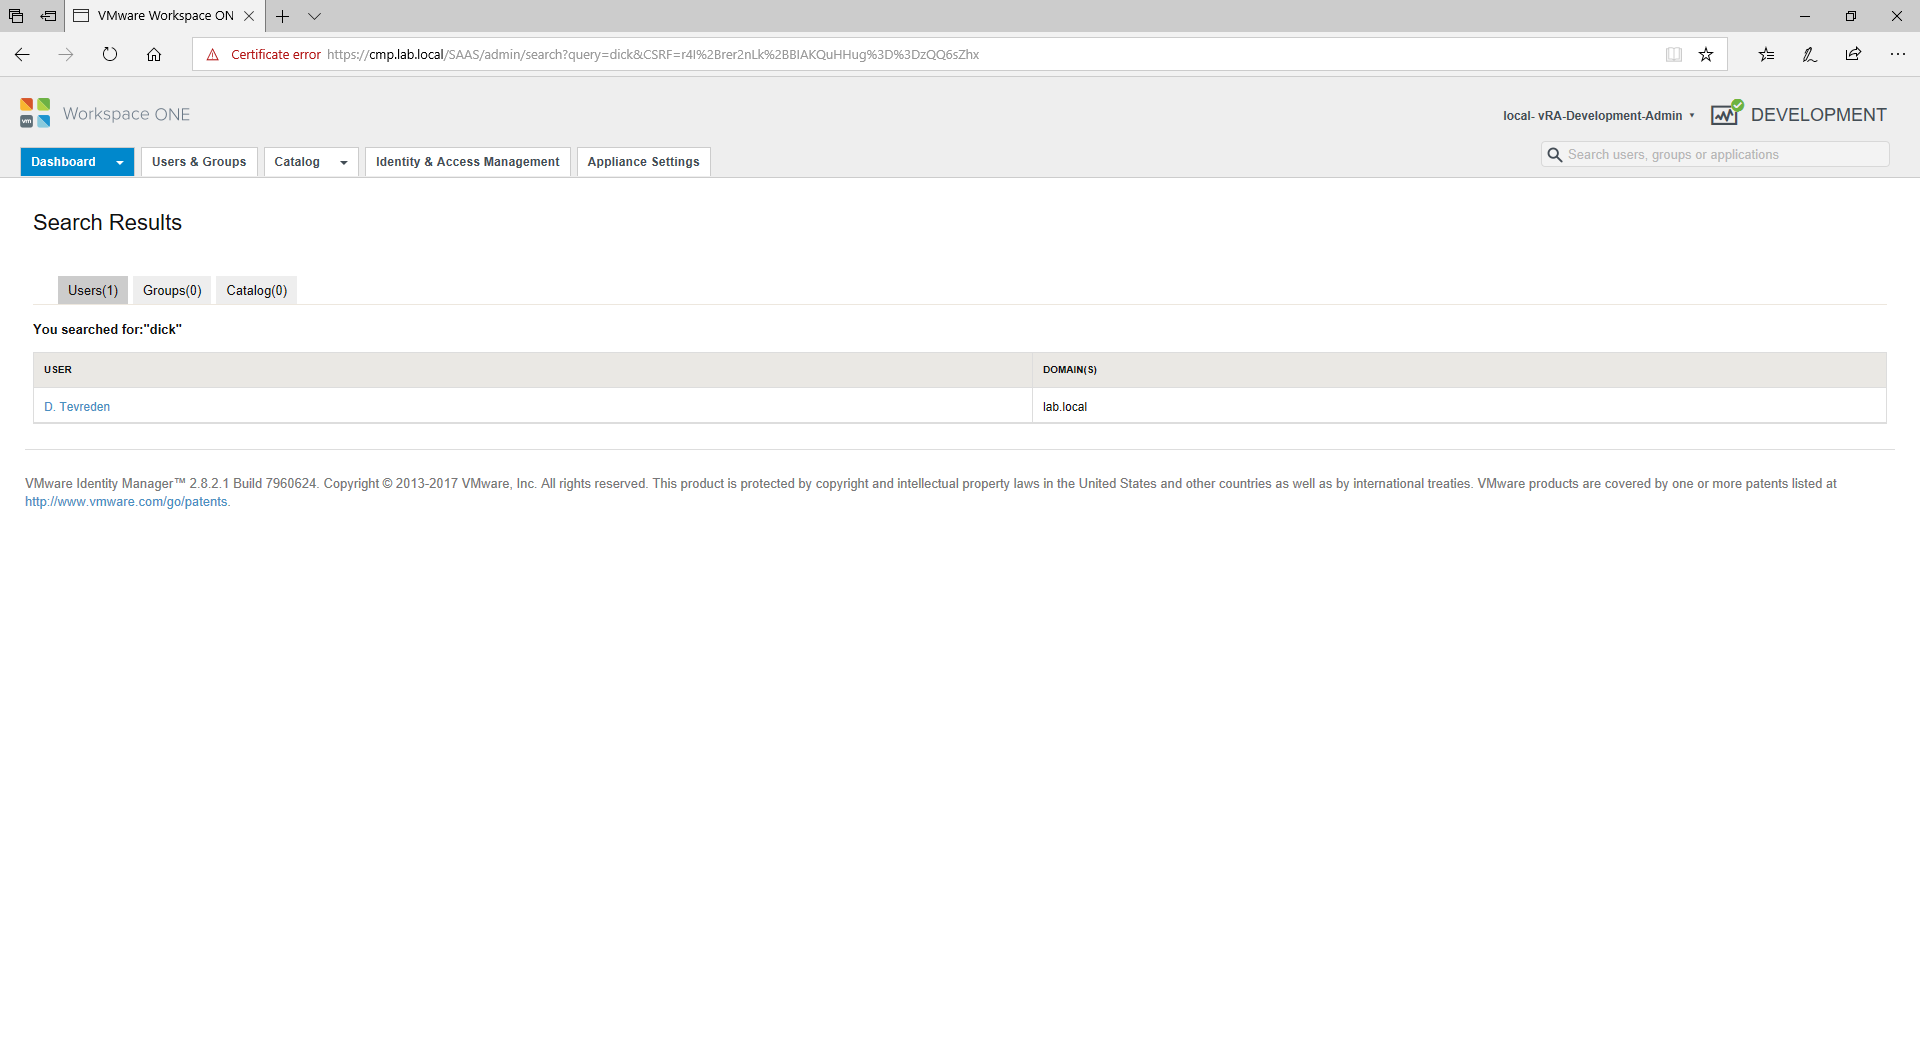
Here is the VMware Identity Manager (vIDM) GUI – Displaying an Active Directory user (by the way: the name Dick is a common name in The Netherlands)
Keep in mind: I’m not completely sure what will happen if you would configure items with the vIDM GUI. Because you are bypassing the default vRealize Automation GUI. I have done some tests and no problems were caused in my Lab environment but it might cause issues later on… So why do you enable it then? Because of the large amount of information provided throughout the vIDM GUI. The vRealize Automation GUI is only showing a small peace and not the big picture.
Product support: I have tested this procedure on vRealize Automation version 7.3 and vRealize Automation 7.3.1. I would expect it to work on newer and older vRealize Automation 7.X releases.
Enable the vIDM Interface
This procedure is for enabling the interface:
Step 01: Connect with an SSH session to the vRealize Automation Appliance. Use for example Putty.
Step 02: Login with the root credentials.
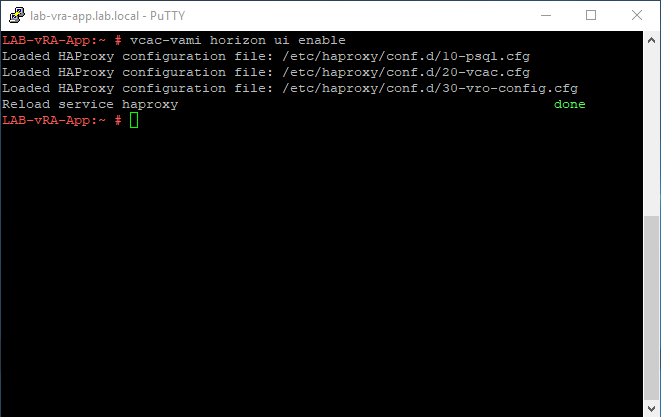
Step 03: Run the following command to start the VMware Identity Manager Interface: (vcac–vami horizon ui enable).
Step 04: Open a web browser and navigate to the following URL:(https://%FQDN%/SAAS/admin/).
VMware Identity Manager (vIDM) interface enable
Disable the vIDM Interface
This procedure is for disabling the interface:
Step 01: Connect with an SSH session to the vRealize Automation Appliance. Use for example Putty.
Step 02: Login with the root credentials.
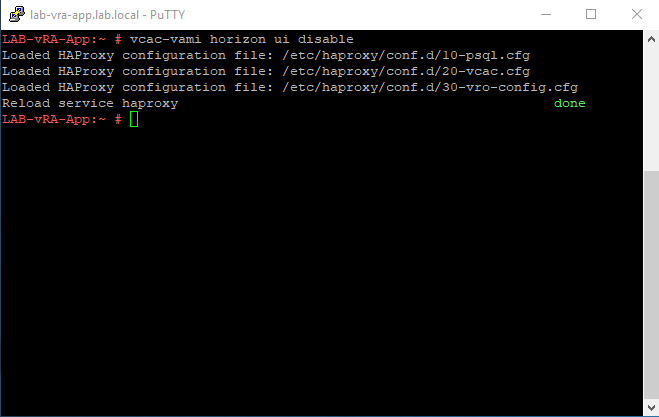
Step 03: Run the following command to stop the VMware Identity Manager Interface: (vcac–vami horizon ui disable).
Step 04: When you navigate to the following URL no page should appear: (https://%FQDN%/SAAS/admin/).
VMware Identity Manager (vIDM) interface disable
Status of the vIDM Interface
This procedure is for viewing the vIDM Interface status:
Step 01: Connect with an SSH session to the vRealize Automation Appliance. Use for example Putty.
Step 02: Login with the root credentials.
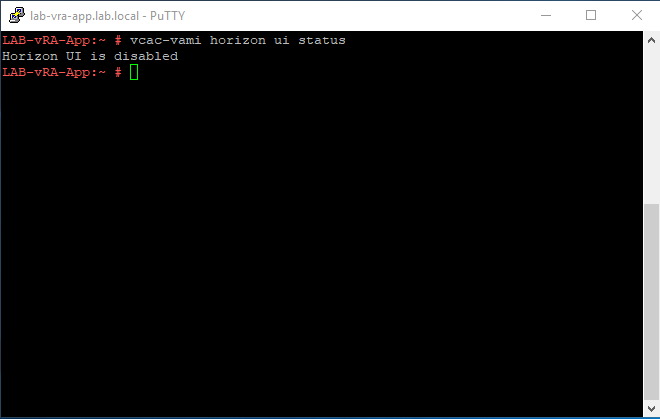
Step 03: Run the following command to view the current status of the VMware Identity Manager Interface: (vcac–vami horizon ui status).
Step 04: When you navigate to the following URL no page should appear: (https://%FQDN%/SAAS/admin/).
VMware Identity Manager (vIDM) interface status
VMware Identity Manager URLs
The following URLs are available when the GUI is enabled (there are probably more URLs available than listed below):
To explain what happens under the covers is the following: When you run the command to start or stop vIDM interface the reverse proxy configuration located in vRealize Automation Appliance (vRA) is changed. The command adds or removes some configuration files. Then the proxy daemon is reloaded to pick up the changes. At that point, the vIDM webpage becomes available or unavailable depending on the given command. Under the covers, vRealize Automation uses HAProxy for IT guys working in container or web hosting environments that might be a very familiar product. Here is a quote from the HAProxy website to explain what HAProxy is capable of:
HAProxy is a free, very fast and reliable solution offering high availability, load balancing, and proxying for TCP and HTTP-based applications. It is particularly suited for very high traffic websites and powers quite a number of the world’s most visited ones. Over the years it has become the de-facto standard opensource load balancer, is now shipped with most mainstream Linux distributions, and is often deployed by default in cloud platforms. Since it does not advertise itself, we only know it’s used when the admins report it.
https://www.haproxy.org/#desc
VMware Identity Manager GUI Advantages
The main advantages of enabling the GUI:
You can view the currently logged in users in vRealize Automation.
When logging into the default tenant in the vIDM GUI you can view the total amount of users and groups that are identified by vIDM (counters are from all tenants combined).
You can view the health status of VMware Identity Manager (vIDM).
You can view the user login history based on the last days and you have reporting functionality.
Final word
In this blog post, I explained how to enable and disable the VMware Identity Manager interface on a vRealize Automation Appliance. As noted before be careful! I personally only use this method for troubleshooting Identity Manager related problems with authentication and viewing user activity.
Content Update
The following items have been verified:
2020-09-24: This is still working on vRealize Automation 7.6.
I am happy to announce that as of today I entered the VMware vExpert NSX sub-program. Thanks, VMware for the award and congratulations to everyone else who also made it! Also an extraordinary achievement for our team at ITQ, we managed to get seven consultants in the vExpert NSX 2018 sub-program! This year VMware awarded 169 people worldwide for the vExpert NSX sub-program.
vExpert NSX:
Since when does the vExpert NSX sub-program exist?
The VMware vExpert NSX sub-program was introduced in the year 2016 and announcements are made every year.
So what is the difference between the vExpert NSX sub-program and vExpert program?
The program is built upon the vExpert program. To apply you must be a current vExpert as well as evangelizing VMware NSX.
What is VMware expecting of a vExpert NSX?
Each of these vExperts has demonstrated significant contributions to the community and a willingness to share their expertise with others. Contributing is not always blogging or Twitter as there are many public speakers, book authors, scriptwriters, VMUG leaders, VMTN community moderators and internal champions among this group.
The vRealize Orchestrator Client is the required tool for vRealize Orchestrator (vRO) server. The vRealize Orchestrator client is used for designing, administering, setting permissions and running workflows. The vRealize Orchestrator client is Java 8 based and should be running locally on your Windows desktop or management server.
The last couple of years a lot of new displays are released that are supporting resolutions above full high definition (HD) (1920 x 1080). As a result of these large displays with high resolutions (for example 3840 × 2160), the vRealize Orchestrator Client is not scaling correctly. The fonts are too small and some boxes are not readable anymore, this is mainly caused because of the scaling that is zoomed out like 300%. This is quite irritating when developing a workflow and you are just not sure if you typed “Input_Username”, “Input Username” or “Input__Username” for example. You are just guessing or copy and pasting between an application to view the text that is written.
So it was time to investigate the problem and look for a solution.
Option 01: Lowering your screen resolution
The easiest option is to lower your screen resolution to 1920 x 1080. This is not always the most prefered option but it is the fastest.
Option 02: Modifying the vRO Client File
This option modifies the file that is used to launch the vRealize Orchestrator Client.
Procedure:
1. Navigate to the vRealize Orchestrator webpage (https://%FQDN%:8281/vco/). 2. Click on the link “START THE ORCHESTRATOR CLIENT“. 3. Save the “client.jnlp” on your desktop or other location on your workstation. 4. Open the “client.jnlp” file with a code/text editor for example Notepad++. 5. Add the following line of code to the resources block at the end (see screenshot below).
6. Save the file and close the editor. 7. Now launch the “client.jnlp“. This will start-up the vRealize Orchestrator Client without the screen resolution problems.
Gallery
vRealize Orchestrator 7.4 – Start the Orchestrator Client
vRealize Orchestrator 7.4 – Client.jnlp
vRealize Orchestrator 7.4 – Without DPI aware setting
vRealize Orchestrator 7.4 – With DPI aware setting
Final Word
In this blog post, I described two methods to deal with large screen resolutions in combination with the vRealize Orchestrator Client. Personally, I prefer option two because it is more permanent and I don’t have to change my resolution which effects other applications. Keep in mind: I only tested this on Microsoft Windows and not on Apple OS X or Linux.
At VMware EMPOWER 2018 in Vienna, I passed the VMware Certified Advanced professional 6.5 Data center Virtualization Design exam or in sort VCAP6.5-DCV. This exam was already for a very long on my certification list, to be more precise for about four years. Because of the large number of new products VMware released the last couple of years, my priorities shifted many times because Data center Virtualization was not really too interesting to study anymore… (sorry Data center Virtualization for calling you not interesting). My experience with VMware vSphere started more than ten years ago and over the years I have been responsible for designing multiple infrastructures for customers.
The VMware way of describing the VMware Certified Advanced Professional 6.5 – Data Center Virtualization Design certification:
“The VCAP6.5-DCV Design certification validates advanced knowledge of simplifying data center operations through virtualization with vSphere 6.5 and its related components, and is able to recommend and design VMware solutions to meet specific goals and requirements. This industry-recognized certification improves your credibility among your peers and proves that you have a deep understanding of data center virtualization design principles and methodologies.”
So where is the exam about: The exam is about the VMware Design Methodology used for designing a VMware vSphere infrastructure the right way. To pass the exam you need to know everything about the following items and make sure you can apply them in real-life examples/use cases:
– AMPRS (Availability, Manageability, Performance, Recoverability and Security).
– RCAR (Requirement, Constraint, Assumption and Risk)
– Non-functional and functional requirements
– RPO (Recovery Point Objective)
– RTO (Recovery Time Objective)
– Conceptual, Logical and Physical Designs
– vSphere 6.5 features, what did the release of vSphere 6.5 provide to each feature and what are the requirements and constraints for implementation.
– vSAN 6.5 features, design and architecture
– Site Recovery Manager features, design and architecture
– vSphere Replication features, design and architecture
Preparation
For me, the preparation of the exam started with a couple of sessions about the vSphere Design Methodology. Jeffrey Kusters was so kind to host a couple of sessions in his spare time about the subject for all the ITQ colleges. Jeffrey Kusters is one of our VMware VCDXs that works at our firm and has a lot of years of experience designing vSphere Infrastructure as an IT architect.
Study Materials
I have used many different material/sources to prepare myself for the exam but watch out. There is so much information available that you can study until 2020 and then you are still not able to read all the information. Focus on the items listed above and you will have a good chance of passing. Important note, sometimes information on a blog or book is a couple of years old and you might expect it to be not relevant. This is not the case the VMware Design Mythology has not changed over the years.
I passed the exam on the first attempt with a good score. The questions are decent around 12 drag en drop and 48 multiple choices. The questions are decent and require you to have deep knowledge of the products. So basically you know the answer or you just don’t. For me passing the VCAP6.5-DCV Design made me a VCIX6.5-DCV, so I was extra pleased with the result.
Special thanks to Jeffrey Kusters! You have been an absolute help!
Recently I was deploying the vRealize Suite Lifecycle Manager (vRSLCM) at a customer. One of their requirement was that the appliance only could reach the internet with their internet proxy configured. The deployment was based on the latest version of the vRSLCM appliance version 1.2. The main use case for deploying this appliance at the customer was to reduce the time spend on their Lifecycle Management proces. The vRLCM appliance is able to maintain vRealize Automation (vRA), vRealize Business (vRB), vRealize Log Insight (vRLI), and vRealize Operations Manager (vROPS).
So for the proxy configuration, we need to identify which proxy URLs are required. Luckily in the VMware Documentation, there is a list of URLs and ports which the vRealize Suite Lifecycle Manager uses. So I configured the URLs but it appeared to be not working. The vRSLCM was complaining about the URL (https://my.vmware.com). So after analyzing the proxy logging, I could conclude that the URL list was not complete. Below this section, I display the difference between the official statement and what was required to get it working.
Proxy URLs – Official List:
This is the official URL list from the vRealize Suite Lifecycle Manager (vRSLCM) v1.2 documentation:
Ports
Port number
Base URLs
My VMware
443
https://apigw.vmware.com
Solutions Exchange
443
https://marketplace.vmware.com
Updates
443
https://vapp-updates.vmware.com
Compatibility
443
https://vapp-updates.vmware.com
Proxy URLs – Unofficial List:
This is the list that was required to get vRSLCM working through the proxy, keep in mind there are a lot of different functionalities in the vRSLCM appliance and I was not using the entire set of functionalities. There might be even more URLs required…
Ports
Port number
Base URLs
My VMware
443
https://apigw.vmware.com
Solutions Exchange
443
https://marketplace.vmware.com
Updates
443
https://vapp-updates.vmware.com
Compatibility
443
https://simservice.vmware.com
My VMware
443
https://my.vmware.com
vConnect
443
https://vconnect.vmware.com
Download location
443
https://download2.vmware.com
Download location
443
https://download3.vmware.com
Icons for marketplace
443
https://marketplace-download.vmware.com
Proxy Configuration:
In the steps below I explain the proxy configuration in the vRealize Suite Lifecycle Manager web interface:
Open the web browser.
Navigate to the vRSLCM URL (https://%FQDN%).
Log in with an administrator account (admin@localhost).
Navigate to the following page (Settings > My VMware).
Toggle the Configure Proxy to enabled.
Enter the following proxy information:
Proxy Server: %FQDN% or %IP%
Proxy Port: %Port Number%
Proxy Username: %Username%
Proxy Password: %Password%
Click on the Submit button.
Verify if the My VMware communication is working and the appliance is able to download the media.
Note:
vRealize Suite Lifecycle Manager (vRSLCM) requires ICMP communication with the internet proxy. When configuring a proxy in vRSLCM version 1.3 the configuration validation fails without allowing ICMP.
At a customer I came across the following problem, the customer was not able to remove a Content Library from vCenter Server. They just created a Content Library and after that, they wanted to remove the item. When they tried to remove the content library it failed. We started troubleshooting the log files and tried to remove the Content Library in different ways with the vSphere Web Client, PowerShell and REST API but all ended with the same error. The error messages are listed below.
To add some more background information: the customer was running the environment with an external platform services controller and a vCenter Server (VCSA). The version that was being used was VCSA 6.5 Update 1e.
Content Library – Error messages
Cannot Remove Content Libary – 01
Cannot Remove Content Libary – 02
Cannot Remove Content Libary – 03
Solution
We ended up calling VMware Global Support Services (GSS) to resolve the issues. They were very helpful and fixed it within a couple of minutes. The knowledge base article listed below is only available for internal VMware personal.
The internal knowledge base article related to the issue: – https://ikb.vmware.com/s/article/50121825 – Unable to delete the stale entry for the content library from the web client
Recently somebody asked me a question about VMware vCenter running on a Windows Server. The Windows Server was running VMware vCenter 6.5 and in case of a datacenter related problem, they wanted to get access to the vSphere Web Client (Flash) on the system locally.
It sounds easy right…? Just open the browser on the Windows Server and navigate to the vSphere Web Client page but that didn’t appear to be the case, because the system is missing the browser plugins required to open the vSphere Web Client.
So let’s dive into the problem.
Microsoft Browsers: They are running Windows Server 2016 and you might expect it to have two browsers: Internet Explorer 11 and Microsoft Edge. That does not seem to be the case. Windows Server 2016 is only shipped with Internet Explorer 11. Why? Windows Server 2016 is marked as an LTSB (Long Time Service Branch) so this means no Microsoft Edge and it is also not available for manual installation.
Microsoft: “The Long-Term Servicing Branch (LTSB) versions of Windows, including Windows Server 2016, don’t include Microsoft Edge or many other Universal Windows Platform (UWP) apps. These apps and their services are frequently updated with new functionality, and can’t be supported on systems running the LTSB operating systems.”
Third-party browsers: The company who was asking had a security policy that does not allow an installation of third-party browsers like Mozilla Firefox or Google Chrome. Alright, so this is not an option. Don’t have to look at that further.
Adobe Flash: So let’s try Internet Explorer 11. It appears to be missing Adobe Flash and you can not download and install it from Adobe Website.
At this point, I was stuck and there did not seem to be a simple solution.
Screenshots
vSphere Web Client missing Adobe Flash
Adobe Flash not available for installation on Windows Server 2016
Solution
After searching for a solution for about an hour. I came across a Microsoft Blog article listed below. This article is talking about installing Adobe Flash on Windows Server 2016. It appears that all the software is already on the system but just needs to be installed.
Procedure:
– Step 01: Close all browsers
– Step 02: Start a PowerShell session with elevated rights.
– Step 03: Run the following command: dism /online /add-package /packagepath:"C:\Windows\servicing\Packages\Adobe-Flash-For-Windows-Package~31bf3856ad364e35~amd64~~10.0.14393.0.mum"
– Step 04: Wait for the installation to complete.
– Step 05: Open a browser and navigate to the vSphere Web Client.
– Step 06: Everything should be working now.
Note: In the Microsoft Blog article they are talking about a reboot required in my case it was not required. Just a browser restart was enough.
Screenshots
Installing Adobe Flash on Windows Server 2016
vSphere Web Client with Adobe Flash
It sounded like an easy problem at first but it took some more time than I expected. The problem is solved with a simple one-liner and the customer is happy. I personally think that there might be other solution to the problem. If you know them please add a comment below.