In this blog post, I will walk you through the process of increasing disk space on a VyOS installation. Whether you’re running VyOS on a virtual machine or a physical server, this step-by-step guide will help you seamlessly allocate more storage to keep your network operations running smoothly. From resizing partitions to adjusting file systems, we’ll cover everything you need to know to efficiently manage your VyOS environment’s disk space.
Preparation
Before you begin, ensure that you have a configuration backup of your VyOS system. This precautionary step is essential to safeguard your current settings and configurations, allowing for a quick recovery in case any issues arise during the disk space expansion process. Proper backups are crucial for maintaining the integrity and continuity of your network operations.
VyOS Commands
Here is an overview of the commands I used on the VyOS virtual machine to make it workout:
Shutdown the virtual machine
Increase the disk space of the boot media
Start the virtual machine
Run the following commands:
# Validate size
fdisk -l
df –h

# Remove partition
fdisk /dev/sda
p (print partition)
d (delete partition)
p (print partition)

# Create new partion
• n (create a new partition)
• p (select primary)
• 1 (select 1 since this only partition)
• 2 (this first cylinder saw in b) )
• 12191 (last cylinder - 1 )
• w (press w for writing change)

# Check
sudo partprobe

# Reboot system
reboot

# Confirm that partition size
partx /dev/sda

# Tell the Linux Kernel about the Change in disk size
sudo resize2fs /dev/sda1

# Reconfirm the increase disk size
df -h

# Reboot system to verify
reboot
Wrap-up
So this is my blog post about increasing disk space on a VyOS virtual machine. Hope it was useful for someone! Please respond below if you have any comments or additional information!
In the latest release of VyOS, a new feature has been added to the product called VRF. VRF or Virtual Routing and Forwarding is a technology that makes it possible to create multiple routing tables on a single router. In this blog post, we are going to set up a VyOS management VRF for out-of-band management traffic.
VRF is for a lot of people in network land a known technology and is leveraged in companies all over the world. The only limit was that VyOS was not capable of running a VRF before. So after the release of the VRF feature is was time to figure out if it working as I would expect it.
So what is a VRF?
I already talked a little bit about Virtual Routing and Forwarding but here is the official statement from the Wikipedia website:
“Virtual routing and forwarding (VRF) is a technology that allows multiple instances of a routing table to co-exist within the same router at the same time. One or more logical or physical interfaces may have a VRF and these VRFs do not share routes therefore the packets are only forwarded between interfaces on the same VRF. VRFs are the TCP/IP layer 3 equivalent of a VLAN. Because the routing instances are independent, the same or overlapping IP addresses can be used without conflicting with each other. Network functionality is improved because network paths can be segmented without requiring multiple routers.”
Goal
The goal for me was to create an out-of-band management interface on my virtual VyoS router that is running on VMware vSphere. This can only be achieved by the new VRF feature because you get an extra/new routing table that is used by the VRF only. The main reason for me was to split the SSH and SNMP traffic from the rest of the traffic. One of the perks of having a dedicated interface is to improve security and it makes creating firewall rules easier because all of the out-of-band interfaces are in one dedicated network.
Here is an overview of the vSphere VM running VyOS with two virtual network cards connected. As you can see one NIC is connected to a portgroup that allows multiple VLANs and the other is connected to a dedicated network for out-of-band management.
VyOS – VMware Virtual Machine – Configuration
VRF Configuration
Now it is time to start configuring VyOS to leverage the VRF. Below you will find the IP addresses that I have used as an example in this blog post.
The first step is setting up an interface that will be leveraged by the VRF in the next part of the configuration.
### Create a new interface
set interfaces ethernet eth1 address 192.168.200.1/24

### Set interface description (optional)
set interfaces ethernet eth1 description 'Dedicated Out-of-Band Management Interface'
Now it is time to set up the VRF configuration and link it to the newly created interface. After that point, the VyOS Management VRF should be reachable in the network.
### Create a VRF called OOB-Management with a new routing table
set vrf name OOB-Management table 100

### Add a description
set vrf name OOB-Management description Out-Of-Band_Management

### Assign the physical interface to the VRF
set interfaces ethernet eth1 vrf OOB-Management

### Add a static route for the VRF to get access to a gateway
set protocols vrf OOB-Management static route 0.0.0.0/0 next-hop 192.168.200.254
Here are some troubleshooting commands that I used when configuring the VRF on VyOS.
### Routing table VRF
show ip route vrf OOB-Management

### Ping
ping 192.168.200.254 vrf OOB-Management
Now it is up and running it is time to set up the out-of-band management services. In my case, this will be SSH & SNMP. SSH is used for access to the command-line of the VyOS router and SNMP is used for monitoring.
### SSH - Activate the service on the VRF
set service ssh vrf OOB-Management

### SSH - Active listing address for SSH on Out-of-Band network
set service ssh listen-address 192.168.200.1

### SNMP - Active the service on the VRF
set service snmp vrf OOB-Management

### SNMP - Add permissions
set service snmp community routers authorization ro
set service snmp community Public
set service snmp community routers client 192.168.200.20

### SNMP - Set the location and contact
set service snmp location "Be-Virtual.net - Datacenter"
set service snmp contact "admin@be-virtual.net"

### SNMP - Activate the listening address
set service snmp listen-address 192.168.200.1 port 161
Here is some information about my IP numbers:
VyOS IP Address for Out-of-Band Management = 192.168.200.1
Gateway of the Out-of-Band Management network = 192.168.200.254
Monitoring server that monitors with SNMP = 192.168.200.100
Wrap-up
The VRF feature that is added to VyOS is really great! It is a great addition to an already great product. There are a lot of use cases think about multiple routers with different routing protocols running on a single VyOS box with there own routing table.
For me, this was an easy step to test the VRF feature with the Out-of-Band management test. This is just the first of testing the VRF. The next step will be to connect with my lab environment and leveraging BGP. Currently, I am running multiple boxes for multi-site just to test VMware NSX-T in my Lab environment. This can be simplified with VRFs!
Thanks for reading this blog post and see you next time. If you have any comments? Please respond below! 🙂
Sources
Here are some sources I used for setting up the management VRF:
In my home lab environment, I wanted to rebuild my VyOS virtual router/firewall. So I exported the configuration from the old appliance and I tried to perform a restore on the new virtual appliance. The question that arose was: how do you perform a VyOS configuration restore?
Somehow on the internet, I could not find any tutorial or manual that explained to me how this action could be performed. There are enough write-ups and articles surrounding the TFTP, FTP and SCP restore procedure but the VyOS appliance is empty… with a default configuration. I just wanted to restore the configuration without setting up all kinds of services and configuring by hand my interfaces on the VyOS appliance.
So it was time to examine the VyOS appliance and figure out what was going on under the covers.
Why do you need VyOS?
Before diving any further let‘s talk about VyOS! I use VyOS for my Lab environment because it is easily configurable and has an entire feature set of enterprise-grade network technology onboard by default. Like the routing protocols BGP and OSPF and high availability option VRRP.
So why do you need OSPF and BGP at home? I’m a VMware Consultant that is responsible for SDDC / SDN / NSX designs and implementations. I regularly need to perform tests in my Lab environment. VMware NSX likes to have a dynamic routing protocol to connect the virtual overlay network to the physical world. Both routing protocols can be used to perform this. An article about a detailed configuration can be found here at Jeffrey Kusters his blog (my ITQ colleague). I not going into further detail on VMware NSX, this blog post is focused on VyOS.
VyOS Virtual Hardware
My VyOS appliance is deployed on a VMware vSphere 6.5 infrastructure. I used the OVA file that is available on the VyOS website (vyos-1.1.8-amd64.ova). The virtual machine is called the “LAB-FW01” this hostname will appear in the video record. The YouTube video is listed below.
The Virtual Machine hardware is configured as default. I only assigned the virtual network cards to the right networks. An overview is listed here:
Public – Network adapter 1 – Connected to a WAN interface
Private – Network adapter 2 – Connected to a VLAN trunk
VyOS Configuration Restore
Now it is time for restoring the VyOS configuration file on a newly deployed VyOS appliance.
Preparation:
Deploy a new VyOS appliance and make sure that the virtual networks are connected to the correct adapter.
Verify and/or change the MAC addresses were needed. The MAC addresses should align between the configuration file and the new virtual appliance:
Option 01: Change the virtual network card MAC address to the ones that were used on the old appliance.
Option 02: Change the MAC addresses in the configuration file that is used for the restore. The MAC address should align with the newly deployed VyOS appliance.
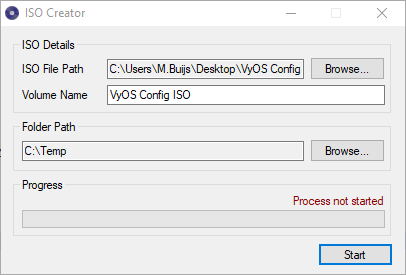
Create an ISO file with your latest configuration on it. I used the following opensource tooling as displayed below. Link to IsoCreator.
Creating an ISO file with VyOS Configuration
Procedure:
Open your vSphere Infrastructure and navigate to the Virtual Machine. This would be in my case “LAB-FW01“.
Assign the newly created ISO file to the Virtual Machine. You connect the ISO file to the CD-ROM drive.
Power-on the Virtual Machine.
Make sure you select in the GRUB bootloader the following mode to startup from: “VyOS 1.1.8 linux (USB console)”.
When VyOS is booted, log in with the following default credentials:
Username: vyos
Password: vyos
You are now logged in into the Linux Shell.
Now it’s time to mount the connected CD-ROM media:
sudo mount /dev/cdrom /mnt
To make sure my configuration is available. I list the directory content with the following command:
ls -l /mnt
Now it is time to copy my old configuration to the startup configuration location of VyOS. Use the following command to perform this action (keep in mind: My configuration is called “2018-06-05-vyos.config.boot”):
To verify the copy action, I run the following command to display my hostname that is listed in the configuration file:
cat /config/config.boot | grep LAB-FW01
Now it is time to reboot the VyOS appliance. At the next boot, the old configuration will be loaded and everything should be restored. The following commands are required for rebooting VyOS:
reboot
yes
After the reboot is completed you should log in with your old credentials that belong to the restored configuration.
To verify that the configuration is loaded correctly I run the following command to display all my interfaces and sub-interfaces:
show interfaces
From this point, everything should be working.
Tips:
I have listed all the VyOS configuration locations that are important to this article.
In case you messed up your VyOS configuration you can always restore the default out-of-the-box configuration with the procedure described above. You only need to change the copy action in step eight to the following: (cp /opt/vyatta/etc/config.boot.default /config/config.boot).
Because there are a couple of steps involved I decided to record a video of me performing the procedure. Keep in mind:my VMware Remote Console is in dutch :).
Final word
About six months back I switched from pfSense to VyOS. The main reason was the BGP support and stability of the BGP routing process. I am happy I did. The VyOS appliance is just amazing and extremely reliable and robust.
If you are familiar with the Cisco CLI than you will be flying through the VyOS CLI in no-time.