In the latest release of VyOS, a new feature has been added to the product called VRF. VRF or Virtual Routing and Forwarding is a technology that makes it possible to create multiple routing tables on a single router. In this blog post, we are going to set up a VyOS management VRF for out-of-band management traffic.
VRF is for a lot of people in network land a known technology and is leveraged in companies all over the world. The only limit was that VyOS was not capable of running a VRF before. So after the release of the VRF feature is was time to figure out if it working as I would expect it.
So what is a VRF?
I already talked a little bit about Virtual Routing and Forwarding but here is the official statement from the Wikipedia website:
“Virtual routing and forwarding (VRF) is a technology that allows multiple instances of a routing table to co-exist within the same router at the same time. One or more logical or physical interfaces may have a VRF and these VRFs do not share routes therefore the packets are only forwarded between interfaces on the same VRF. VRFs are the TCP/IP layer 3 equivalent of a VLAN. Because the routing instances are independent, the same or overlapping IP addresses can be used without conflicting with each other. Network functionality is improved because network paths can be segmented without requiring multiple routers.”
Goal
The goal for me was to create an out-of-band management interface on my virtual VyoS router that is running on VMware vSphere. This can only be achieved by the new VRF feature because you get an extra/new routing table that is used by the VRF only. The main reason for me was to split the SSH and SNMP traffic from the rest of the traffic. One of the perks of having a dedicated interface is to improve security and it makes creating firewall rules easier because all of the out-of-band interfaces are in one dedicated network.
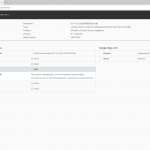
Here is an overview of the vSphere VM running VyOS with two virtual network cards connected. As you can see one NIC is connected to a portgroup that allows multiple VLANs and the other is connected to a dedicated network for out-of-band management.

VRF Configuration
Now it is time to start configuring VyOS to leverage the VRF. Below you will find the IP addresses that I have used as an example in this blog post.
The first step is setting up an interface that will be leveraged by the VRF in the next part of the configuration.
### Create a new interface
set interfaces ethernet eth1 address 192.168.200.1/24

### Set interface description (optional)
set interfaces ethernet eth1 description 'Dedicated Out-of-Band Management Interface'
Now it is time to set up the VRF configuration and link it to the newly created interface. After that point, the VyOS Management VRF should be reachable in the network.
### Create a VRF called OOB-Management with a new routing table
set vrf name OOB-Management table 100

### Add a description
set vrf name OOB-Management description Out-Of-Band_Management

### Assign the physical interface to the VRF
set interfaces ethernet eth1 vrf OOB-Management

### Add a static route for the VRF to get access to a gateway
set protocols vrf OOB-Management static route 0.0.0.0/0 next-hop 192.168.200.254
Here are some troubleshooting commands that I used when configuring the VRF on VyOS.
### Routing table VRF
show ip route vrf OOB-Management

### Ping
ping 192.168.200.254 vrf OOB-Management
Now it is up and running it is time to set up the out-of-band management services. In my case, this will be SSH & SNMP. SSH is used for access to the command-line of the VyOS router and SNMP is used for monitoring.
### SSH - Activate the service on the VRF
set service ssh vrf OOB-Management

### SSH - Active listing address for SSH on Out-of-Band network
set service ssh listen-address 192.168.200.1

### SNMP - Active the service on the VRF
set service snmp vrf OOB-Management

### SNMP - Add permissions
set service snmp community routers authorization ro
set service snmp community Public
set service snmp community routers client 192.168.200.20

### SNMP - Set the location and contact
set service snmp location "Be-Virtual.net - Datacenter"
set service snmp contact "admin@be-virtual.net"

### SNMP - Activate the listening address
set service snmp listen-address 192.168.200.1 port 161
Here is some information about my IP numbers:
- VyOS IP Address for Out-of-Band Management = 192.168.200.1
- Gateway of the Out-of-Band Management network = 192.168.200.254
- Monitoring server that monitors with SNMP = 192.168.200.100
Wrap-up
The VRF feature that is added to VyOS is really great! It is a great addition to an already great product. There are a lot of use cases think about multiple routers with different routing protocols running on a single VyOS box with there own routing table.
For me, this was an easy step to test the VRF feature with the Out-of-Band management test. This is just the first of testing the VRF. The next step will be to connect with my lab environment and leveraging BGP. Currently, I am running multiple boxes for multi-site just to test VMware NSX-T in my Lab environment. This can be simplified with VRFs!
Thanks for reading this blog post and see you next time. If you have any comments? Please respond below! 🙂
Sources
Here are some sources I used for setting up the management VRF: