Today I was planning a NSX manager deployment in my Home Lab… But that turn out to be a problem, because I could not upload an OVF file in the vSphere Client and HTML5 Web Client. When looking in my Home Lab notes I realized the last time I deployed an OVF was when the VCSA was running 6.5 without update 1. I think something went wrong with updating to VCSA 6.5 update 1.
Problem:
Both webpages display the problem in a different way.
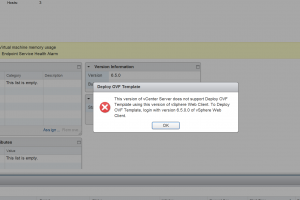
vSphere Client:
With the vSphere Client the following pop-up appears when trying to deploy an OVF file: “This version of vCenter Server does not support Deploy OVF Template using this version of vSphere Web Client. To Deploy OVF Template, login with version 6.5.0.0 of vSphere Web Client”
vSphere Client – OVF Deployment
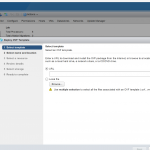
HTML5 Web Client:
The HTML5 Web Client does not display any error at all. It just disables the option to deploy an OVF file.
HTML5 Web Client – Deployment not possible
Fix:
After some googling I found the following VMware KB article 2151085 (link). This turned out to be the solution.
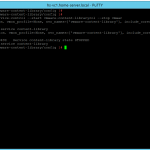
1. Connect to the vCenter Server Appliance with an SSH session and root credentials.
2. Run this command to enable access the Bash shell:
shell.set –enabled true
3. Type shell and press Enter.
4. Navigate to /etc/vmware-content-library/config/ with this command:
cd /etc/vmware-content-library/config/
5. Create a backup of the ts-config.properties and ts-config.properties.rpmnew file with these commands:
cp ts-config.properties ts-config.properties.orig
cp ts-config.properties.rpmnew ts-config.properties.rpmnew.orig
6. Rename ts-config.properties.rpmnew to ts-config.properties.
mv ts-config.properties.rpmnew ts-config.properties
7. Restart the Content Library service:
service-control –stop vmware-content-library
service-control –start vmware-content-library
8. Refresh or close your browser and connect with one of the web interfaces.
Yesterday VMware announced the list of 2017 Second Half vExperts. I was pleased to hear that I am also selected. For ITQ (my employer) this means we have in total 14 vExpert and 5 vExpertNSX. Congratulations to everyone else that got their accreditations.
What is a vExpert?
The VMware vExpert program is VMware’s global evangelism and advocacy program. The program is designed to put VMware’s marketing resources towards your advocacy efforts. Promotion of your articles, exposure at our global events, co-op advertising, traffic analysis, and early access to beta programs and VMware’s roadmap.
Each year, we bring together in the vExpert Program the people who have made some of the most important contributions to the VMware community. These are the bloggers, book authors, VMUG leaders, speakers, tool builders, community leaders and general enthusiasts. They work as IT admins and architects for VMware customers, they act as trusted advisors and implementors for VMware partners or as independent consultants, and some work for VMware itself. All of them have the passion and enthusiasm for technology and applying technology to solve problems. They have contributed to the success of us all by sharing their knowledge and expertise over their days, nights, and weekends.
In this blog post, we are going to automate the installation of VMware ESXi 5.5, 6.0 and 6.5. This can be done with a so-called “kickstart” configuration file which is officially supported by VMware. The file contains the configuration for a VMware ESXi Host to configure settings like IP address, subnet mask, hostname, license key, datastore, etc.
The kickstart configuration file can be made available in the following locations:
FTP
HTTP/HTTPS
NFS Share
USB flash drive
CD/DVD device
Personally, I prefer to use the HTTP protocol.
Use Case
You might ask yourself, why should I install an ESXi Host with a kickstart file? Some of the use cases I identified over the years are:
The very first ESXi Hosts for your SDDC environment (before VMware vCenter is deployed or vSphere Auto Deploy is configured).
A standalone ESXi Host for a small environment.
A Home Lab environment to install nested VMware ESXi Hosts.
Setup a web server
To make the kickstart configuration file available for the ESXi host we need a web server. Basically, every web server available on the market can serve this file. Here is a list of web server products that I have used: Apache, Microsoft IIS and NGINX.
In this environment/example I used a Microsoft IIS server on a Windows 10 Client. Do not forget to add the cfg extension to the MIME types.
Configuration file
Now it’s time to create a text file with your favourite text editor. The text file in this example is called (ks.cfg). I have added two configuration files as samples, one with the minimum settings and one I normally use for my Lab environment.
Configuration file – Simple (ks.cfg)
This is a default ks.cfg configuration file with just the minimum of settings required.
#
# Sample scripted installation file
#

# Accept the VMware End User License Agreement
vmaccepteula

# Set the root password for the DCUI and Tech Support Mode
rootpw mypassword

# The install media is in the CD-ROM drive
install --firstdisk --overwritevmfs

# Set the network to DHCP on the first network adapter
network --bootproto=dhcp --device=vmnic0

# A sample post-install script
%post --interpreter=python --ignorefailure=true
import time
stampFile = open('/finished.stamp', mode='w')
stampFile.write( time.asctime() )
Configuration file – Advanced (ks.cfg)
This is the more advanced version of the configuration file that also configures a lot of other settings like NTP servers, search domain, CEIP and a static IP address for the management interface.
### ESXi Installation Script
### Hostname: LAB-ESXi01A
### Author: M. Buijs
### Date: 2017-08-11
### Tested with: ESXi 6.0 and ESXi 6.5

##### Stage 01 - Pre installation:

    ### Accept the VMware End User License Agreement
    vmaccepteula

    ### Set the root password for the DCUI and Tech Support Mode
    rootpw VMware1!

    ### The install media (priority: local / remote / USB)
    install --firstdisk=local --overwritevmfs --novmfsondisk

    ### Set the network to DHCP on the first network adapter
    network --bootproto=static --device=vmnic0 --ip=192.168.151.101 --netmask=255.255.255.0 --gateway=192.168.151.254 --nameserver=192.168.126.21,192.168.151.254 --hostname=LAB-ESXi01A.lab.local --addvmportgroup=0

    ### Reboot ESXi Host
    reboot --noeject

##### Stage 02 - Post installation:

    ### Open busybox and launch commands
    %firstboot --interpreter=busybox

    ### Set Search Domain
    esxcli network ip dns search add --domain=lab.local

    ### Add second NIC to vSwitch0
    esxcli network vswitch standard uplink add --uplink-name=vmnic1 --vswitch-name=vSwitch0

    ###  Disable IPv6 support (reboot is required)
    esxcli network ip set --ipv6-enabled=false

    ### Add NTP Server addresses
    echo "server 192.168.126.21" >> /etc/ntp.conf;
    echo "server 192.168.151.254" >> /etc/ntp.conf;

    ### Allow NTP through firewall
    esxcfg-firewall -e ntpClient

    ### Enable NTP autostartup
    /sbin/chkconfig ntpd on;

    ### Rename local datastore (currently disabled because of --novmfsondisk)
    #vim-cmd hostsvc/datastore/rename datastore1 "DAS - $(hostname -s)"

    ### Disable CEIP
    esxcli system settings advanced set -o /UserVars/HostClientCEIPOptIn -i 2

    ### Enable maintaince mode
    esxcli system maintenanceMode set -e true

    ### Reboot
    esxcli system shutdown reboot -d 15 -r "rebooting after ESXi host configuration"
Installing an ESXi Host with Kickstart file
The following procedure needs to be performed to boot from a kickstart file:
Boot the ESXi host with a VMware ESXi ISO (ISO file can be obtained from the VMware download page).
Press the key combination “shift + o” at boot.
Enter one of the following lines after runweasel:
For an HTTP share: ks=http://%IP_or_FQDN%/kg.cfg
For an HTTPs share: ks=https://%IP_or_FQDN%/kg.cfg
For a NFS share: ks=nfs://%IP_or_FQDN%/ks.cfg
The installation will start and use the kickstart configuration file (ks.cfg).
After the installation is complete the ESXi Host will reboot.
Screenshots
Here are some screenshots of the procedure:
HTTP Path to ks.cfg file on webserver.
ESXi Host is downloading/reading file from HTTP mirror
Article updates:
2018-10-04 – This article has been updated.
2018-11-16 – Code blocks were not displaying correctly.
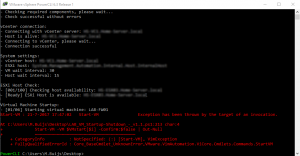
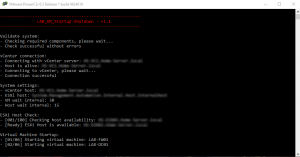
Today I was running one of my favourite home lab scripts to startup and shutdown my lab environment. Sadly, this ended with a PowerCLI error code. So it was time to investigate what was going wrong because the code did not change but the script stopped functioning at some point.
Error message:
The first thing we look at is the error message. The following error message was displayed inside my PowerCLI console: “Start-VM Exception has been thrown by the target invocation”
So it appears the command “Start-VM” is causing some issue. The Start-VM PowerCLI cmdlet is responsible for sending a command to vCenter Server to start a particular virtual machine.
Fix:
The first thing I noticed the system I was using was not running the most recent version of PowerCLI. So the first thing I did was upgrade PowerCLI from version 6.3 to PowerCLI version 6.5. I rebooted the system and I started the script again. It appeared that all the problems were gone :). So something surrounding the “Start-VM” cmdlet is not working correctly in PowerCLI 6.3. I could not find any information or a changelog entry related to the issue but it fixed “something” :).
Screenshots:
The first screenshot displays the script and encountering the issue with PowerCLI version 6.3. The second screenshot the same script is run but with an installed PowerCLI 6.5 version. As you can see the issue is resolved now.
PowerCLI 6.3 – Start-VM Exception has been thrown by the target invocation
This week VMware released vSphere Integrated Containers (VIC) version 1.1. Below are the product highlights and a small introduction to the new product.
Information about VMware Integrated Containers
vSphere Integrated Containers comprises three components:
VMware vSphere Integrated Containers Engine, a container runtime for vSphere that allows developers who are familiar with Docker to develop in containers and deploy them alongside traditional VM-based workloads on vSphere clusters. vSphere administrators can manage these workloads by using vSphere in a way that is familiar.
VMware vSphere Integrated Containers Registry, an enterprise-class container registry server that stores and distributes container images. vSphere Integrated Containers Registry extends the Docker Distribution open source project by adding the functionalities that an enterprise requires, such as security, identity and management.
VMware vSphere Integrated Containers Management Portal, a container management portal that provides a UI for DevOps teams to provision and manage containers, including retrieving stats and info about container instances. Cloud administrators can manage container hosts and apply governance to their usage, including capacity quotas and approval workflows. When integrated with vRealize Automation, more advanced capabilities become available, such as deployment blueprints and enterprise-grade Containers-as-a-Service.
With these capabilities, vSphere Integrated Containers enables VMware customers to deliver a production-ready container solution to their developers and DevOps teams. By leveraging their existing SDDC, customers can run container-based applications alongside existing virtual machine based workloads in production without having to build out a separate, specialized container infrastructure stack. As an added benefit for customers and partners, vSphere Integrated Containers is modular. So, for example, if your organization already has a container registry in production, you can use that registry with vSphere Integrated Containers Engine and vSphere Integrated Containers Management Portal.
New features:
A unified OVA installer for all three components
Upgrade from version 1.0
Official support for vSphere Integrated Containers Management Portal
A unified UI for vSphere Integrated Containers Registry and vSphere Integrated Containers Management Portal
A plug-in for the HTML5 vSphere Client
Support for Docker Client 1.13 and Docker API version 1.25
Support for using Notary with vSphere Integrated Containers Registry
Support for additional Docker commands. For the list of Docker commands that this release supports, see Supported Docker Commands in Developing Container Applications with vSphere Integrated Containers.
Photon Platform version 1.2 has been released this week. Keep in mind the support for VMware ESXi 6.0 has been dropped for Photon Platform version 1.2.
On March 16 2017, I attended the NLVMUG 2017 in the Netherlands. Frank Denneman from VMware presented the opening keynote about “VMware Cloud on AWS”. The NLVMUG is a one-day event and displayed 65 sessions, a remarkably high number. The NLVMUG is one of the largest/is the largest VMUG in the world.
This week the NLVMUG organization published the presentations and recorded sessions online. The information is for everyone available and free of charge.
A security vulnerability has been discovered in some VMware products (CVE-2017-5638). It’s a critical vulnerability which allows remote code execution (RCE) on Apache Struts 2.
The vulnerability affects the following VMware products:
– DaaS 6.X / 7.X
– Hyperic 5.X
– vCenter 5.5 / 6.0 / 6.5
– vROPS 6.X
I recently got a question about enabling and disabling the quest time synchronization for virtual machines. The customer asked about a solution to change the settings from within the operating system instead of the VMware vSphere Client or vSphere Web Client. Normally you would change the virtual machine time synchronization settings by hand with the vSphere Client/Web Client/HTML5 or with a PowerCLI script, but after some searching, it appears, there is a solution provided by VMware. Read more
When deploying some virtual machines in a test environment I ran into the following problem. In most cases, I make use of a VMware vCenter Storage DRS cluster, in this case when deploying a virtual machine the best-suited datastore is selected for the virtual machines. The only problem is not all customers are entitled to use Storage DRS, because Storage DRS requires a vSphere Enterprise Plus license.
So I needed to create a workaround to select a datastore with enough space. The default PowerCLI behavior is selecting the first datastore detected on a alphabetic order.
So when you are deploying let’s say twenty virtual machines all those virtual machines will be put on the first datastore, so that isn’t going to work well in most cases.
PowerCLI Code
To solve the problem I created the following PowerCLI code. The code selects a cluster and lists all the datastore available. The datastore with the most space available is selected for the virtual machine that is being deployed.
In the PowerCLI code, I just create a very simple virtual machine but you probably get the point. The magic is the $DS line that selects the datastore.
Requirements:
The PowerShell code is tested with the following VMware software components on Microsoft Windows:
PowerCLI 6.5 Update 1
VMware vCenter Server 6.0
### Variables
$CLUSTER = "Production"       # A Cluster Name
$FOLDER = "Deployed VMs"      # A Virtual Machine folder name located in the vCenter inventory

### Select datastores available and sort them on free space (select the one with most space free)
$DS = Get-Cluster -Name $CLUSTER | Get-Datastore | Select Name, FreeSpaceGB | Sort-Object FreeSpaceGB -Descending | Select -first 1

### Create a virtual machine called VM01
New-VM -Name VM01 -ResourcePool $CLUSTER -Datastore $DS.Name -Location $FOLDER -MemoryGB 1 -CD -DiskGB 5
Article update:
2018-07-30 – Added feature image.
2018-11-17 – Updated article to support the new standards of the website.


 On March 16 2017, I attended the NLVMUG 2017 in the Netherlands.