Today I was planning a NSX manager deployment in my Home Lab… But that turn out to be a problem, because I could not upload an OVF file in the vSphere Client and HTML5 Web Client. When looking in my Home Lab notes I realized the last time I deployed an OVF was when the VCSA was running 6.5 without update 1. I think something went wrong with updating to VCSA 6.5 update 1.
Problem:
Both webpages display the problem in a different way.
vSphere Client:
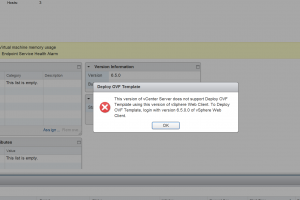
With the vSphere Client the following pop-up appears when trying to deploy an OVF file: “This version of vCenter Server does not support Deploy OVF Template using this version of vSphere Web Client. To Deploy OVF Template, login with version 6.5.0.0 of vSphere Web Client”
vSphere Client – OVF Deployment
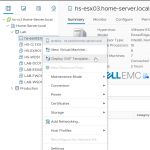
HTML5 Web Client:
The HTML5 Web Client does not display any error at all. It just disables the option to deploy an OVF file.
HTML5 Web Client – Deployment not possible
Fix:
After some googling I found the following VMware KB article 2151085 (link). This turned out to be the solution.
1. Connect to the vCenter Server Appliance with an SSH session and root credentials.
2. Run this command to enable access the Bash shell:
shell.set –enabled true
3. Type shell and press Enter.
4. Navigate to /etc/vmware-content-library/config/ with this command:
cd /etc/vmware-content-library/config/
5. Create a backup of the ts-config.properties and ts-config.properties.rpmnew file with these commands:
cp ts-config.properties ts-config.properties.orig
cp ts-config.properties.rpmnew ts-config.properties.rpmnew.orig
6. Rename ts-config.properties.rpmnew to ts-config.properties.
mv ts-config.properties.rpmnew ts-config.properties
7. Restart the Content Library service:
service-control –stop vmware-content-library
service-control –start vmware-content-library
8. Refresh or close your browser and connect with one of the web interfaces.
In this blog post, we are going to automate the installation of VMware ESXi 5.5, 6.0 and 6.5. This can be done with a so-called “kickstart” configuration file which is officially supported by VMware. The file contains the configuration for a VMware ESXi Host to configure settings like IP address, subnet mask, hostname, license key, datastore, etc.
The kickstart configuration file can be made available in the following locations:
FTP
HTTP/HTTPS
NFS Share
USB flash drive
CD/DVD device
Personally, I prefer to use the HTTP protocol.
Use Case
You might ask yourself, why should I install an ESXi Host with a kickstart file? Some of the use cases I identified over the years are:
The very first ESXi Hosts for your SDDC environment (before VMware vCenter is deployed or vSphere Auto Deploy is configured).
A standalone ESXi Host for a small environment.
A Home Lab environment to install nested VMware ESXi Hosts.
Setup a web server
To make the kickstart configuration file available for the ESXi host we need a web server. Basically, every web server available on the market can serve this file. Here is a list of web server products that I have used: Apache, Microsoft IIS and NGINX.
In this environment/example I used a Microsoft IIS server on a Windows 10 Client. Do not forget to add the cfg extension to the MIME types.
Configuration file
Now it’s time to create a text file with your favourite text editor. The text file in this example is called (ks.cfg). I have added two configuration files as samples, one with the minimum settings and one I normally use for my Lab environment.
Configuration file – Simple (ks.cfg)
This is a default ks.cfg configuration file with just the minimum of settings required.
#
# Sample scripted installation file
#

# Accept the VMware End User License Agreement
vmaccepteula

# Set the root password for the DCUI and Tech Support Mode
rootpw mypassword

# The install media is in the CD-ROM drive
install --firstdisk --overwritevmfs

# Set the network to DHCP on the first network adapter
network --bootproto=dhcp --device=vmnic0

# A sample post-install script
%post --interpreter=python --ignorefailure=true
import time
stampFile = open('/finished.stamp', mode='w')
stampFile.write( time.asctime() )
Configuration file – Advanced (ks.cfg)
This is the more advanced version of the configuration file that also configures a lot of other settings like NTP servers, search domain, CEIP and a static IP address for the management interface.
### ESXi Installation Script
### Hostname: LAB-ESXi01A
### Author: M. Buijs
### Date: 2017-08-11
### Tested with: ESXi 6.0 and ESXi 6.5

##### Stage 01 - Pre installation:

    ### Accept the VMware End User License Agreement
    vmaccepteula

    ### Set the root password for the DCUI and Tech Support Mode
    rootpw VMware1!

    ### The install media (priority: local / remote / USB)
    install --firstdisk=local --overwritevmfs --novmfsondisk

    ### Set the network to DHCP on the first network adapter
    network --bootproto=static --device=vmnic0 --ip=192.168.151.101 --netmask=255.255.255.0 --gateway=192.168.151.254 --nameserver=192.168.126.21,192.168.151.254 --hostname=LAB-ESXi01A.lab.local --addvmportgroup=0

    ### Reboot ESXi Host
    reboot --noeject

##### Stage 02 - Post installation:

    ### Open busybox and launch commands
    %firstboot --interpreter=busybox

    ### Set Search Domain
    esxcli network ip dns search add --domain=lab.local

    ### Add second NIC to vSwitch0
    esxcli network vswitch standard uplink add --uplink-name=vmnic1 --vswitch-name=vSwitch0

    ###  Disable IPv6 support (reboot is required)
    esxcli network ip set --ipv6-enabled=false

    ### Add NTP Server addresses
    echo "server 192.168.126.21" >> /etc/ntp.conf;
    echo "server 192.168.151.254" >> /etc/ntp.conf;

    ### Allow NTP through firewall
    esxcfg-firewall -e ntpClient

    ### Enable NTP autostartup
    /sbin/chkconfig ntpd on;

    ### Rename local datastore (currently disabled because of --novmfsondisk)
    #vim-cmd hostsvc/datastore/rename datastore1 "DAS - $(hostname -s)"

    ### Disable CEIP
    esxcli system settings advanced set -o /UserVars/HostClientCEIPOptIn -i 2

    ### Enable maintaince mode
    esxcli system maintenanceMode set -e true

    ### Reboot
    esxcli system shutdown reboot -d 15 -r "rebooting after ESXi host configuration"
Installing an ESXi Host with Kickstart file
The following procedure needs to be performed to boot from a kickstart file:
Boot the ESXi host with a VMware ESXi ISO (ISO file can be obtained from the VMware download page).
Press the key combination “shift + o” at boot.
Enter one of the following lines after runweasel:
For an HTTP share: ks=http://%IP_or_FQDN%/kg.cfg
For an HTTPs share: ks=https://%IP_or_FQDN%/kg.cfg
For a NFS share: ks=nfs://%IP_or_FQDN%/ks.cfg
The installation will start and use the kickstart configuration file (ks.cfg).
After the installation is complete the ESXi Host will reboot.
Screenshots
Here are some screenshots of the procedure:
HTTP Path to ks.cfg file on webserver.
ESXi Host is downloading/reading file from HTTP mirror
Article updates:
2018-10-04 – This article has been updated.
2018-11-16 – Code blocks were not displaying correctly.
When deploying some virtual machines in a test environment I ran into the following problem. In most cases, I make use of a VMware vCenter Storage DRS cluster, in this case when deploying a virtual machine the best-suited datastore is selected for the virtual machines. The only problem is not all customers are entitled to use Storage DRS, because Storage DRS requires a vSphere Enterprise Plus license.
So I needed to create a workaround to select a datastore with enough space. The default PowerCLI behavior is selecting the first datastore detected on a alphabetic order.
So when you are deploying let’s say twenty virtual machines all those virtual machines will be put on the first datastore, so that isn’t going to work well in most cases.
PowerCLI Code
To solve the problem I created the following PowerCLI code. The code selects a cluster and lists all the datastore available. The datastore with the most space available is selected for the virtual machine that is being deployed.
In the PowerCLI code, I just create a very simple virtual machine but you probably get the point. The magic is the $DS line that selects the datastore.
Requirements:
The PowerShell code is tested with the following VMware software components on Microsoft Windows:
PowerCLI 6.5 Update 1
VMware vCenter Server 6.0
### Variables
$CLUSTER = "Production"       # A Cluster Name
$FOLDER = "Deployed VMs"      # A Virtual Machine folder name located in the vCenter inventory

### Select datastores available and sort them on free space (select the one with most space free)
$DS = Get-Cluster -Name $CLUSTER | Get-Datastore | Select Name, FreeSpaceGB | Sort-Object FreeSpaceGB -Descending | Select -first 1

### Create a virtual machine called VM01
New-VM -Name VM01 -ResourcePool $CLUSTER -Datastore $DS.Name -Location $FOLDER -MemoryGB 1 -CD -DiskGB 5
Article update:
2018-07-30 – Added feature image.
2018-11-17 – Updated article to support the new standards of the website.