Tag: VMware

VCF Orchestrator Node.js Environment Variables

In this blog post, we will explore how to use environment variables in a Node.js script running inside Broadcom VMware VCF Orchestrator. Environment variables are a great way to configure your scripts without hardcoding values, making your code more flexible and secure.

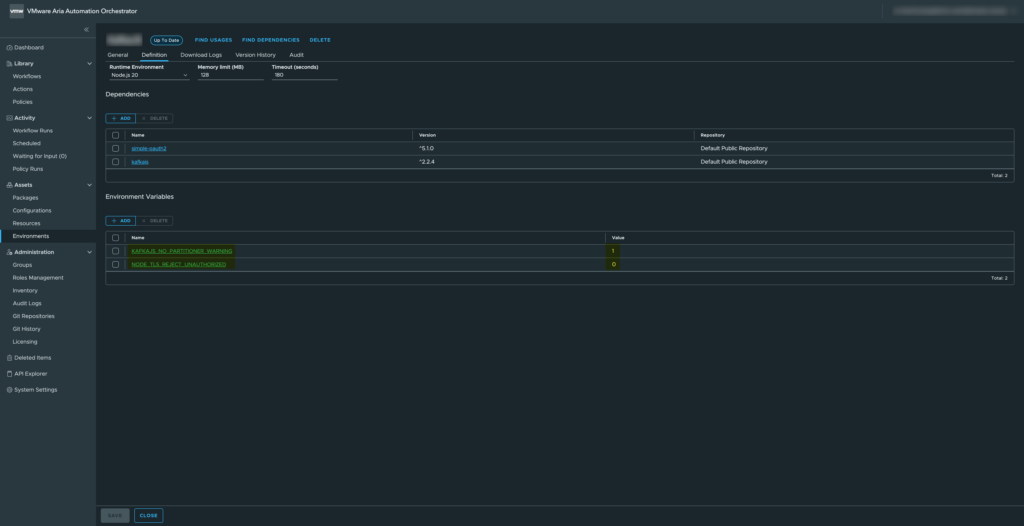
Environment Variables in VCF Orchestrator

For this example, we will use two environment variables available in the VCF Orchestrator environment.
– KAFKAJS_NO_PARTITIONER_WARNING
– NODE_TLS_REJECT_UNAUTHORIZED

These variables are commonly used when integrating with Kafka or handling TLS certificates in Node.js.

01 - VCF Orchestrator - Node.JS - Environment variables
VCF Orchestrator – Node.JS – Environment variables
02 - VCF Orchestrator - Node.JS - Setting environment variables
VCF Orchestrator – Node.JS – Setting environment variables

Loading and Validating Environment Variables

Below is a function that retrieves these environment variables and validates their values:

// Load container environment variables
const loadEnvs = () => {
    const { KAFKAJS_NO_PARTITIONER_WARNING, NODE_TLS_REJECT_UNAUTHORIZED } = process.env;

    // Validation: only "0" or "1" are allowed
    if (!['0', '1'].includes(KAFKAJS_NO_PARTITIONER_WARNING)) {
        throw new Error(`${LOG_PREFIX} Invalid KAFKAJS_NO_PARTITIONER_WARNING value: ${KAFKAJS_NO_PARTITIONER_WARNING}`);
    }
    if (!['0', '1'].includes(NODE_TLS_REJECT_UNAUTHORIZED)) {
        throw new Error(`${LOG_PREFIX} Invalid NODE_TLS_REJECT_UNAUTHORIZED value: ${NODE_TLS_REJECT_UNAUTHORIZED}`);
    }

    // Return the validated variables
    return { KAFKAJS_NO_PARTITIONER_WARNING, NODE_TLS_REJECT_UNAUTHORIZED };
};

Explanation: We destructure the variables directly from process.env. Validation ensures the variables are either “0” or “1” only, preventing invalid configurations. The function returns an object with the validated variables, which can be safely used in your script.

Using the Environment Variables

Once loaded, you can use these variables in your Node.js script like this:

// Load environment variables
const envs = loadEnvs();

console.log(`${LOG_PREFIX} Setting environment variable KAFKAJS_NO_PARTITIONER_WARNING=${envs.KAFKAJS_NO_PARTITIONER_WARNING}`);
console.log(`${LOG_PREFIX} Setting environment variable NODE_TLS_REJECT_UNAUTHORIZED=${envs.NODE_TLS_REJECT_UNAUTHORIZED}`);

This allows you to reference the environment variables throughout your script, for example to configure KafkaJS behavior or TLS certificate validation.

Why This Approach Is Useful

  • Centralized configuration: No hardcoding; variables can be changed per environment.
  • Fail-fast validation: The script throws an error immediately if a variable has an invalid value.
  • Secure defaults: Particularly important for TLS and security-related flags.
  • Reproducibility: Works consistently across VCF Orchestrator containers.

This setup ensures that your Node.js scripts in VCF Orchestrator are flexible, secure, and maintainable, while keeping the environment-specific configuration outside your code.

VCF Orchestrator the JavaScript week-number

While working with Broadcom VMware Cloud Foundation (VCF) Orchestrator, formerly known as vRealize Orchestrator, I ran into a subtle but very real problem: week numbers that did not match what we expect in The Netherlands.

At first glance this looked like a bug in the platform. In reality, it turned out to be a classic JavaScript date-handling pitfall that becomes especially visible in automation workflows.

The issue: week numbers don’t line up

In one of my Orchestrator workflows I evaluated two timestamps:

  • 2025-02-17 20:39:00.000 +01:00 → returns week 7
  • 2025-02-18 20:39:00.000 +01:00 → returns week 8

From a Dutch perspective, both dates fall in week 8. So why does JavaScript suddenly jump a week overnight?

ISO-8601 vs local expectations

The answer lies in how JavaScript (and most supporting libraries) determine week numbers.

JavaScript itself does not have a native getWeek() function, but most common implementations follow the ISO-8601 standard:

  • Weeks start on Monday
  • Week 1 is the first week of the year that contains at least four days in the new year
  • Week boundaries are calculated relative to Thursday

For 2025, that leads to the following result:

  • Monday, February 17, 2025 → still ISO week 7
  • Tuesday, February 18, 2025 → ISO week 8

So while this feels “wrong” locally, JavaScript is technically correct according to ISO-8601.

Why this matters in VCF Orchestrator

In Broadcom VMware VCF Orchestrator, JavaScript is often used to:

  • Schedule tasks
  • Generate weekly reports
  • Drive time-based logic in workflows
  • Integrate with external systems like ITSM or ticketing platforms

If your organization assumes Dutch calendar logic without explicitly coding for it, you can end up with off-by-one-week errors that are extremely hard to trace later.

The solution: make the week calculation explicit

To avoid ambiguity, I implemented an explicit ISO-week calculation in JavaScript and documented it clearly in the action itself. This ensures that anyone reading or reusing the code understands exactly which standard is applied.

Here is the action I use in Orchestrator:

function calculateCurrentWeek(dateNow) {
	function getISOWeekNumber(date) {
	    var d = new Date(date.getTime());
	    d.setHours(0, 0, 0, 0);
	    
	    // Adjust to the Thursday of the current week
	    d.setDate(d.getDate() + 3 - (d.getDay() || 7));
	
	    // Find the start of the year (first Thursday's week)
	    var yearStart = new Date(d.getFullYear(), 0, 4);
	    yearStart.setDate(yearStart.getDate() + 3 - (yearStart.getDay() || 7));
	
	    // Calculate the week number
	    var weekNumber = Math.round(((d - yearStart) / 86400000) / 7) + 1;
	
	    return weekNumber;
	}
	
	// Set variable
	var actionName = arguments.callee.name.substr(6);
	
	// Input validation
	if (!(dateNow instanceof Date)) {
	    throw new Error("[" + actionName + "] 'dateNow' must be a Date object");
	}
	
	// Calculate the week number
	var weekNumber = getISOWeekNumber(dateNow);
	
	// Return the result
	return weekNumber;
	
}

Takeaway

This is not a bug in Broadcom VMware VCF Orchestrator, nor in JavaScript itself. It is a reminder that date logic is never “obvious” in automation.

If your workflows depend on week numbers:

  • Decide explicitly which standard you use (ISO vs local convention)
  • Document that choice in your actions
  • Never rely on “what feels correct” for calendar logic

In automation platforms like VCF Orchestrator, these small details can make the difference between predictable workflows and subtle production issues that surface weeks later.

Your subscription has expired Aria Automation Orchestrator 8.18

After upgrading to VMware Aria Automation Orchestrator 8.18.1 update 2, I was greeted with a warning banner that read: “Your subscription has expired. The core product operations are unavailable.“. Here’s a screenshot of the message as it appears on the License page in Aria Automation Orchestrator — just in case you’re wondering how it looks in the UI.

Despite the product being fully licensed and working perfectly prior to the upgrade, this message appeared across the UI and disrupted basic functionality. While searching for answers, I found the official fix in Broadcom KB 380260, which turned out to be spot-on.

The Problem – Your subscription has expired

With the release of version 8.18, VMware introduced an updated licensing mechanism tied to Aria With the release of version 8.18, VMware introduced an updated licensing mechanism tied to the Aria Universal Suite Subscription. If your system had an expired Authentication Token, the application incorrectly flagged the license as invalid — even though your actual subscription was still valid.

So while everything was fine on the licensing side, the platform’s backend had issues validating the license properly.

What Was Affected:

At the time of the issue, the following core functionalities were completely disabled:

  • No workflows could run
  • No scheduled workflows were executed
  • No policies were triggered

This essentially rendered the product useless and unavailable for serving any customer platforms.

The Solution

Here’s what fixed it for me:

  1. SSH into the Aria Automation Orchestrator appliance.
  2. Run the following command to fix the issue: (vracli vro properties set –key com.vmware.o11n.license.check.automation-endpoint.enabled –value false).
  3. Wait for the services to stabilize, or reboot the appliance if needed.
  4. After a few minutes, the warning disappeared and all functionality returned to normal.

It was that simple — no need to re-upload the license, no need to redeploy anything. Just a simple command to run in the shell.

Final Thoughts

I’d suggest running this command as part of your post-upgrade validation checklist if you’re moving to Aria Automation 8.18 or later.

Have you seen similar issues after upgrades? Let me know on be-virtual.net — always happy to exchange notes.

Installation of a VMware Aria Automation Orchestrator Certificate

Overview

This guide provides step-by-step instructions for installing a custom certificate on the VMware Aria Automation Orchestrator (VAAO) appliance. Using a proper certificate ensures secure communication and meets compliance requirements.

Preparation

Before starting the installation, ensure the TLS certificate is formatted correctly in a PEM file. The file should include the following components in the exact order:

-----BEGIN RSA PRIVATE KEY-----
<Private Key>
-----END RSA PRIVATE KEY-----
-----BEGIN CERTIFICATE-----
<Primary TLS certificate>
-----END CERTIFICATE-----
-----BEGIN CERTIFICATE-----
<Intermediate certificate>
-----END CERTIFICATE-----
-----BEGIN CERTIFICATE-----
<Root CA certificate>
-----END CERTIFICATE-----

Validate the structure and contents of the PEM file to avoid configuration errors.

Installing the Certificate

1. Log in to the Automation Orchestrator Appliance
Access the VAAO appliance command line over SSH using the root user account.

ssh root@<your-vaao-appliance-ip>

2. Upload the Certificate Chain File
Copy the PEM file containing the certificate chain to the appliance. For this example, the file is named HS-vRO01-full-chain.pem and is placed in the /root directory.

scp HS-vRO01-full-chain.pem root@<your-vaao-appliance-ip>:/root/

Ensure the file path on the appliance matches the one used in the next steps.

3. Select the Certificate
Run the following command to configure the new TLS certificate:

vracli certificate ingress --set /root/HS-vRO01-full-chain.pem --force

The --force flag ensures the changes overwrite any existing configuration if necessary.

4. Apply the New TLS Certificate
Execute the deployment script to apply the new certificate:

/opt/scripts/deploy.sh

This script updates the services with the new certificate. Monitor the output for any errors during the deployment process.

Wrap-Up

By following these steps, you have successfully installed and configured a custom TLS certificate on the VMware Aria Automation Orchestrator appliance. This ensures secure communication and aligns with best practices for infrastructure management. Always validate your certificate chain and monitor your appliance post-deployment to confirm functionality.

Feel free to drop me a comment if you have any questions or need further clarification.

VMware Aria Automation Orchestrator vSphere Plugin Configuration

Overview

Welcome to another post on be-virtual.net! Today, we’re diving into a powerful plugin within VMware Aria Automation Orchestrator—the vSphere plugin. This default plugin is designed to make managing vSphere environments smoother and more efficient, especially when it comes to automating workflows and connecting seamlessly with vCenter Server.

Configuration

Setting up the vSphere plugin might seem like a daunting task, but don’t worry—it’s pretty straightforward once you get the hang of it. Here’s how you can add a vCenter Server instance:

Step-by-Step Procedure:

  1. Log in to the Orchestrator interface with an admin account.
  2. Go to Library > Workflows.
  3. Navigate to Workflows > Library > vCenter > Configuration.
  4. Start the workflow: Add a vCenter Server instance.
  5. You’ll need to input the following details:
vCenter Server Instance Properties:
  • IP or Hostname: %fqdn-vcenter%
  • HTTPS Port: 443
  • SDK Location: /sdk
  • Ignore Certificate Warnings: True (This automatically accepts the vCenter Server certificate if you choose this option.)
Connection Properties:
  • Create Session Per User: True (This means Orchestrator will create a session per user for a more secure connection. You can choose Embedded: True / External: False based on your needs.)
  • Username: svc-vaao@example.local
  • Password: **********
  • Domain Name: example.local
Additional Endpoints:
  • PBM Endpoint URL: default
  • SMS Endpoint URL: default
  1. Once you’ve entered all the necessary details, simply Click Run, and the workflow will take care of the rest.

Screenshot

Here is an screenshot of the location of the workflow (Add a vCenter Server instance). This is the required workflow for adding a vSphere environment to VAAO.

VAAO - Add a vCenter Server Instance

Validation

Once you’ve configured the plugin, you’ll want to verify that everything is working as expected. Here’s a quick way to check if the plugin is properly connected to your vCenter Server:

  1. Go to Administration > Inventory in the Orchestrator interface.
  2. Under vSphere vCenter Server, you should see a vCenter Server listed and accessible at the object level.

If you’re not seeing this, it might be worth revisiting your configuration settings.

Wrap-up

I hope this guide helps you get the most out of the vSphere plugin. Feel free to drop me a comment if you have any questions or need further clarification.

VMware vExpert 2024 Award

Hey everyone, let me share some awesome news, I’ve just been awarded the VMware vExpert 2024 for the eighth year in a row! 🏆🎉

Now, if you’re scratching your head wondering what exactly that means, don’t worry, I’ve got you covered. Essentially, the VMware vExpert program is like the club for folks who are really into VMware technologies. And guess what? I’m super honored to be part of that club, especially for the eighth time running!

First things first, I gotta give a massive shoutout to VMware / Broadcom and the amazing vExpert Team. Seriously, these folks are like the unsung heroes behind the scenes, making sure the VMware community stays vibrant and buzzing with excitement. Without their hard work and dedication, none of this would be possible.

I’ve met some incredible folks along the way, fellow vExperts who have become friends, mentors, and colleagues at ITQ, and most importantly, we’ve learned from each other.

So, what does eight years of vExpert status mean to me? Well, for starters, it’s a reminder to never stop pushing myself, to keep learning, growing, and evolving as a technologist. Whether I’m writing blog posts, giving talks at conferences, or just hanging out in the VMware community Slack channel, I’m always looking for ways to give back and pay it forward.

And of course, none of this would be possible without the support of my family, friends, and colleagues. You guys are the real MVPs, always cheering me on, even when I’m knee-deep in a particularly gnarly ESXi upgrade.

So here’s to another year of virtualization adventures, of pushing the boundaries of what’s possible with VMware technologies, and most importantly, of being part of an incredible community that I’m proud to call home.

Thanks again to VMware and the vExpert Team for this amazing honor. Let’s make the next eight years even more epic!

See you next time! 🙂 Thanks for reading my blog.

Aria Orchestrator – Add CD-ROM to a Virtual Machine

In this blog post, we will add a CD-ROM device to a vSphere Virtual Machine in an automated way. This will be done with vRO (vRealize Orchestrator/Aria Automation Orchestrator). The action is used for creating a CD-ROM drive when provisioning a new machine with vRO.

I am doing this blog post because, after a lot of Googling, I could not find a good example or solution online. So it was time to do a blog post after figuring out what I needed to do!

So let’s start the blog post about adding a CD-ROM to a virtual machine.

vRO – Action Code

Here is the vRealize Orchestrator/Aria Automation Orchestrator code for an action. This action creates the specification for adding a CD-ROM to an already running or a new virtual machine. It’s a lot of code for a “simple” CD-ROM drive because, in the vCenter Server interface, it feels like a couple of easy clicks. In the backend it is another story, see the code below. You need to attach a lot of specifications together to add a CD-ROM to a virtual machine.

Action details:

  • Name: createCdDvdDriveSpecification
  • Version: 1.0.0
  • Description: Create the specification for a vSphere CD/DVD drive to add a CD/DVD drive to a virtual machine with the VMware vCenter SDK.
  • Inputs: None
  • Return Type: Any
  • Location: com.bv.vsphere.vm.spec
// Set variable
var deviceConfigSpecs = new Array();
var deviceConfigSpec;

// Add CD-ROM connect spec
var connectInfo = new VcVirtualDeviceConnectInfo();
    connectInfo.allowGuestControl = true;
    connectInfo.connected = false;
    connectInfo.startConnected = true;

// Add CD-ROM backing spec
var backingInfo = null;
    backingInfo = new VcVirtualCdromRemotePassthroughBackingInfo();
    backingInfo.deviceName = "";

// Add Virtual CD-ROM
var cdrom = new VcVirtualCdrom();
    cdrom.backing = backingInfo;
    cdrom.controllerKey = 200;
    cdrom.key = 0;
    cdrom.unitNumber = 0;
    cdrom.connectable = connectInfo;

// Create CD-ROM configuration spec
var deviceConfigSpec = new VcVirtualDeviceConfigSpec();
    deviceConfigSpec.device = cdrom;
    deviceConfigSpec.operation = VcVirtualDeviceConfigSpecOperation.add;
    deviceConfigSpecs[0] = deviceConfigSpec;

// Troubleshooting generated configuration specification
// System.debug(deviceConfigSpec);

// Return specification
return deviceConfigSpec;

vRO – Workflow

This is a part of a larger workflow but it will help you get started. I have listed the most important parts of creating a virtual machine and how to get started. This code is quite identical to changing a virtual machine to add a CD-ROM drive.

// Load module
var vsphereVmSpec = System.getModule("com.bv.vsphere.vm.spec");

// Set variable
var actionName = arguments.callee.name.substr(6);
var deviceConfigSpecs = [];
var deviceConfigSpec;

// Virtual machine spec
var vmConfigSpec = new VcVirtualMachineConfigSpec();
// Lot more stuff here like VM name, resource pool, host etc

// Add CD-ROM
deviceConfigSpec = vsphereVmSpec.createCdDvdDriveSpecification();
deviceConfigSpecs[ii++] = deviceConfigSpec;

// Combine configuration
vmConfigSpec.deviceChange = deviceConfigSpecs;

// Start Virtual Machine creation
try {
    System.log("[" + actionName + "] Starting Virtual Machine creation (" + virtualMachineName +")");
    task = vmFolder.createVM_Task(vmConfigSpec, vmResourcePool, vmHost);
}
catch (exception) {
    throw "[" + actionName + "] exception";
}

// Return VC:Task
return task;

Wrap-up

So this is my technical blog post about adding a CD-ROM to a virtual machine with vRealize Orchestrator (vRO). Hopefully, it is useful for somebody, please respond below if you have any comments or additional information! See you next time! 🙂

NSX Advanced Load Balancer Data Network Issue

When configuring the NSX Advanced Load Balancer for some testing in my Home Lab. I noticed something odd related to the service engines management network and data network settings. After thinking I was crazy… I saw an issue in the interface surrounding the data network configuration which caused the issue. In this short blog post, I will explain what was happening and how to resolve the issue.

Environment

My Home Lab environment was running the following products:

Note: Licenses are provided by the vExpert program (this also includes the NSX Advanced Load Balancer licenses for lab usage).

Data Network Issue

At first, we will go to the location in the interface that causes the issue:

  1. Log in on the web interface.
  2. Navigate to “Infrastructure > Cloud Resources > Service Engine Group“.
  3. Click for example on the “Default-Group” (depending on your configuration).
  4. Go to the section “Placement“.
  5. Check the following setting “Override Data Network“.
  6. Select a network that you want…

Sounds all good so far… but look at the description popup on the last screenshot. Are we configuring the management or data network for the service engines? Because the description and the field tell something different.

Management Network or Data Network?

After verifying what happened to the service engines in the group the management network for the Service Engines is changed. This was noticeable to me because the service engines were not reachable anymore on the management network for the controller.

My conclusion after some testing was that the description field is correct. This setting changes the management network!

How can you verify the changes to the service engine group?

Option 01:

  1. Open a command prompt.
  2. Run the following command “ping %management-ip-address service engine%“.
  3. They are probably not available anymore because they are on the wrong network.

Option 02:

  1. Navigate to the vCenter Server.
  2. Login with your account.
  3. Select the Service Engine virtual machine belonging to the group where you configured this setting.
  4. Check the virtual network cards.
  5. There the management network card is assigned to the “override data network” network.

Wrapup

So that was my blog post about the service engine group data network issue. I hope it was useful for somebody because it took me some hours to figure it out…

This wraps up the blog article hopefully it is useful for somebody, please respond below if you have any comments or additional information! See you next time! 🙂

vRealize Log Insight Domain Login Problem

Today a blog post about vRealize Log Insight domain login problems. After some time I wanted to check my vRealize Log Insight instance but somehow the domain authentication was not working anymore. So it was time for a new blog post about this issue.

Environment

The vRealize Log Insight instance is deployed in my 24×7 Lab environment that is running vExpert licenses. I am analyzing my logging and checking my login attempts in vRealize Log Insight.

So I am running the following version but I have seen this issue reoccurring in the last years:

  • VMware vRealize Log Insight 8.X (vRLI) (my screenshots are from version 8.8.2).
  • Windows Server 2022 Domain Controllers (as domain connected to vRealize Log Insight)

Problem

So let’s start with the actual problem. At first, the domain login is working for months… nothing strange and everything is fine but then one day it doesn’t work anymore. A vRealize Log Insight cluster restart doesn’t help nor do other basic troubleshooting steps. The local account like the admin account is still working, SSH access is also still working. So it is related to the domain accounts that are provided by my Active Directory.

Here is my configuration and screenshots of the domain login problem issue:

Fix

Now it is time to fix the issue. As always not difficult unless you know what is going wrong.

So let’s start with the actual problem, the problem is that every year the certificates of the domain controllers are replaced by my Certificate Authority and extended by a year. At that moment vRealize Log Insight doesn’t trust the domain controllers anymore as a login source.

So how do we fix it? By adding and trusting the new certificate on the vRealize Log Insight appliance. Luckily this can be done with the GUI so it is straightforward.

Procedure

  1. Log in as the local “admin” account on the vRealize Log Insight appliance web interface (TCP 443).
  2. Go to the following location “Configuration > Authentication > Active Directory”.
  3. Click on the following button “Test Connection“.
  4. Accept all the offered certificates.
  5. This must result in the green text “Succeeded“.

Now try to log in again with a domain account, this should be working again (for another year in my case).

Wrapup

So that was my blog post about the vRealize Log Insight domain login problems. I hope it was useful for somebody because I always run into this issue. It happens in my Lab but also with customers that are using the Active Directory integration.

This wraps up the blog article hopefully it is useful for somebody, please respond below if you have any comments or additional information! See you next time! 🙂

HPE ProLiant Removing SD Card iLO Degraded

Recently I was removing an SD card from one of my lab servers but after removing it, the server kept complaining about it. The HPE ProLiant is equipped with HPE Integrated Lights-Out (iLO). This is an out-of-band management system to manage and configure the server. It also is responsible for monitoring the components inside the server.

This means it also monitors the health state of the SD card that is located on the motherboard slot. So when I removed the SD card it just kept checking the health of the component and causing health alerts.

In this blog post, I going to explain what I did to reset the HPE iLO to stop it from monitoring the SD card after permanent removal.

Environment

Here is a short list of information about the HPE ProLiant system that I used for this blog post:

  • Hardware: HPE Proliant DL360e Gen 8
  • HPE ilO version: 4
  • HPE SD card: HP 32GB SD card / Part nr: 700135-001
  • Firmware: HPE iLO version: 2.78
  • Software: VMware ESXi 7.0.3

Location – SD Card

To make the blog post complete I added the motherboard drawing from the HPE manual. The SD card slot is located on the HPE ProLiant DL360e Gen 8 motherboard and the slot is located at number 29 in the drawing below.

Problem – Removing SD card causes degraded state

The issue occurred when the SD card failed. After the SD card failure, I removed the SD card from the system and moved to an SSD-based boot media for VMware ESXi.

I performed some basic troubleshooting like removing the power from the server and restarting the HPE iLO but the health status was still degraded and it was still searching for the SD card.

Here are the error messages in the interface:

  • Error message on the login page: iLO Self-Test report a problem with: Embedded Flash/SD-CARD. View details on Diagnostics page.
  • Error message on diagnostics: Controller firmware revision 2.10.00 NAND read failure

Here are some screenshots related to the error messages:

Resolving – Resetting the SD card slot

Resolving the issue isn’t partially hard… if you know which buttons to push and in what order ;). Before starting, make sure the SD card is removed from the system and that the iLO has been rebooted.

To make sure that everything just works directly… open a clean browser and login into the iLO and directly follow the procedure described below.

Closing words

In the end, it cost me about three hours to get it fixed. The reason why I wanted it so badly fixed was that it kept triggering my monitoring system and that drove me crazy. This server in particular powers on and powers off regularly and during every power cycle, the health state resets and triggers monitoring alerts.

This wraps up the blog article hopefully it is useful for somebody, please respond below if you have any comments or additional information! See you next time! 🙂