Tag: ITQ

Installation of a VMware Aria Automation Orchestrator Certificate

Overview

This guide provides step-by-step instructions for installing a custom certificate on the VMware Aria Automation Orchestrator (VAAO) appliance. Using a proper certificate ensures secure communication and meets compliance requirements.

Preparation

Before starting the installation, ensure the TLS certificate is formatted correctly in a PEM file. The file should include the following components in the exact order:

-----BEGIN RSA PRIVATE KEY-----
<Private Key>
-----END RSA PRIVATE KEY-----
-----BEGIN CERTIFICATE-----
<Primary TLS certificate>
-----END CERTIFICATE-----
-----BEGIN CERTIFICATE-----
<Intermediate certificate>
-----END CERTIFICATE-----
-----BEGIN CERTIFICATE-----
<Root CA certificate>
-----END CERTIFICATE-----

Validate the structure and contents of the PEM file to avoid configuration errors.

Installing the Certificate

1. Log in to the Automation Orchestrator Appliance
Access the VAAO appliance command line over SSH using the root user account.

ssh root@<your-vaao-appliance-ip>

2. Upload the Certificate Chain File
Copy the PEM file containing the certificate chain to the appliance. For this example, the file is named HS-vRO01-full-chain.pem and is placed in the /root directory.

scp HS-vRO01-full-chain.pem root@<your-vaao-appliance-ip>:/root/

Ensure the file path on the appliance matches the one used in the next steps.

3. Select the Certificate
Run the following command to configure the new TLS certificate:

vracli certificate ingress --set /root/HS-vRO01-full-chain.pem --force

The --force flag ensures the changes overwrite any existing configuration if necessary.

4. Apply the New TLS Certificate
Execute the deployment script to apply the new certificate:

/opt/scripts/deploy.sh

This script updates the services with the new certificate. Monitor the output for any errors during the deployment process.

Wrap-Up

By following these steps, you have successfully installed and configured a custom TLS certificate on the VMware Aria Automation Orchestrator appliance. This ensures secure communication and aligns with best practices for infrastructure management. Always validate your certificate chain and monitor your appliance post-deployment to confirm functionality.

Feel free to drop me a comment if you have any questions or need further clarification.

VMware Aria Automation Orchestrator vSphere Plugin Configuration

Overview

Welcome to another post on be-virtual.net! Today, we’re diving into a powerful plugin within VMware Aria Automation Orchestrator—the vSphere plugin. This default plugin is designed to make managing vSphere environments smoother and more efficient, especially when it comes to automating workflows and connecting seamlessly with vCenter Server.

Configuration

Setting up the vSphere plugin might seem like a daunting task, but don’t worry—it’s pretty straightforward once you get the hang of it. Here’s how you can add a vCenter Server instance:

Step-by-Step Procedure:

  1. Log in to the Orchestrator interface with an admin account.
  2. Go to Library > Workflows.
  3. Navigate to Workflows > Library > vCenter > Configuration.
  4. Start the workflow: Add a vCenter Server instance.
  5. You’ll need to input the following details:
vCenter Server Instance Properties:
  • IP or Hostname: %fqdn-vcenter%
  • HTTPS Port: 443
  • SDK Location: /sdk
  • Ignore Certificate Warnings: True (This automatically accepts the vCenter Server certificate if you choose this option.)
Connection Properties:
  • Create Session Per User: True (This means Orchestrator will create a session per user for a more secure connection. You can choose Embedded: True / External: False based on your needs.)
  • Username: svc-vaao@example.local
  • Password: **********
  • Domain Name: example.local
Additional Endpoints:
  • PBM Endpoint URL: default
  • SMS Endpoint URL: default
  1. Once you’ve entered all the necessary details, simply Click Run, and the workflow will take care of the rest.

Screenshot

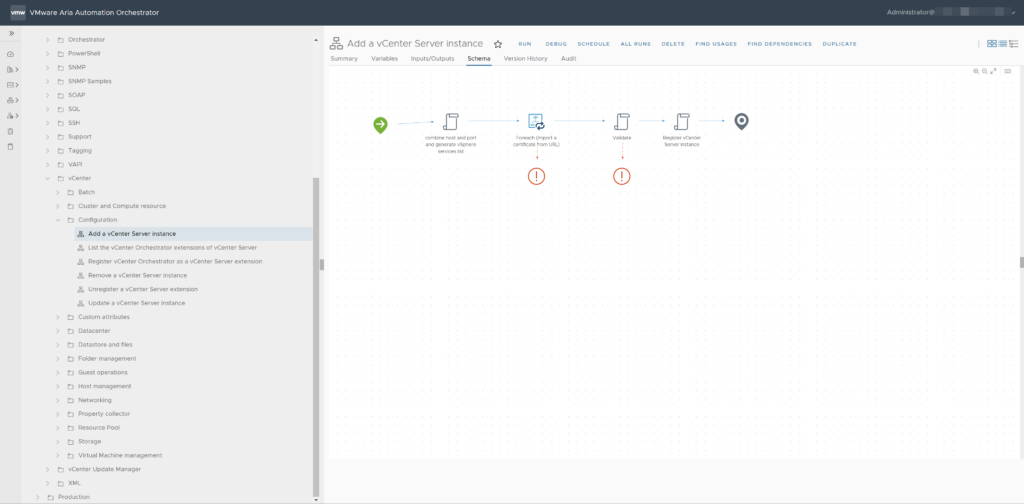
Here is an screenshot of the location of the workflow (Add a vCenter Server instance). This is the required workflow for adding a vSphere environment to VAAO.

VAAO - Add a vCenter Server Instance

Validation

Once you’ve configured the plugin, you’ll want to verify that everything is working as expected. Here’s a quick way to check if the plugin is properly connected to your vCenter Server:

  1. Go to Administration > Inventory in the Orchestrator interface.
  2. Under vSphere vCenter Server, you should see a vCenter Server listed and accessible at the object level.

If you’re not seeing this, it might be worth revisiting your configuration settings.

Wrap-up

I hope this guide helps you get the most out of the vSphere plugin. Feel free to drop me a comment if you have any questions or need further clarification.

Terraform Fortigate Provider Authentication Issue

Working with automation tools like Terraform can sometimes present unexpected challenges. Recently, we encountered a tricky authentication issue with the Fortigate Terraform Provider, specifically when attempting to create firewall resources. In this blog post, we’ll walk you through the problem, the error message we received, and how we ultimately solved it.

The problem

We were configuring the Fortigate Terraform Provider for a client project when we encountered a persistent authentication issue. Despite our best efforts to configure everything correctly, we kept running into a 401 Unauthorized error, which prevented us from successfully connecting the provider to the device and creating firewall resources.

Here’s the configuration we were using:

terraform {
  required_providers {
    fortios = {
      source  = "fortinetdev/fortios"
      version = "1.20.0"
    }
  }
}

provider "fortios" {
  hostname = "%ip-or-fqdn%"
  username = "%username%"
  token    = "%token%"
  insecure = "true"
}

resource "fortios_firewall_address" "trname" {
  name   = "test1"
  subnet = "22.1.1.0"
}

The error we kept seeing was as follows:

```
fortios_firewall_address.trname: Creating...
â•·
│ Error: [Warning] Can not update device version: 
│ <!DOCTYPE HTML PUBLIC "-//IETF//DTD HTML 2.0//EN">
│ <html><head>
│ <title>401 Unauthorized</title>
│ </head><body>
│ <h1>Unauthorized</h1>
│ <p>This server could not verify that you
│ are authorized to access the document
│ requested.  Either you supplied the wrong
│ credentials (e.g., bad password), or your
│ browser doesn't understand how to supply
│ the credentials required.</p>
│ <p>Additionally, a 401 Unauthorized
│ error was encountered while trying to use an ErrorDocument to handle the request.</p>
╵
```

This error clearly indicated that the server was unable to verify our credentials, which caused the resource creation to fail.

The solution

The real breakthrough came when my colleague Michael Meelis opened a GitHub issue to bring attention to the problem. A fellow user responded with a suggestion that ultimately resolved the issue. It turned out that a small but crucial tweak in the authentication settings was needed.

You can find the full discussion and solution in this GitHub issue.

The solution involved correctly configuring the API token and making adjustments to the authentication process. After implementing the suggested changes from the GitHub discussion, the authentication settings worked as expected, and we were able to successfully use the Fortigate Terraform Provider to create firewall resources.

myfgt # config system global 

myfgt (global) # set rest-api-key-url-query enable 

myfgt (global) # show
config system global
    set hostname "myfgt"
    set rest-api-key-url-query enable
    set timezone "US/Pacific"
end

myfgt (global) # end

Conclusion

Authentication and configuration issues like the “401 Unauthorized” error can be frustrating, but with the right approach, collaboration, and persistence, they can be resolved. Utilizing platforms like GitHub to share problems and find solutions proved essential to our success in this case.

Hope it was useful for someone! Please respond below if you have any comments or additional information!

VyOS Increase Disk Space

In this blog post, I will walk you through the process of increasing disk space on a VyOS installation. Whether you’re running VyOS on a virtual machine or a physical server, this step-by-step guide will help you seamlessly allocate more storage to keep your network operations running smoothly. From resizing partitions to adjusting file systems, we’ll cover everything you need to know to efficiently manage your VyOS environment’s disk space.

Preparation

Before you begin, ensure that you have a configuration backup of your VyOS system. This precautionary step is essential to safeguard your current settings and configurations, allowing for a quick recovery in case any issues arise during the disk space expansion process. Proper backups are crucial for maintaining the integrity and continuity of your network operations.

VyOS Commands

Here is an overview of the commands I used on the VyOS virtual machine to make it workout:

  1. Shutdown the virtual machine
  2. Increase the disk space of the boot media
  3. Start the virtual machine
  4. Run the following commands:
# Validate size
fdisk -l
df –h

# Remove partition
fdisk /dev/sda
p (print partition)
d (delete partition)
p (print partition)

# Create new partion
• n (create a new partition)
• p (select primary)
• 1 (select 1 since this only partition)
• 2 (this first cylinder saw in b) )
• 12191 (last cylinder - 1 )
• w (press w for writing change)

# Check
sudo partprobe

# Reboot system
reboot

# Confirm that partition size
partx /dev/sda

# Tell the Linux Kernel about the Change in disk size
sudo resize2fs /dev/sda1

# Reconfirm the increase disk size
df -h

# Reboot system to verify
reboot

Wrap-up

So this is my blog post about increasing disk space on a VyOS virtual machine. Hope it was useful for someone! Please respond below if you have any comments or additional information!

VMware vExpert 2024 Award

Hey everyone, let me share some awesome news, I’ve just been awarded the VMware vExpert 2024 for the eighth year in a row! 🏆🎉

Now, if you’re scratching your head wondering what exactly that means, don’t worry, I’ve got you covered. Essentially, the VMware vExpert program is like the club for folks who are really into VMware technologies. And guess what? I’m super honored to be part of that club, especially for the eighth time running!

First things first, I gotta give a massive shoutout to VMware / Broadcom and the amazing vExpert Team. Seriously, these folks are like the unsung heroes behind the scenes, making sure the VMware community stays vibrant and buzzing with excitement. Without their hard work and dedication, none of this would be possible.

I’ve met some incredible folks along the way, fellow vExperts who have become friends, mentors, and colleagues at ITQ, and most importantly, we’ve learned from each other.

So, what does eight years of vExpert status mean to me? Well, for starters, it’s a reminder to never stop pushing myself, to keep learning, growing, and evolving as a technologist. Whether I’m writing blog posts, giving talks at conferences, or just hanging out in the VMware community Slack channel, I’m always looking for ways to give back and pay it forward.

And of course, none of this would be possible without the support of my family, friends, and colleagues. You guys are the real MVPs, always cheering me on, even when I’m knee-deep in a particularly gnarly ESXi upgrade.

So here’s to another year of virtualization adventures, of pushing the boundaries of what’s possible with VMware technologies, and most importantly, of being part of an incredible community that I’m proud to call home.

Thanks again to VMware and the vExpert Team for this amazing honor. Let’s make the next eight years even more epic!

See you next time! 🙂 Thanks for reading my blog.

Aria Orchestrator – Add CD-ROM to a Virtual Machine

In this blog post, we will add a CD-ROM device to a vSphere Virtual Machine in an automated way. This will be done with vRO (vRealize Orchestrator/Aria Automation Orchestrator). The action is used for creating a CD-ROM drive when provisioning a new machine with vRO.

I am doing this blog post because, after a lot of Googling, I could not find a good example or solution online. So it was time to do a blog post after figuring out what I needed to do!

So let’s start the blog post about adding a CD-ROM to a virtual machine.

vRO – Action Code

Here is the vRealize Orchestrator/Aria Automation Orchestrator code for an action. This action creates the specification for adding a CD-ROM to an already running or a new virtual machine. It’s a lot of code for a “simple” CD-ROM drive because, in the vCenter Server interface, it feels like a couple of easy clicks. In the backend it is another story, see the code below. You need to attach a lot of specifications together to add a CD-ROM to a virtual machine.

Action details:

  • Name: createCdDvdDriveSpecification
  • Version: 1.0.0
  • Description: Create the specification for a vSphere CD/DVD drive to add a CD/DVD drive to a virtual machine with the VMware vCenter SDK.
  • Inputs: None
  • Return Type: Any
  • Location: com.bv.vsphere.vm.spec
// Set variable
var deviceConfigSpecs = new Array();
var deviceConfigSpec;

// Add CD-ROM connect spec
var connectInfo = new VcVirtualDeviceConnectInfo();
    connectInfo.allowGuestControl = true;
    connectInfo.connected = false;
    connectInfo.startConnected = true;

// Add CD-ROM backing spec
var backingInfo = null;
    backingInfo = new VcVirtualCdromRemotePassthroughBackingInfo();
    backingInfo.deviceName = "";

// Add Virtual CD-ROM
var cdrom = new VcVirtualCdrom();
    cdrom.backing = backingInfo;
    cdrom.controllerKey = 200;
    cdrom.key = 0;
    cdrom.unitNumber = 0;
    cdrom.connectable = connectInfo;

// Create CD-ROM configuration spec
var deviceConfigSpec = new VcVirtualDeviceConfigSpec();
    deviceConfigSpec.device = cdrom;
    deviceConfigSpec.operation = VcVirtualDeviceConfigSpecOperation.add;
    deviceConfigSpecs[0] = deviceConfigSpec;

// Troubleshooting generated configuration specification
// System.debug(deviceConfigSpec);

// Return specification
return deviceConfigSpec;

vRO – Workflow

This is a part of a larger workflow but it will help you get started. I have listed the most important parts of creating a virtual machine and how to get started. This code is quite identical to changing a virtual machine to add a CD-ROM drive.

// Load module
var vsphereVmSpec = System.getModule("com.bv.vsphere.vm.spec");

// Set variable
var actionName = arguments.callee.name.substr(6);
var deviceConfigSpecs = [];
var deviceConfigSpec;

// Virtual machine spec
var vmConfigSpec = new VcVirtualMachineConfigSpec();
// Lot more stuff here like VM name, resource pool, host etc

// Add CD-ROM
deviceConfigSpec = vsphereVmSpec.createCdDvdDriveSpecification();
deviceConfigSpecs[ii++] = deviceConfigSpec;

// Combine configuration
vmConfigSpec.deviceChange = deviceConfigSpecs;

// Start Virtual Machine creation
try {
    System.log("[" + actionName + "] Starting Virtual Machine creation (" + virtualMachineName +")");
    task = vmFolder.createVM_Task(vmConfigSpec, vmResourcePool, vmHost);
}
catch (exception) {
    throw "[" + actionName + "] exception";
}

// Return VC:Task
return task;

Wrap-up

So this is my technical blog post about adding a CD-ROM to a virtual machine with vRealize Orchestrator (vRO). Hopefully, it is useful for somebody, please respond below if you have any comments or additional information! See you next time! 🙂

OpenSSL Creating Wildcard Certificate Request

OpenSSL Wildcard Certificate Request

In this short blog post, we will create an OpenSSL request for a wildcard certificate. We are going over the installation, configuration, and request. I am performing the steps on a Windows 11-based machine and requesting the certificate at https://www.xolphin.nl/ an external certificate provider, this can also be an internal certificate provider like Microsoft Active Directory Certificate Services (ADCS).

Leveraging a wildcard certificate can be used for many purposes. This can be an internal or external certificate. On a load balancer or a web server with multiple https services. In my case, I am using it for my Lab environment with a load balancer. I am trying to eliminate the certificate complexity for some simple testing of web applications in Kubernetes.

Environment

My environment for performing this operation is as followed:

  • Operating System: Windows 11 X64
  • Public internet access: yes
  • Permissions on the system: Administrator

Installation of OpenSSL on Windows 11

To install OpenSSL on a Windows 11 machine the easiest way is with the package manager “Choco“. Open a PowerShell command prompt with administrative permissions and run the following command:

# Installation of OpenSSL on your system
choco install openssl
PS C:\windows\system32> choco install openssl
Chocolatey v1.4.0
Installing the following packages:
openssl
By installing, you accept licenses for the packages.
Progress: Downloading vcredist2015 14.0.24215.20170201... 100%
Progress: Downloading vcredist140 14.36.32532... 100%
Progress: Downloading chocolatey-core.extension 1.4.0... 100%
Progress: Downloading chocolatey-compatibility.extension 1.0.0... 100%
Progress: Downloading KB3033929 1.0.5... 100%
Progress: Downloading chocolatey-windowsupdate.extension 1.0.5... 100%
Progress: Downloading KB3035131 1.0.3... 100%
Progress: Downloading KB2919355 1.0.20160915... 100%
Progress: Downloading KB2919442 1.0.20160915... 100%
Progress: Downloading KB2999226 1.0.20181019... 100%
Progress: Downloading openssl 3.1.1... 100%

chocolatey-compatibility.extension v1.0.0 [Approved]
chocolatey-compatibility.extension package files install completed. Performing other installation steps.
 Installed/updated chocolatey-compatibility extensions.
 The install of chocolatey-compatibility.extension was successful.
  Software installed to 'C:\ProgramData\chocolatey\extensions\chocolatey-compatibility'

chocolatey-core.extension v1.4.0 [Approved]
chocolatey-core.extension package files install completed. Performing other installation steps.
 Installed/updated chocolatey-core extensions.
 The install of chocolatey-core.extension was successful.
  Software installed to 'C:\ProgramData\chocolatey\extensions\chocolatey-core'

chocolatey-windowsupdate.extension v1.0.5 [Approved]
chocolatey-windowsupdate.extension package files install completed. Performing other installation steps.
 Installed/updated chocolatey-windowsupdate extensions.
 The install of chocolatey-windowsupdate.extension was successful.
  Software installed to 'C:\ProgramData\chocolatey\extensions\chocolatey-windowsupdate'

KB3035131 v1.0.3 [Approved]
kb3035131 package files install completed. Performing other installation steps.
The package KB3035131 wants to run 'ChocolateyInstall.ps1'.
Note: If you don't run this script, the installation will fail.
Note: To confirm automatically next time, use '-y' or consider:
choco feature enable -n allowGlobalConfirmation
Do you want to run the script?([Y]es/[A]ll - yes to all/[N]o/[P]rint): A

Skipping installation because update KB3035131 does not apply to this operating system (Microsoft Windows 11 Pro).
 The install of kb3035131 was successful.
  Software install location not explicitly set, it could be in package or
  default install location of installer.

KB3033929 v1.0.5 [Approved]
kb3033929 package files install completed. Performing other installation steps.
Skipping installation because update KB3033929 does not apply to this operating system (Microsoft Windows 11 Pro).
 The install of kb3033929 was successful.
  Software install location not explicitly set, it could be in package or
  default install location of installer.

KB2919442 v1.0.20160915 [Approved]
kb2919442 package files install completed. Performing other installation steps.
Skipping installation because this hotfix only applies to Windows 8.1 and Windows Server 2012 R2.
 The install of kb2919442 was successful.
  Software install location not explicitly set, it could be in package or
  default install location of installer.

KB2919355 v1.0.20160915 [Approved]
kb2919355 package files install completed. Performing other installation steps.
Skipping installation because this hotfix only applies to Windows 8.1 and Windows Server 2012 R2.
 The install of kb2919355 was successful.
  Software install location not explicitly set, it could be in package or
  default install location of installer.

KB2999226 v1.0.20181019 [Approved] - Possibly broken
kb2999226 package files install completed. Performing other installation steps.
Skipping installation because update KB2999226 does not apply to this operating system (Microsoft Windows 11 Pro).
 The install of kb2999226 was successful.
  Software install location not explicitly set, it could be in package or
  default install location of installer.

vcredist140 v14.36.32532 [Approved]
vcredist140 package files install completed. Performing other installation steps.
Runtime for architecture x86 version 14.36.32532 is already installed.
Runtime for architecture x64 version 14.36.32532 is already installed.
 The install of vcredist140 was successful.
  Software install location not explicitly set, it could be in package or
  default install location of installer.

vcredist2015 v14.0.24215.20170201 [Approved]
vcredist2015 package files install completed. Performing other installation steps.
 The install of vcredist2015 was successful.
  Software installed to 'C:\ProgramData\chocolatey\lib\vcredist2015'

openssl v3.1.1 [Approved]
openssl package files install completed. Performing other installation steps.
Installing 64-bit openssl...
openssl has been installed.
WARNING: No registry key found based on  'OpenSSL-Win'
PATH environment variable does not have C:\Program Files\OpenSSL-Win64\bin in it. Adding...
WARNING: OPENSSL_CONF has been set to C:\Program Files\OpenSSL-Win64\bin\openssl.cfg
  openssl can be automatically uninstalled.
Environment Vars (like PATH) have changed. Close/reopen your shell to
 see the changes (or in powershell/cmd.exe just type `refreshenv`).
 The install of openssl was successful.
  Software installed to 'C:\Program Files\OpenSSL-Win64\'

Chocolatey installed 11/11 packages.
 See the log for details (C:\ProgramData\chocolatey\logs\chocolatey.log).

Installed:
 - kb3033929 v1.0.5
 - chocolatey-windowsupdate.extension v1.0.5
 - vcredist140 v14.36.32532
 - kb2999226 v1.0.20181019
 - kb2919355 v1.0.20160915
 - chocolatey-core.extension v1.4.0
 - kb2919442 v1.0.20160915
 - vcredist2015 v14.0.24215.20170201
 - chocolatey-compatibility.extension v1.0.0
 - openssl v3.1.1
 - kb3035131 v1.0.3
PS C:\windows\system32>

Configuration OpenSSL on Windows 11

To create a certificate you need to tell OpenSSL what to generate. So we create a configuration file for OpenSSL that specifies what type of certificate should be generated.

Create the following configuration file called “config.cfg“. This is the configuration file that will be used by OpenSSL when running the command listed below. Make sure you change your domain name and information in the configuration file.

[ req ]
default_bits            = %In most cased: 2048 or 4094%
default_keyfile         = %key file name%
default_md              = sha512
distinguished_name      = req_distinguished_name
encrypt_key             = no
prompt                  = no

[ req_distinguished_name ]
commonName              = %Certificate address > your wildcard%
countryName             = %Company country code%
emailAddress            = %Administrator/IT email%
localityName            = %Company location%
organizationName        = %Company name%
organizationalUnitName  = %Company department%
stateOrProvinceName     = %Company location province%
[ req ]
default_bits            = 4096
default_keyfile         = wildcard.domain.com.key
default_md              = sha512
distinguished_name      = req_distinguished_name
encrypt_key             = no
prompt                  = no

[ req_distinguished_name ]
commonName              = *.domain.com
countryName             = NL
emailAddress            = admin@domain.com
localityName            = Amsterdam
organizationName        = Domain B.V.
organizationalUnitName  = IT
stateOrProvinceName     = Noord-Holland

OpenSSL Creating Wildcard Certificate Request

Now it is time for generating the certificate request that can be delivered to your certificate provider. This can be done by running the following command in an elevated PowerShell command-prompt.

# Set the path variable
$path = "c:\Users\$Env:UserName\Desktop\cert"

# Create directory
mkdir $path

# Copy the config.cfg into the $path location (manually)

# Create the certificate request
openssl req -new -nodes -out "$path\wildcard.domain.com.csr" -config "$path\config.cfg" -keyout "$path\wildcard.domain.com.key"

# After running the commands, you will end up with three files in the $path location
- config.cfg
- wildcard.domain.com.csr
- wildcard.domain.com.key

Signing the request

Go to your certificate provider website and upload the “wildcard.domain.com.csr” file. You should receive the wildcard certificate in a couple of minutes/hours depending on the certificate provider.

Wrap up

So this is my blog post about creating a wildcard certificate with OpenSSL. Hopefully, it is useful for somebody, please respond below if you have any comments or additional information! See you next time! 🙂

Ubiquiti UniFi Inform/Adopt Access Point

Today we will look at the Ubiquiti UniFi inform/adopt access point process. Recently I bought some new UniFi equipment for my home environment but I had some issues with assigning them to a new UniFi Controller. Also, I received a secondhand unit that was already configured to an existing UniFi Controller. Because it took me some time to figure out the complete process and some items were not directly clear to me it was time for a quick write-up.

This blog post will cover three scenarios depending on the status of your UniFi access point.

Some important notes:

  • In case your UniFi Access Point management network is not in the same network as the UniFi Controller it will not be found automatically by the UniFi Controller.
  • The network configuration is a little bit more complex than the standard for home environments:
    • Dedicated management network for the management interface of the UniFi APs.
    • Two separate SSIDs with two separate networks.

Environment:

I created an example configuration for this blog post based on my home environment. Below is also a basic network diagram to give you some insight into the configuration.

Network configuration:

  • UniFi Controller IP address: 192.168.10.1/24 (VLAN 10)
  • UniFi Access Point Management IP address: 192.168.11.1/24 (VLAN 11)
  • Two separate WIFI SSIDs backed by different networks for isolation of devices:
    • SSID: Guest-Wifi / VLAN 12 / 192.168.12.X/24
    • SSID: Home-Wifi / VLAN 13 / 192.168.13.X/24

Device types:

  • UniFi Controller: version 7.3 (docker image) running on a Synology NAS.
  • UniFi Access Point: Ubiquiti UniFi 6 Pro

Components explained:

  • UniFi Controller: The UniFi Controller is the management suite/management interface for controlling the UniFi environment. This is a free downloadable software package from the Ubiquiti website or you can pay for the cloud service.
  • UniFi Access Point: The access point is the physical component you buy from Ubiquiti which after a successful configuration a WIFI client connects to.

Diagrams/photos:

Here is a basic network diagram of the UniFi setup of the environment and also some basic screenshots to give you an idea.

Credentials

Default credentials with a new or reset UniFi access point.

  • Username: ubnt
  • Password: ubnt

Procedure: New UniFi Access Point

This is the procedure for a brand new access point or an access point that had a factory reset. With this command, you will let the UniFi Controller know the UniFi access point is available for adoption.

  1. Power up the access point
  2. Check the DHCP server for its lease
  3. Connect with SSH (for example use Putty)
  4. Login with the following default credentials:
    • Username: ubnt
    • Password: ubnt
  5. Run the following command on the UniFi Access Point:
# Syntax
set-inform http://%UniFi-Controller-IP-Address%:8080/inform

# Command with an example IP address to let the UniFi Controller know the AP is ready for adoption
set-inform http://192.168.10.1:8080/inform

Procedure: Physical Device Reset

This is the procedure for when the device is unreachable or the login credentials are unknown:

  1. Locate the access point, and remove it from its bracket (it might differ per type of UniFi access point).
  2. Make sure the access point has power and is booted before starting the procedure.
  3. Hold the reset button on the underside with a paperclip for 10 seconds (it might differ per type of UniFi access point).
  4. Continue with the procedure “New UniFi Access Point”.

Procedure: Software Reset

This is the procedure for when the device is accessible but needs to be moved to another UniFi Controller instance.

  1. Power up the access point
  2. Check the DHCP server for lease
  3. Connect with SSH (for example use Putty)
  4. Log in with the known configured credentials by the current UniFi Controller.
  5. Run the following commands on the UniFi Access Point:
# Run the following command to issue a factory reset on the device
set-default
or
syswrapper.sh restore-default

# Syntax
set-inform http://%UniFi-Controller-IP-Address%:8080/inform

# Command with an example IP address to let the UniFi Controller know the AP is ready for adoption
set-inform http://192.168.10.1:8080/inform

Wrap up

So this is my blog post about informing and adopting an UniFi access point by an UniFi Controller. Hopefully, it is useful for somebody, please respond below if you have any comments or additional information! See you next time! 🙂

NSX Advanced Load Balancer Data Network Issue

When configuring the NSX Advanced Load Balancer for some testing in my Home Lab. I noticed something odd related to the service engines management network and data network settings. After thinking I was crazy… I saw an issue in the interface surrounding the data network configuration which caused the issue. In this short blog post, I will explain what was happening and how to resolve the issue.

Environment

My Home Lab environment was running the following products:

Note: Licenses are provided by the vExpert program (this also includes the NSX Advanced Load Balancer licenses for lab usage).

Data Network Issue

At first, we will go to the location in the interface that causes the issue:

  1. Log in on the web interface.
  2. Navigate to “Infrastructure > Cloud Resources > Service Engine Group“.
  3. Click for example on the “Default-Group” (depending on your configuration).
  4. Go to the section “Placement“.
  5. Check the following setting “Override Data Network“.
  6. Select a network that you want…

Sounds all good so far… but look at the description popup on the last screenshot. Are we configuring the management or data network for the service engines? Because the description and the field tell something different.

Management Network or Data Network?

After verifying what happened to the service engines in the group the management network for the Service Engines is changed. This was noticeable to me because the service engines were not reachable anymore on the management network for the controller.

My conclusion after some testing was that the description field is correct. This setting changes the management network!

How can you verify the changes to the service engine group?

Option 01:

  1. Open a command prompt.
  2. Run the following command “ping %management-ip-address service engine%“.
  3. They are probably not available anymore because they are on the wrong network.

Option 02:

  1. Navigate to the vCenter Server.
  2. Login with your account.
  3. Select the Service Engine virtual machine belonging to the group where you configured this setting.
  4. Check the virtual network cards.
  5. There the management network card is assigned to the “override data network” network.

Wrapup

So that was my blog post about the service engine group data network issue. I hope it was useful for somebody because it took me some hours to figure it out…

This wraps up the blog article hopefully it is useful for somebody, please respond below if you have any comments or additional information! See you next time! 🙂

vRealize Log Insight Domain Login Problem

Today a blog post about vRealize Log Insight domain login problems. After some time I wanted to check my vRealize Log Insight instance but somehow the domain authentication was not working anymore. So it was time for a new blog post about this issue.

Environment

The vRealize Log Insight instance is deployed in my 24×7 Lab environment that is running vExpert licenses. I am analyzing my logging and checking my login attempts in vRealize Log Insight.

So I am running the following version but I have seen this issue reoccurring in the last years:

  • VMware vRealize Log Insight 8.X (vRLI) (my screenshots are from version 8.8.2).
  • Windows Server 2022 Domain Controllers (as domain connected to vRealize Log Insight)

Problem

So let’s start with the actual problem. At first, the domain login is working for months… nothing strange and everything is fine but then one day it doesn’t work anymore. A vRealize Log Insight cluster restart doesn’t help nor do other basic troubleshooting steps. The local account like the admin account is still working, SSH access is also still working. So it is related to the domain accounts that are provided by my Active Directory.

Here is my configuration and screenshots of the domain login problem issue:

Fix

Now it is time to fix the issue. As always not difficult unless you know what is going wrong.

So let’s start with the actual problem, the problem is that every year the certificates of the domain controllers are replaced by my Certificate Authority and extended by a year. At that moment vRealize Log Insight doesn’t trust the domain controllers anymore as a login source.

So how do we fix it? By adding and trusting the new certificate on the vRealize Log Insight appliance. Luckily this can be done with the GUI so it is straightforward.

Procedure

  1. Log in as the local “admin” account on the vRealize Log Insight appliance web interface (TCP 443).
  2. Go to the following location “Configuration > Authentication > Active Directory”.
  3. Click on the following button “Test Connection“.
  4. Accept all the offered certificates.
  5. This must result in the green text “Succeeded“.

Now try to log in again with a domain account, this should be working again (for another year in my case).

Wrapup

So that was my blog post about the vRealize Log Insight domain login problems. I hope it was useful for somebody because I always run into this issue. It happens in my Lab but also with customers that are using the Active Directory integration.

This wraps up the blog article hopefully it is useful for somebody, please respond below if you have any comments or additional information! See you next time! 🙂