Tag: VAAO

Your subscription has expired Aria Automation Orchestrator 8.18

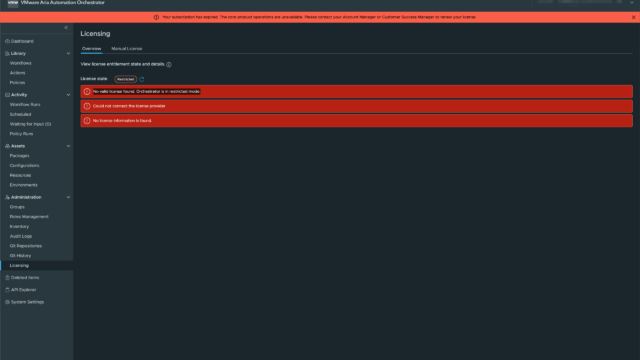
After upgrading to VMware Aria Automation Orchestrator 8.18.1 update 2, I was greeted with a warning banner that read: “Your subscription has expired. The core product operations are unavailable.“. Here’s a screenshot of the message as it appears on the License page in Aria Automation Orchestrator — just in case you’re wondering how it looks in the UI.

Despite the product being fully licensed and working perfectly prior to the upgrade, this message appeared across the UI and disrupted basic functionality. While searching for answers, I found the official fix in Broadcom KB 380260, which turned out to be spot-on.

The Problem – Your subscription has expired

With the release of version 8.18, VMware introduced an updated licensing mechanism tied to Aria With the release of version 8.18, VMware introduced an updated licensing mechanism tied to the Aria Universal Suite Subscription. If your system had an expired Authentication Token, the application incorrectly flagged the license as invalid — even though your actual subscription was still valid.

So while everything was fine on the licensing side, the platform’s backend had issues validating the license properly.

What Was Affected:

At the time of the issue, the following core functionalities were completely disabled:

  • No workflows could run
  • No scheduled workflows were executed
  • No policies were triggered

This essentially rendered the product useless and unavailable for serving any customer platforms.

The Solution

Here’s what fixed it for me:

  1. SSH into the Aria Automation Orchestrator appliance.
  2. Run the following command to fix the issue: (vracli vro properties set –key com.vmware.o11n.license.check.automation-endpoint.enabled –value false).
  3. Wait for the services to stabilize, or reboot the appliance if needed.
  4. After a few minutes, the warning disappeared and all functionality returned to normal.

It was that simple — no need to re-upload the license, no need to redeploy anything. Just a simple command to run in the shell.

Final Thoughts

I’d suggest running this command as part of your post-upgrade validation checklist if you’re moving to Aria Automation 8.18 or later.

Have you seen similar issues after upgrades? Let me know on be-virtual.net — always happy to exchange notes.
Installation of a VMware Aria Automation Orchestrator Certificate

Overview

This guide provides step-by-step instructions for installing a custom certificate on the VMware Aria Automation Orchestrator (VAAO) appliance. Using a proper certificate ensures secure communication and meets compliance requirements.

Preparation

Before starting the installation, ensure the TLS certificate is formatted correctly in a PEM file. The file should include the following components in the exact order:

-----BEGIN RSA PRIVATE KEY-----
<Private Key>
-----END RSA PRIVATE KEY-----
-----BEGIN CERTIFICATE-----
<Primary TLS certificate>
-----END CERTIFICATE-----
-----BEGIN CERTIFICATE-----
<Intermediate certificate>
-----END CERTIFICATE-----
-----BEGIN CERTIFICATE-----
<Root CA certificate>
-----END CERTIFICATE-----

Validate the structure and contents of the PEM file to avoid configuration errors.

Installing the Certificate

1. Log in to the Automation Orchestrator Appliance
Access the VAAO appliance command line over SSH using the root user account.

ssh root@<your-vaao-appliance-ip>

2. Upload the Certificate Chain File
Copy the PEM file containing the certificate chain to the appliance. For this example, the file is named HS-vRO01-full-chain.pem and is placed in the /root directory.

scp HS-vRO01-full-chain.pem root@<your-vaao-appliance-ip>:/root/

Ensure the file path on the appliance matches the one used in the next steps.

3. Select the Certificate
Run the following command to configure the new TLS certificate:

vracli certificate ingress --set /root/HS-vRO01-full-chain.pem --force

The --force flag ensures the changes overwrite any existing configuration if necessary.

4. Apply the New TLS Certificate
Execute the deployment script to apply the new certificate:

/opt/scripts/deploy.sh

This script updates the services with the new certificate. Monitor the output for any errors during the deployment process.

Wrap-Up

By following these steps, you have successfully installed and configured a custom TLS certificate on the VMware Aria Automation Orchestrator appliance. This ensures secure communication and aligns with best practices for infrastructure management. Always validate your certificate chain and monitor your appliance post-deployment to confirm functionality.

Feel free to drop me a comment if you have any questions or need further clarification.

VMware Aria Automation Orchestrator vSphere Plugin Configuration

Overview

Welcome to another post on be-virtual.net! Today, we’re diving into a powerful plugin within VMware Aria Automation Orchestrator—the vSphere plugin. This default plugin is designed to make managing vSphere environments smoother and more efficient, especially when it comes to automating workflows and connecting seamlessly with vCenter Server.

Configuration

Setting up the vSphere plugin might seem like a daunting task, but don’t worry—it’s pretty straightforward once you get the hang of it. Here’s how you can add a vCenter Server instance:

Step-by-Step Procedure:

  1. Log in to the Orchestrator interface with an admin account.
  2. Go to Library > Workflows.
  3. Navigate to Workflows > Library > vCenter > Configuration.
  4. Start the workflow: Add a vCenter Server instance.
  5. You’ll need to input the following details:
vCenter Server Instance Properties:
  • IP or Hostname: %fqdn-vcenter%
  • HTTPS Port: 443
  • SDK Location: /sdk
  • Ignore Certificate Warnings: True (This automatically accepts the vCenter Server certificate if you choose this option.)
Connection Properties:
  • Create Session Per User: True (This means Orchestrator will create a session per user for a more secure connection. You can choose Embedded: True / External: False based on your needs.)
  • Username: svc-vaao@example.local
  • Password: **********
  • Domain Name: example.local
Additional Endpoints:
  • PBM Endpoint URL: default
  • SMS Endpoint URL: default
  1. Once you’ve entered all the necessary details, simply Click Run, and the workflow will take care of the rest.

Screenshot

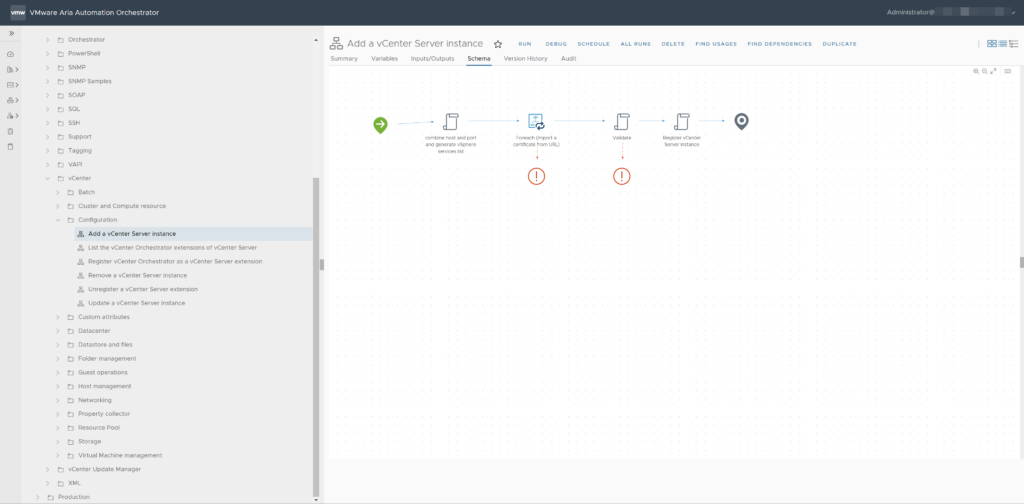
Here is an screenshot of the location of the workflow (Add a vCenter Server instance). This is the required workflow for adding a vSphere environment to VAAO.

VAAO - Add a vCenter Server Instance

Validation

Once you’ve configured the plugin, you’ll want to verify that everything is working as expected. Here’s a quick way to check if the plugin is properly connected to your vCenter Server:

  1. Go to Administration > Inventory in the Orchestrator interface.
  2. Under vSphere vCenter Server, you should see a vCenter Server listed and accessible at the object level.

If you’re not seeing this, it might be worth revisiting your configuration settings.

Wrap-up

I hope this guide helps you get the most out of the vSphere plugin. Feel free to drop me a comment if you have any questions or need further clarification.